Posts Tagged With: vegetarian

Portobello Pecan Burger with Pumpkin Wedges – Original Recipe from Peace and Parsnips

THE MIGHTY ONE!!
In honour of Peace&Parsnips being released in the U.S. (31st May – wahooooo!) we’re going to share a few of our favourite #recipes with you lovely folk. Here’s a real whopper to get started with!
This is probably (almost definitely) my favourite burger. Its utterly packed with flavour and is actually quite sophisticated, not your average patty! Let’s face it, you can’t beat a burger in a sunny garden with a chilled cucumber mojito.
I don’t mess around with burgers, there is a whole chapter dedicated to them, along with sausages, chorizo etc, in Peace and Parsnips and they are all at least this size and tastiness;)
Enjoy!!:)

————————–

Source: Portobello Pecan Burger with Pumpkin Wedges – Original Recipe from Peace and Parsnips

Categories: Uncategorized | Tags: , , , , , , , , | 6 Comments

Pea and Mint Hummus

Pea and Mint Hummus

Pea and Mint Hummus

Now that one half (me) of the BHK is rocking Spain, things are going totally Med for a while.  Fresh, vital, packed with sun, light and easy. Tapas basically. Little plates of flavour explosions that tantalise and don’t make you feel like a stuffed courgette. Perfect summer fare.

This is a nice twist on your standard hummus, plenty of lemon to lift it and enliven and a good hit of mint. It looks so vibrant, everyone will want a dip!  The great thing about peas is they freeze brilliantly and a I used frozen peas here.  When frozen, they don’t lose much of their nutritional value or texture, so its all good.

A hummus twist

A hummus twist

In Spain, the hummus wave is really hitting.  We went out with out mate in Madrid, a cool area and all the bars were serving hummus.  It seems like all the cool kids were at the crudites.  I think hummus is such a staple now in the UK, its nice to give it a twist now and again, although there’s absolutely nothing wrong with a well made ‘normal’ hummus.  I like mine nice and thick and creamy, with plenty of tahini.  I don’t think I’ll ever tire of it.

*Warning* – my posts from Spain may get a little erratic at times.  I’m normally tucked away in one of the the few local bars that have wifi.  There is a heady atmosphere of shouting and laughter and I’m no doubt sipping a ferocious black coffee.

Give peas a chance;)

2016-05-09 17.23.45

The Bits – Makes one big bowlful

480g chickpeas

275g peas

1 tbs dried mint

1 big handful fresh mint (finely sliced)

150ml olive oil

4 tbs tahini

1 1/2 medium lemons (juice)

2 big cloves garlic (crushed)

1 teas salt

50ml chickpea cooking broth


Do It

Place all ingredients into a blender and blitz until nicely smooth, drizzle in the chickpea broth (or water) until you get the consistency you like.  Remember that the hummus will thicken up in the fridge.  Check seasoning and served with a crazy array of chopped vegetables, flatbread slices, oat cakes, whatever tickles your fancy really.

View from one of the local interent hubs/ bars

View from one of the local interent hubs/ bars.  Life’s a long beach!

Categories: healthy, photography, Recipes, Snacks and Inbetweens, Summer, Travel, Vegan | Tags: , , , , , | 7 Comments

Butter Bean, Lemon and Black Olive Salad – A Real Taste of Murcia!

Butter Bean, Lemon and Black Olive Salad

Butter Bean, Lemon and Black Olive Salad

A simple sunshine salad which makes a great quick summertime lunch.  Ideal served as a side or starter, add some chunky croutons or toasted nuts for a more substantial dish.

The sun is coming and with it comes sprouting a host of beautiful fruits and vegetables. Summer is an exciting time of year, we can finally don shorts again and be collectively surprised at how white our feet are! The flip flops are out in force, maybe a vest and we’re into the garden with salads and fizzy glasses. Certainly in Spain, salads are an every day delight.

There is a global constant that baffles me. You visit local markets and shops (this does not apply to the sub-Saharan region) and there are a wonderful selection of fruits and veggies displayed. You then go to the restaurant next door to find that none of the lovely local fruits and veggies are present on the menu. It’s a strange old situation. The world is addicted to potatoes and tomatoes it seems. Murcia is similar. Although this is the ‘garden’ of Spain, and possibly Europe, a Murcian salad consists of onion, tomato and some black olives (plus tinned tuna if you’re particularly unlucky). This is my version of the local salad using things we can all get our hands on.

You can’t just throw things into your finest salad bowl and expect magical results, salads need a little thought. There’s a balance there. I’d say always gently handle and chop your ingredients and toss them together with care. You want a nice combo of flavours and textures, without over doing it. Salads are our chance to showcase amazing produce and whenever possible, lets buy good stuff for our salads. You might be able to hide vacuous tomatoes in a stew, but in a salad, they just look so lame.

Puerto Mazarron market in full swing

Puerto Mazarron market in full swing

DOWN AT ‘EL MERCADO ESTUPENDO’

I’ve just been down to the local Sunday market here in Mazarron and beeeee jeehzus there is a startling array of amazing produce at the minute. Piled up like technicolour forts; melons like beachballs, bewildering varieities of tomato action, gangs of crimson peppers so deep and vivid, every conceivable shade of olive and crispy, fresh donuts (churros). Well, they seem to balance up all the healthy veggie behaviour. Spain is hot in weather and generally, super chilled in attitude. My kind of combo. ‘Manana!’ (tomorrow) is the Murcian moto. Their crest is probably a tranquil terrace scene, but I can’t verify that. Today is for enjoying…..

I rock up mid-morning just after the donut breakfast feast that’s washed down with goblets of brandy or thick coffee (maybe beer) sometimes a combination of them all will lashing of condensed milk and randomly, nutmeg. It’s a coffee called an Asiatico and is more like several desserts in a small glass swimming in a few shots of black espresso. If you’re lucky, you can score a fresh orange juice, but expect at least two funny looks as you make your way back to a wobbly plastic chair in the sun. Sunday is a good day here.

There is a whole host of other items sold at the market; counterfeit cd’s, plants, leggings, trees and the occasional pot or pan or pot plant. There is also a very cool pan pipe band from Peru who belt out all the classics. I must say, I just focus on edibles. I have a routine, I sweep past with an empty backpack, the first pass. I am above temptation. I don’t buy anything. This is a strict regime, fact finding, and essential for quality control and price comparison. There is no Asda price in Murcia, you’ve got to do the leg work and have hawk like instincts. Bargains are fleeting and sometimes well disguised.

I asses the form and then stop for a well earned cafe americano (sometimes plus a few crispy donuts). If I don’t have donuts, the lady will feel sorry for me and give me some anyway. Older ones from the bottom of the pile. A donut constant that I go with. Then the fun begins. I have pockets of small change and throw myself into the crowds of haggling Spanish and Moroccan housewives, all at least half my size and double my strength, who posses pin sharp elbows. Dead legs and worse have been known around the olive stand and especially at the bargain tomato family and always at the toothless apple dude.

Tomatoes - so many new types to try in Murcia

Tomatoes – so many new types to try in Murcia

The olive stand is a piece of work, ran by three generations of a family. It seems they’ll pickle or preserve anything going. Capers, caperberries, garlic, cucumbers, pink pickled onions the size of a cricket ball, the olives are pretty hot too. You’ll always get a few freebie tasters if you offer equally confused and intrigued expressions. Have you tried a purple olive? I went for some bitter bright green local olives today, they love their bitter olives in these parts, stuffed with lemon rind, minced onion and rosemary. Quite a thing I can assure you.

I know each stand intimately by now, after ten years, I’m one of the villages most well schooled veg selector. They all have their stregths and weaknesses and I try to spread the wealth (amounting to a few euros) around. I’d say on average, the fruit and veg here is at least 1/3 price in a UK supermarket. The Spanish supermarkets also charge more than Mazarron market. The market shifts from town to town, four days a week, I’ve been to each location but the Sunday one is the best. People are letting there hair down and there is a sense of celebration, most of the stall owners clutch a cold can of beer, churches occasionally ring bells and you’re never far from a chuckle or guffaw.

It’s a tough old life in Spain guys!! I’ll keep the sunny plant-based correspondence flowing. Here’s what I did with todays haul.

Mazarron sunsets are regularly a bit special

Mazarron sunsets are regularly a bit special

Recipe Notes
For a more filling salad, drizzle some bread with olive oil and toast under a grill. Roughly chop up and toss in a little more oil, a pinch of salt and a few pinches of dried herbs like oregano and thyme. Scatter over the salad before serving.

Pickled garlic is not that easy to find but it is a superstar ingredient. Use a couple of cloves of fresh garlic instead, it’s worth noting that the flavour is different, pickled garlic is sweet and mild tasting pretty well pickled! I find it quite addictive and sometimes just eat it straight up, I find its quite nice served with nibbles.

I find the lemon and a good extra virgin olive oil is more than enough dressing wise.

Spain boasts very fat and creamy butter beans. Seek out some beauties for this salad, they are one of the highlights.

Using pitted olives is a good idea.  An unexpected olive stone is always an unwanted crunch.

Great with some toasted croutons or a handful or toasted almonds

Great with some toasted croutons or a handful or toasted almonds

The BitsFor 4 as main course, 6-8 as side salad/ starter

500g cooked or 2 tins butterbeans (the fatter, the better)
1 small sweet onion or 3 spring onions (finely sliced)
6 medium sized tomatoes (ripe and sweet)
1 handful pickled garlic cloves (roughly chopped)
1/2 courgette (diced)
1/2 cucumber (diced)
1 head baby gem lettuce or similar (sliced)
2 big handfuls black olives

1 handful parsley (finely sliced)
Extra virgin olive oil
1 lemon (juice and zest)
Salt and pepper

Do It
Place all ingredients in a large salad bowl, drizzle with a little olive oil and the juice and zest of one lemon. Toss gently together with your hands.

Scatter over the parsley, some salt and pepper and croutons if your using them. Serve with more wedges of lemon if you fancy a little more zing and extra virgin olive oil for drizzling.

2016-05-08 17.05.07

Categories: gluten-free, healthy, Healthy Eating, Lunch, photography, Recipes, Salads, Side Dish, Summer, Travel, Vegan | Tags: , , | 4 Comments

Chickpea, Date and Potato Tagine

Chickpea, Date and Potato Tagine Chickpea, Date and Potato Tagine

Tagine is a great summer time staple, a light stew with lovely spice and hints of sweetness from the dates. The perfect place for brilliant seasonal vegetables, a straightforward and ideal addition to your mid week special board!

In Morocco, tagines are a showcase for the amazing local produce. The stock base is just the cooking juices of the vegetables and a little salt, no added stock needed. You know how good your veggies are, its a good test actually. If this tagine is tasteless, its all down to the produce (add a little veg stock).

I went to Morocco straight from Mexico and I remember being hungry quite a lot. I was travelling on hope and pennies and there was certainly not the range of cheap street eats that you find everywhere in Mexico. It was a bit of a shock to the system. When I found a place that did cook veggie food, normally cous cous or tagine, it was a real find. There was normally then a wait while the cook/ owner went out to but the vegetables and cook the tagine. I travelled in mostly rural areas and this could mean a long wait for dinner/ lunch. Still mint tea always flowed easy and the pace of life in Morocco suits me down to the ground. Life ebbs by nice and easy.

Let’s face it, most of us don’t have a proper tagine (the cooking vessel). That’s fine, we can still call it a tagine (just don’t tell your Moroccan mates!) As you’d imagine, we do have a tagine dish. It is normally used as a fruit bowl and I’m always looking for an excuse to use it. A tagine is actually a brilliant shape and design to cook vegetables and cous cous to perfection. You need very little water as the heavy lid keeps in most of the water, it acts as something like a pressure cooker. I find this especially helpful when cooking cous cous.

I like a good mix of veggies in my tagines and potatoes are very important base to other more glamorous (you know what I mean) veg like aubergine, peppers etc. The potatoes have the added benefit of making the tagine sauce thick when they begin to break down.

The flavour or Morocco (in a little jar), just add amazing veggies The flavour or Morocco (in a little jar), just add amazing veggies

I always bang on about fresh spice, but it makes a huge difference. Many spices have been lurking around our cupboards for a while and may be past their sensational best. Ras El Hanout is the traditional spice mix used, but you know what, other spice mixes can be added to make a tasty stew. Think garam masala, curry mixes, berbere, jerk style mixes. The basic technique will be the same, just experiment with the spice quantity.

I’ve been cooking all over the UK in the past month, it seems like a different kitchen every night! I love it!! I’ve found most people have really good kitchens and its interesting to try out different ovens and cook with a range of pots, pans and utensils. Most people have some amazing kit, much better than the stuff I’ve got!!!  This tagine was made in Durham a few days ago, my Dad who you probably know by now was like me, a real, full power, carnivore and is now going through a real shift. He’s making his own twelve veggie stew at home. I knew Dad would dig this and he says he’ll be trying it out again soon. It’s always wicked when your loved ones enjoy what you make.

Not Durham! Sunset from the terrace last night in Spain Not Durham! Sunset from the terrace last night in Spain

Recipe Notes

Tagines are normally chunky. Cut all the veggies into roughly 1 1/2 inch chunks.

As a variation, you can substitute the dates with dried apricots and use whatever vegetables are good and seasonal, easy to get hold of.

My friend Abdul, who lives in a cave near the Sahara, swears by a nice glug of olive oil when serving a tagine. It adds extra richness and gives the sauce a shimmer.

To make things extra special, adding a few handfuls of greens just before you serve the tagine would be nice. Something like spinach, kale or chard. Spring greens are awesome, just add then about five minutes before serving, they take a bit more cooking.

Do not use a metal spoon or spatula to stir stews, unless you want the vegetables to break down. A trusty wooden spoon is perfect.

We cooked quinoa to serve the tagine with, instead of the traditional cous cous. Gluten free and delicious, its also packed with massive amounts of goodness/ nutrition.

2016-04-28 19.00.21 Simple summer special!

The Bits – For 6-8

2 tbs cooking oil
1 onion (peeled and sliced)
2 inches fresh ginger (peeled and finely sliced)
½ medium butternut squash (peeled and chopped)

4 small potatoes (chopped)

2 bell peppers (deseeded and chopped)

1 aubergine (chopped)

4 large tomatoes (chopped)

250g/1 tin chickpeas
16 dates (de-stoned and cut in half)
4 tbs tomato paste
3 tbs ras el hanout spice mix
1 3 inch cinnamon stick
400ml hot water
Salt (to taste)

Serving
A little good olive oil, fresh coriander and extra spice

Do It

This is an easy one…….

In a large frying pan or saucepan on medium heat, add the oil and fry the onions and ginger for five minutes until soft, then add the other vegetables, cinnamon, spices and some salt. Stir and fry for two minutes then add the tomatoes, dates, tomato puree and water.

Stir gently and pop on a loose fitting lid and cook on a steady simmer for 35-40 minutes, until the potatoes are just breaking down. Season with a little more salt to taste.

Serve with cous cous, topped with a drizzled of olive oil, fresh coriander and a sprinkle of extra spices.

Nice with some greens! (Isn't everything;) Nice with some greens! (Isn’t everything;)
Categories: Dinner, gluten-free, healthy, photography, Recipes, Stew, Summer, Vegan | Tags: , , , | 3 Comments

Decadent Double Chocolate Cake

Decadent Double Chocolate Cake

Decadent Double Chocolate Cake

A really decadent vegan chocolate cake!  This is one we find any excuse to make.  Its a lovely light and rich cake smothered in a very silky, chocolaty icing.  I think you’re going to love it!!

Nigella Lawson certainly knows her way around a cake and this recipe is based on one from her new book. Thanks Nigella! Jane found it somewhere and is such a fan of sweet things, knew it would be a wonder.  It’s one of those recipes that any non-vegan would be amazed to find out had no eggs or dairy in. The texture is wonderful and the icing is a knockout.  I don’t always tell people things are vegan anyway.  It’s just shining, delicious food.  ‘Nuff said!

THE UK COOKING CREW

People like Nigella, Hugh Fearnley Whittingstall, Jamie Oliver and Rick Stein really kept me interested in cooking in my mid 20’s.  Mum normally had Rick and Nigella’s knocking around the house and Hugh was one of my favs. I remember him cooking things on open fires with antique looking pots dangling off his land rover and belting out ‘Baba O Riley’ by The Who with some proper chops. He seemed to be having a great time and it was infectious.  I loved the idea of grabbing a bunch of tomatoes from the green house and popping them straight into a pot.  That definitely sounded like the good life.

SIR JAMIE

A lady bought me Jamie’s first book in a hotel I used to work at, she knew I liked cooking and felt that a cheeky chap on a scooter would appeal.  I loved Jamie’s energy, skill and passion.  He didn’t go down stairs, he slid down bannister’s.  He tore stuff up, threw things, chopped things with his bare hands….  His carefree approach triggered something in me, I’d worked in a kitchen that was classically French, with big hats and all.  Simple, fresh and tasty food was where it was at and Jamie made it all accessible and fun.  That was one of the main things, it was FUN!  You didn’t have to take yourself or food seriously and this was surprisingly quite revolutionary.  Well done Sir Jamie (it can’t be long now lets face it with the sugar thing and all!!!)  Just one little question mate. When are you going fully vegan again????!  Jamie recently talked to Tim Shieff and came straight out and said that the future of food is plant-based.  Which was a really bold thing to say for a celeb chef but unfortunately, in his new book, there is not one vegan recipe.  Maybe the next one will be charged with plant power.  Fingers crossed.   I know that he loves vegan food and there are loads of vegan recipes over on Jamie’s site.

I used to try out loads of this crews recipes whenever I wasn’t working, which was quite a bit back then as I was a restaurant manager.  Cooking has always been a way for me to unwind and be creative.  I remember baking loads of Nigella cakes, there was one chocolate orange cake, oh! and who could forget the chocolate and guiness one.  I used to have it routinely for birthdays.  I just made some chocolate and stout cupcakes that I think you’ll like….coming soon.

Being a vegan chef now, I get the same feeling of inspiration that I did back in my early 20’s when I discovered the real joy of playing with pots and pans.  I can now check out these guy’s recipes and take them in a whole new direction.  The world of vegan cooking seems so vibrant and creative at the minute, I feel so lucky to be part of it.  It’s also great to see Nigella taking a step into the world of vegan baking.  There is an almost unlimited scope for brilliant baking without all that other, unnecessary stuff.  All you need is plants!!

THE MAIN EVENT

I make this Decadent Double Chocolate Cake recipe at least once a week in the kitchen and sometimes opt for a slightly less luxurious icing, a standard chocolate butter cream icing made using plant-based spread goes down very well (see below) and is a reasonable economy style option.  The team I work with in the retreat centre get quite excited when they see this on the menu, which cannot be a bad thing (as long as there’s leftovers that is!)

If you try this recipe out, please let us know.  We’ll be over the moon to hear that you’re in a happy chocolate place.

Recipe Notes

The batter is wet here, don’t fret.  Use a tight fitting tin and line it well.  This will mean that the batter doesn’t sneak through.

Please, please (please), please…..do not open the oven door, no matter how curious you get, when baking.  Leave it for 45 minutes before peaking.  This cake is a good sinker, the bicarb makes it shoot up, but until its almost baked, will quite happily sag back down making it a bit on the heavy side.

Ovens vary and this batter takes a long time to bake but thats what gives the lovely crust and gooey middle.  A winner of a cake combo!  It may need another 10 minutes.

Unless its a special occasion, we normally substitute the coconut oil in the cake and icing for vegan sunflower or olive spread.  This works well, but lacks the ultimate richness and shine that coco oil gives.  We’d recommend treating yourself to a nice big jar of coconut oil.  Early Christmas present.

You can see that I also make a version of the cake in a rectangular tin, whatever you’ve got really.  A rectangular cake is easier to portion, but in this instance, is much wider than a circular cake tin.  This means less time in the oven as the mix is thinner.  Go with your cake instincts!

The economy version with a more everyday icing

The economy version with a more everyday icing

Have some fun with this one!!!!!

Decadent Double Chocolate Cake

The Bits – 1 large cake (10-12 slices)

225g white flour

2 tbs chickpea flour

1½ teaspoons instant coffee powder

80g cocoa

300g soft light brown sugar

1½ teaspoons bicarbonate of soda

½ teaspoon sea salt

375ml hot water

75g non-dairy spread or solid coconut oil

1½ teaspoons apple cider vinegar or white wine vinegar

Chocolate Icing

150g dark chocolate (finely chopped)

75g coconut oil

50g light brown sugar

60ml cold water

1½ tablespoons cocoa

Decoration (optional)

1 tbs edible rose petals or flowers

2 tbs chopped pistachios or almonds

1 tbs orange zest

Do It

Preheat oven 180oC and pop in a baking tray.

For the icing – Put all of the icing ingredients except the chopped chocolate into a heavy-based saucepan and bring to a gentle boil.  Stirring and ensuring all is dissolve. Then turn off the heat and add the chocolate, stir until melted and the icing is glossy. Leave to cool, stirring occasionally.

Line the bottom of a 20cm round springform/ loose bottomed cake tin (you will need a leak proof one, this is a wet batter) with baking parchment.

Place the flour, bicarb, salt, instant coffee, chickpea flour and cocoa in a bowl and mix together.

In a separate bowl, mix together the sugar, hot (not warm) water, non-dairy spread/ coconut oil and vinegar until all has melted and is combined. Stir gradually into the dry ingredients, adding a little liquid at a time, then pour into the prepared tin and bake for 45-55 minutes.

Check after 45 minutes. When done, the cake will be coming away from the edges of the tin and a cake tester will come out clean, apart from a few crumbs. This is a fudgey style cake and you don’t want to overdo it.

Transfer the tin to a wire rack and let the cake cool in its tin.

Give the icing a good stir and check it is nice and thick, yet runny enough to spread on the cake. Pour over the cake and use a spatula to ease the icing to the edges.

A lovely light cake

A lovely light cake

Decorate the cake with scattering of pistachios, orange zest and edible flowers if you have them. Leave to stand for 30 minutes for the icing to set before slicing into the cake.

Store in an airtight container for up to 5 days.

This cake freezes well, without the icing. Wrap the fully cooled cake in a double layer of cling film and a layer of foil. Freeze for up to 3 months. To defrost, unwrap and place on a serving plate at room temperature for 3-4 hours. 

Pop some flowers on your cake - you won't regret it

Pop some flowers on your cake – you won’t regret it

Foodie Fact

For loads of information and nutritional facts about chocolate, or more specifically, cacao, head over to our previous post.  We had an almighty chocolate tasting recently and sampled all the wonders of cacao.


Categories: Baking, Cakes, Desserts, photography, Recipes, Vegan | Tags: , , , , | 20 Comments

Seeded spelt bread & simple tips to make awesome loaves

Seeded Spelt Loaf Seeded Spelt Loaf

Here’s a simple, wholesome and tasty loaf for all made with one of our favourite flours, spelt.  In the wonderful world of bread making, this Seeded Spelt Bread is one for the beginner but will no doubt be enjoyed by everyone.  There is nothing that can beat the fresh wafts of warm bread floating around your house, although Dad’s mulled wine at Christmas does come close.  Bread wafts instantly makes a house into a home.

Shop bought bread, not even the posh deli style stuff, can come close to a lovely loaf of home baked happiness.  Some things you just can’t buy and I believe that most foods are well worth that little bit extra effort and bread is definitely one of those.

There is something priceless and utterly magnificent about the whole bread making process.  Its magical and only takes a little practice and know how.  I’ve popped a few tips below that will get you started on the road to bread brilliance.  If you’re a keen baker, and lets face it, its become a bit of trend recently, this loaf is simple and yet delicious.

A loaf of bread is surely one of the nicest things you could ever give to someone.  If I enter a persons house and they say ‘I’ve just taken some loaves out of the oven’ it’s like entering some kind of ideal parallel universe where everything is just about right.  I was once made a German sourdough loaf by some friends and I rave about it still.  It was over five years ago but I’ll be taking that loaf to the grave!  I wanted to move into their kitchen and make baked goods for the rest of my days.

In my humble opinion, making bread is one of the most soulful things you can do in the kitchen.  Really, I see cooking for people as a privilege.  Once you get the hang of it, the world of bread is yours to explore.   There is no doubting that bread making can be daunting at first and you’ll probably not knock out a perfectly risen and crusty sourdough loaf at the first time of asking.  But stick to the basics and you’ll make something wholesome and full of homemade goodness.

We don’t eat loads of bread in the BHK, I might bake one morning a week.  At work, I bake bread every morning and its one of my favourite ways of starting a day.  All that kneading wakes the body up nicely.  For me, keeping things simple first thing is always a good idea!  

Breakfast loaves at Trigonos, almost ready for the oven

WHAT IS SPELT?

Spelt is one of my favourite flours giving a lovely light and nutty loaf.  It is really different from using wheat flour and is a highly nutritious grain that many people who are sensitive to wheat can enjoy.  Sometimes known as dinkel wheat (a word I appreciate) spelt has been cultivated since 5000BC.  It’s fair to say that folk around here in North Wales have probably been making loaves like this since the Bronze age.

Spelt is basically a sub species of wheat and being an ancient grain, has not been manipulated to meet manufacturing needs (like many variations of wheat have for example).  Spelt is easy on the digestive system as the gluten in spelt is water soluble and breaks down when mixed or chewed.  Being an ancient grain, spelt has kept its hard hull intact.  Many modern wheat grains have no hull which protects the grains from pests and the elements.  These wheat grains have now developed an enzyme inhibitor that keeps pests at bay but effects the way that we digest these grains, as enzymes are an essential part of good digestion.  If you feel bloated or heavy after eating bread, switching to spelt bread may be a good idea.

SIMPLE TIPS FOR AWESOME LOAVES

Bread takes some time and effort, not to mention a little technique and skill:

  • LINING – Line your loaf tin/ oven tray with baking parchment.  If your equipment is not totally non-stick, and that attribute is quite rare, then don’t risk a sticky situation.  Quickly line with baking parchment and you are certain of a simple extraction.
  • PROVING – The texture of a loaf comes mainly from the gluten waking up and doing its thing.   This takes a long proving and some kneading.  You don’t always have to pummel your dough for a long time, you can even leave dough in a fridge or a cool place for a very slow prove, overnight for example.  This allows gluten and flavours to develop and makes for a delicious loaf.  In Wales, it is so cold and we have no central heating, we have no choice but to take it slow.  We have however been known to use a warm hot water bottle to help get our dough woken up.
  • OVEN – Baking in general will mean getting to know your oven.  They are all different and timings may vary.  Where you place loaves/ cakes in an oven has a huge effect on the outcome and results will vary depending on whether the oven is heated by a fan or the main heat source is from the base etc.  It can be trail and error at first and the only way to learn sometimes is an over baked bottom on your loaf.
  • PRESENTATION – Bread looks cool when its a bit rough I believe.  Smooth is nice but try and give the surface some texture by not playing with it too much.  Tears and bobbles are great on bread and add to the texture of an interesting loaf.  You may also like to slash the top of the loaf before the final proving.  This adds texture to the loaf and also looks mighty fine.  Dusting with flour will result in a soft crust and brushing with soya milk will result in a crisp and darker crust.  With wet doughs, the loaf will spread out in the oven a little, this is worth bearing in mind if you have a particular shape in mind.
  • OBSERVE – Its also important to remember to be patient with bread making and flexible.  Observe the bread, whats happening to it?  When proving the loaf, is it rising too quickly or too slowly.  This will all be dependent on the ambient temperature (or you forgot the yeast!!)  Gauge whether the loaf is actually twice the size and amend the timings, less or more.  Sometimes the loaf will take much longer to prove and that is fine and actually preferred.  The key factor is that the yeast wakes up and does its thing, working its magic within the bread.  A quick prove can result in off, sour aromas and big air pockets in the loaf.
  • KNEADING – A wet, sticky dough is always better than dry and floury loaf.  I use oil when kneading the loaf as this will not add flour to the recipe, changing the texture of the loaf.  Many bread makers use dough spatulas instead of hands when ‘kneading’.  The old fashioned image of sleeves rolled up and pummeling an hapless lump of dough is not always the best way to go.  When your dough can stretched easily without breaking, around 8 inches is a good gauge, then its ready.
  • STEAM – Turn your oven at home into a professional bakers oven by adding a cooking tray to a lower shelf whilst preheating and when the loaf goes in, pour some water into the tray.  Creating steam which allows the loaf to develop a nice thick and light crust.  I do this with most loaves.
  • YEAST – This is the magic dust that makes bread rise.  Always keep it separate from salt,  they don’t get along and salt can kill it.  Add them to different parts of the bowl.  You can add your yeast to the warm water before mixing, but I find that it wakes up by itself.

Recipe Notes

I like this loaf with poppy seeds included in the seed mix.  They have a lovely flavour and give a nice bite to the loaf.  You may also like to add dried fruits like dates, apricots or herbs like rosemary and thyme to the loaf.  Spices like cinnamon and even garam masala can be delicious.

Rapeseed is one of my favourite oils and is local to us in the UK.  It has a great flavour that compliments spelt well, but you can use any oil, olive or sunflower etc.

Remember that spelt proves quicker than wheat.  I have proved this loaf twice, but you can easily omit the first prove and go straight for a single 40 minute prove followed by baking.  This is of course quicker and leads to a lighter loaf and ever so slightly crumbly.  Not better or worse really, just different.

This bread can be baked in a loaf tin, this makes it easier to handle as the dough can be quite wet.  If your just starting on your bread journey, go for a 1kg tin here.  Handling a spelt loaf is different from a wheat loaf, it can be quite floppy and needs some gentle encouragement (see below).

Add white flour instead of spelt for a lighter loaf.

Due to the gluten being different in spelt, it does not take as much kneading as wheat.  This can actually break down the gluten in the loaf, as oppose to strengthen it as with wheat.


Seeded Spelt Bread

The Bits – For one large loaf (10-12 slices)

500g spelt flour

1 teas yeast

1 1/3 teas salt

1 tbs malted rice extract (or sweetener of choice)

2 tbs rapeseed oil (plus extra for brushing)

2 handfuls mixed seeds (choose from poppy, sesame, sunflower, pumpkin, hemp etc)

350ml warm water


Do It

In a large mixing bowl add the flour, seeds, salt and yeast.  Stir the sweetener into the water and gradually pour the water into the flour mix. Mixing it in with your hand or a wooden spoon.   Once all of the water is combined and a dough is formed add the oil and brush/ rub all the excess dough on your hands/ spoon back into the bowl and begin to knead the dough.

If your bowl is big enough, its possible to knead it in the bowl.  Otherwise turn out onto a cool surface, ideally lightly oiled.  Knead, it will be quite sticky, don’t worry, just give a good twist and pummel.  A lightly film of oil on your hands helps with the stickiness.  Work it!  Imagine you’re a kid again playing with food.  Its fun!  Give it roughly a couple of minutes kneading.  When the dough is smooth and pliant, you’re ready.

Form a ball and lightly oil it all over, in the bowl, lightly cover with a kitchen cloth and leave in a place that is slightly warmer than room temperature for 45 minutes.  The warmer it is, the more the yeast will come to life, so keep your eye on it.  The key is that the dough doubles in size.

A nicely shaped spelt dough ball, ready for its first prove A nicely shaped spelt dough ball, ready for its first prove

Now knock it back (or knead it again).  Basically knocking the bubbles out of the bread and getting the gluten going even more.  This will all add to the firm and chewy texture of the loaf.  Form a rough and fat ball.  It will spread out, so tall is good.

Sprinkle or roll the dough in seeds if you like.  Grab an oven tray lined with baking parchment and place your dough on it and leave to prove for 35 minutes, until the dough has almost doubled in size (ideally, in a very perfect world, leaving just a little room for expanding in the oven).

Preheat an oven to 200oc and place a baking tray on a lower shelf.

The loaf ready for its final 35 minute prove The loaf ready for its final 35 minute prove

This is spelt so the loaf may now look like a fat pizza base.  This is fine.  Using your hands or a spatula, gently form the loaf back together into the shape you prefer, pushing it and tucking it in.  You don’t want to handle it much at all at this stage.  A bit of gentle persuasion is best.  The loaf will be quite thin, nothing like a sphere but should not resemble a gorgeous, 2D frisbee.

Pour a couple of cups of water into a the now hot oven tray (lots of steam) and pop the loaf into the oven on a middle shelf.

(The tray steaming step is not essential).

Bake for 40-45 minutes.  Tap the base, it should sound nice and hollow with a good crust.  If this is not the case, pop it back in for another five minutes and repeat the process.

Lovely light spelt loaf with a good thick crust Lovely light spelt loaf with a good thick crust

Once baked, leave the loaf on a wire rack (with a few inches of clearance underneath, too close to the surface and you’ll end up with a soggy bottom, which is never pleasant).  I give it at least 30 minutes before tucking in.  If you are in a hurry to cool the loaf down, cut in half or quarters.  This will release the steam making the loaf cool much quicker.

Serve

Makes a brilliant slice of toast and is ideal with soups especially.  I like it best warm with a drizzle of nice rapeseed oil or a little pot of balsamic vinegar and olive oil.  Just a quick dip in that and then………woahhhhhh!  Lovely stuff.

Foodie Fact

Spelt is a good source of protein, dietary fibre, some B vitamins and minerals, especially manganese with good levels of iron.  It makes for a highly nutritious loaf.

Categories: Baking, Healthy Eating, photography, Recipes, Vegan, Wales | Tags: , , , , , , | 4 Comments

Baked Mushrooms with Sun-dried Tomato Pesto and Walnuts

P1270083 Baked Mushrooms with Sun-dried Tomato Pesto and Walnuts

Just such and easy and flavoursome number!  The kind of dish you could serve as a main course or starter  at a dinner party (aka when you’re trying to look a bit flash in the kitchen) and really not go to any great trouble.

One of the main reasons for me popping this recipe on the BHK is the wonderful Vegan Recipe Hour, happening soon over on Twitter.  A great place for vegan cooking inspiration and tonight the theme is……well……MUSHROOMS!

They look lovely and pack some intense flavours; mushrooms, sun-dried tomatoes, roasted nuts, pesto, these are some of the bedrocks of richness and savoury flavours in a vegan cooks locker.  Combined……POW!  I’d also like to mention that this is most definitely healthy.

UMAMI!

One of the five basic tastes and a word that sounds like something Vic and Bob would exclaim (with loads of reverb) mid ‘Shooting Stars’.  If you are not British, this may take some explaining…..this clip might help.

Umami is a savoury taste in things like mushrooms, nuts, fermented foods like miso and tamari, yeast extract, seaweed and sun dried tomatoes, they’re packed with that mysterious and delicious flavour that acts like catnip to our tastebuds.  We know we love it!

The history of umami can be found here and it is of course the source of MSG.  Its natures MSG, which means all the crazy good flavour without the unpleasant side effects.  Many rich and flavourful plant based meals use something umami as a base.

I have started to make these mushrooms for lunch regularly and they always go down a treat.  This is a dish I choose when I’m giving myself a bit of a break.  It’s so easy!

Now.  Lets make something delicious.

Recipe Notes

The mushrooms will shrink quite a bit during cooking.  Make sure you get big ones, or double up per person.  I have found that most folk like a second mushroom after they’ve tasted the first.

Portobellos are full of flavour and texture but field mushrooms are also fine (and a little cheaper).

I always try to make my own pesto, but at this time of year, fresh leafy herbs are not exactly sprouting from the earth.  You could use a good jar of vegan pesto, you’ll find this in most supermarkets and especially health food shops or similar.

The Bits – For 4

4 large mushrooms (peeled and the end of stalks trimmed off)

Pesto

2 big handfuls sun dried tomatoes (roughly chopped)

2 big handfuls basil leaves

1/2 lemon (zest)

3 large cloves garlic (peeled and crushed)

1 handful cashews (best when soaked in warm water for an hour before)

50ml+ olive oil

2 tbs nutritional yeast flakes

Sea Salt (to taste)

OR

10-12 tbs green pesto (of your choice)

Mixing in the sun dried tomatoes and lemon (zest) – same quantities as above


2 handfuls walnuts (roughly chopped)


Topping

Fresh green herbs – parsley, thyme, basil

P1270079 Fresh out of the oven

Do It

Preheat an oven 180oc.

Peel the mushrooms, lightly oil a baking tray, sprinkle the mushrooms with salt and pepper.  Bake the mushrooms for 15-20 minutes.  They should be soft but still nice and succulent.

Place all of the pesto ingredients into a food processor (except the olive oil) and pulse until a chunky pesto is formed whilst drizzling in the oil.  Or, just mix the tomatoes and lemon zest into your shop bought pesto.  Taste and season with salt if needed.  Adding more nooch (nutritional yeast flakes) will up the cheesiness. A good thing.

Spoon roughly 2-3 tbs of the pesto over each mushroom and sprinkle with walnuts.  Pop back into the oven for 10 minutes to warm them through.  Thats it!

Sprinkle over some herbs and serve soon after.

P1270073


Categories: Dinner, gluten-free, Healthy Eating, Recipes, Vegan | Tags: , , , , , , , | 4 Comments

Cookbook Competition Winners & Happy Birthday Beach House Kitchen!!!

What a way to celebrate a birthday!  So many amazing recipes have hit our blog inbox over the past couple of weeks. Our minds are boggled now by sheer deliciousness…..!  Its been so hard to pick winners so we’ve changed the rules a little, we’re giving away two more books!!  You are all winners really and we will be cooking as many of your amazing recipes as possible.

Here are the lucky three who will be getting a copy of ‘Peace & Parsnips’ very soon (plus two we just had to include for being extra amazing…..):

Cucumber Rolls with Harissa Cream by Katharina Winner!  Little Plate – Cucumber Rolls with Harissa Cream by Katharina
Little Plate – Cucumber Rolls with Harissa Cream
Katharina loves drawing, eating and cooking….sometimes all at the same time!!!  Instead of a taking a photo, Katharina sent in a painting.  We thing its wonderful!  Anybody this talented with a paintbrush is bound to be a hit in the kitchen!  We think these will look incredible, rolled into a beautiful rose and stuffed with a harissa cashew cream.  Woah!  The kick of the Harissa makes Katarina happy and we are sure this dish is going to make us smile.  This cream will also go well on bread, with salads or dip a falafel in.  YUM!
You need
1 cup cashews, soaked
3 tbs nooch, aka the nutritional yeast:)
2 tbs olive oil, extra virgin of course
3 tbs water or some more if needed
3 ts smoky paprika
1 ts jeera/ cumin
1 ts caraway seeds
1 ts coriander seeds
1 ts salt (Himalayan Rose)
to serve
1 long cucumber
iceberg salad or frillice
Blend cashews with water and  nutritional yeast and grind the spices in a pestle and mortar.  Add the spice mix to the cashew cream and give it a short final blend.
Slice cucumber lengthways with vegetable peeler into thin long strips. Spread the cream onto the strips and roll them into roses.


Big Plate Winner! Greek Butter Bean Pie by Laura Winner! Big Plate Winner – Greek Butter Bean Pie by Laura
Big Plate – Greek Butter Bean Pie
We love the cooking style of the Med so much and Laura is such a talented cook and blogger.
“A hearty baked version of a Greek meze classic. This Butter Bean Pie is simple to make, full of delicious savoury flavour and packed with wholesome ingredients.”
You’ll find more delicious recipes like this on Laura’s blog ‘The Whole Ingredient’.
Serves: 2-4
Ingredients
  • 200g dried butter beans, soaked overnight (or 3 tins of pre-cooked butter beans)
  • 2 tsp olive oil
  • 1 white onion
  • 1 carrot
  • 2 celery stalks
  • 4-6 garlic cloves
  • 1 tin chopped tomatoes
  • 2 tbsp tomato purée
  • 1 tbsp lemon juice
  • 1 tbsp + 2 tsp dried oregano
  • 1 tsp cinnamon
  • Salt & pepper, to taste
  • 30g fresh dill
  • 200g fresh spinach
Method
  1. Heat the oven to 180°C / 350°F / Gas Mark 4.
  2. If you haven’t already pre-cooked the butter beans, put them on to boil in a large pan of water. Leave to simmer for 20-30 minutes – about the same time it takes to prepare the sauce.
  3. While the beans are cooking, make the sauce. Chop the onion, carrot and celery small, all to a similar size.
  4. Heat 1 tsp of olive oil in a large frying pan and add these to the pan.
  5. Cook for 5-10 minutes, or until the onion is translucent. Slice the garlic and add this to the pan, giving it all a good stir.
  6. Now stir in the chopped tomatoes, tomato purée, lemon juice, 1 tbsp of oregano, cinnamon, salt and pepper. Chop the dill (discarding any thick or tough stalks) and stir this in too.
  7. Leave the sauce to simmer for 10 minutes.
  8. While this is cooking, wilt the spinach in a separate pan until there is no water remaining from the leaves.
  9. You can now assemble the pie. Line the bottom of an oven dish or pie tin with the spinach. Drain the butter beans and stir these into the tomato sauce. Gently pour this over the spinach and level it out. Sprinkle on the rest of the oregano and olive oil.
  10. Cook on a middle shelf for 30 minutes.
Coconut Scones by Janice Winner! Sweet Treat – Coconut Scones by Janice

Sweet Treat – Coconut Scones

Janice says: “The most delicious scones ever!” These are low in sugar but sweetened with the super healthy coconut.  A ingredient Janice and ourselves can’t get enough of. Janice recommends cutting these scones thick, as they should be (otherwise they’re biscuits) and enjoying them straight from the oven with plenty of coconut oil and home chia seed jam!  Sounds truly amazeballs!!!

Find plant-based delights and natural health magic over at Janice’s blog ‘Nourished by Nature’.

Ingredients

8oz/225g self raising flour, preferably organic

2 level teaspoons baking powder

1 ½ oz/40g caster sugar

4 oz /110g soya or sunflower spread

2 oz/55g desiccated coconut

3 or 4 tablespoons plant based milk

Method

1. Heat the oven to 220C/425F/ Gas 7 and lightly grease a baking sheet.

2. The easiest way to make these scones is to add all the dry ingredients to
a food processor and pulse for a few minutes, then add the milk a little at
a time until the mixture comes together,

3. If you don’t have a food processor then put the flour and baking powder into a large bowl. Using your fingertips rub the spread into the flour until it resembles breadcrumbs. Vegan spreads are really soft so run your hands under a cold tap before you start and work quickly to keep the mixture from clumping.

4. Stir in the sugar and coconut then add the milk gradually and mix with a
wooden spoon until the mixture comes together.

5. Turn out onto a floured work surface and pat into a round ¾ inch or 2 cm thick.

6. Cut out 10 scones, I use a heart shaped cookie cutter since I reckon
we could all do with more love in our lives!

7. Brush the tops of the scones with milk and liberally sprinkle coconut on
the top.

8. Bake in the oven for 12 to 15 minutes until well risen and nicely browned

EXTRA AMAZING SPECIAL MENTIONS:
Copies of ‘Peace & Parsnips’ will also be heading to Victoria and Amy who both sent in three course vegan banquets to make even the most hardy meat-eater drool!  Delicious!!  We’ve included a picture of some of the dishes below:
Stuffed Peppers A couple of Victoria’s beautiful dishes. Stuffed Peppers with Cauliflower Rice.  We love cauliflower rice and everything tastes amazing when stuffed in a pepper;)


Baked Apples - Stuffed Baked Apples with Cashew Vanilla Cream by Victoria.  Love the blackberries in this and the cashew cream sounds delicious!!!

Amy is 17!  What a rock n roll star!!!!  Amy is studying cooking at college and is interested and passionate about cooking all foods.  Amy loved trying out vegan food and it shows.  We especially like Amy’s specially printed menu.  Vegan<3

Amy cooked up a wonderful three course feast! Amy cooked up a wonderful three course feast!  Can’t wait to try the chocolate brownie recipe and curries are always welcome in the BHK.


We loved Amy's specially printed menu. So cool:) We loved Amy’s specially printed menu. So cool:)

We’d also like send big thanks to (recipes that we loved and will be cooking soon):

Sharon’s – Seaside Pasta with Samphire
Rebecca’s – Parsnip and Chickpea Loaf with Lemon and Thyme AKA Not Roast and Chocolate Tiffin
Cora’s – Unbaked Banana Bread Balls
V’s – Spiced Coconutty Butternut Squash Soup
Thank you so much to everyone who has taken part, we loved reading your emails and recipes, the response has really touched us.  You’ve made our 4th birthday party extra special.  Its been a real celebration of home cooked happiness!
Happy Cooking,
Lee & JaneX
Categories: competition, Desserts, Dinner, Healthy Eating, Peace and Parsnips, photography, Recipes, Vegan | Tags: , , , , , | 8 Comments

Oven Baked Squash Gnocchi with Sun-dried Tomatoes, Fennel & Spinach Pesto

Oven Baked Squash Gnocchi with Sun-dried Tomato, Fennel and Spinach Pesto

Oven Baked Squash Gnocchi with Sun-dried Tomato, Fennel and Spinach Pesto

Veganz! Omnivores! Traffic Wardens! Rock Stars! Mamas! Papas! Botanists! Kayakers!……..You’re all going to like this one.

January is here and most of us feel quite droopy.  Over fed and watered, back to work but filled with good intentions for the new year.  Over 15,000 people world wide are trying out a vegan lifestyle in January thanks to the awesome Veganuary (see below).  This year we’re all going to be healthy superheroes!  Environmental angels!  Animal lovers extraordinaire!  Just by changing our eating and consuming habits.   Its such a shining, peaceful, positive way to get 2016 off to a flying start.

Here’s a healthy recipe straight out of Peace & Parsnips.  Loads of people have been in touch and said that this has been one of their favourites.  A colourful twist on your traditional gnocchi. This is a light dish packed with texture, a rich pesto, bucket loads of nutrition and plenty of big flavours.

Colourful food always gets us happy and hungry and this is a proper rainbow plate; orange, red, green, red……YUM!  It’s an ideal dish for a special dinner, a Saturday night feast or mid-week indulgence.  If you are cooking for people who think vegan/ healthy/ vegetables/(fill in the blank….) is boring and bland, here’s something to dispel such misguided waffle.

I’m sure this recipe will help all those going fully vegan for this Veganuary.  It’s not all veggie burger, tofu and falafels after all.  One friend said to me recently, a little apprehensively; “But is being vegan any fun?”, I replied “How much fun is Halloumi???!?”  (We  were talking about giving up Halloumi at the time).  How much fun is cheese?  There is no connection between happiness and dairy products.  Trust me.

Go vegan for January (what's left of it;)

Go vegan for January (what’s left of it;)

Veganuary is a global campaign that gets people into a vegan lifestyle in January.  Being a vegan is big news in 2016 and there has been plenty of interest in the press.  There are thousands of people giving veganism a try; my Mum and sister are giving it a go and Jane is giving up her Kefir and occasional Cappuccino for the month.  I also have a load of friends who are getting into the plant-based party.  Its amazing!  Jack Monroe is posting vegan recipes over on ‘Cooking on a Bootstrap’ and other celebrities like Vivienne Westwood, Sarah Pascoe and Romesh Ranganathan are taking part.  In 2015, 49% of the folk who tried out Veganuary stayed vegan full-time.  The Veganuary site is packed with information, advice, recipes and inspiration.  In fact, you’ll find a load of recipes from Peace & Parsnips over there.  Of course, you could also have a wee look at our back catalogue for a massive slice of vegan treats.

Being vegan is becoming ever more accessible, there are an infinite number of ways to eat simply delicious, plant-based food.  Many more restaurants, supermarkets and suppliers are realising that being vegan is far from a fad.  Interest in veganism has grown hugely worldwide in 2015 and will continue to do so in 2016.

Let’s cook plants!  Here’s what I said in the book:

Making gnocchi with coloured vegetables makes brilliant sense. Any quite starchy root works well: parsnip, sweet potato, purple potatoes, cassava, pumpkin . . . But the vivid orange of squash really electrifies the plate (and the palate). With its vibrant oranges, reds and greens, this dish is a feast for the eyes as well as the belly!

The Bits

1 large squash, about 1.5kg (the more starchy varieties of summer squash are best, such as butternut) peeled and cut into rough chunks olive oil, for roasting

a little sea salt

1 large fennel bulb, thinly sliced lengthways

240g firm tofu, well drained

300g unbleached white flour, sifted

1 teaspoon sea salt

½ teaspoon white pepper

1½ teaspoons dried sage

2 big handfuls of sun-dried tomatoes, roughly chopped


For the topping
2 tablespoons roasted hazelnuts, roughly chopped

Spinach Pistou

100g hazelnuts

100g spinach or watercress leaves

2 big handfuls fresh basil leaves

3 cloves garlic (crushed)

juice of 1 lemon

zest of 1/2 lemon

Large pinch of sea salt

2 large pinches of black pepper

75ml extra virgin olive oil


Do It – For 4-6

First make the spinach pistou (even better if you can make it the day before). Pistou is a Provencal version of Pesto – much lighter, without the cheese and pine nuts.

Preheat the oven to 200°C/gas mark 6.

Place the squash on an oiled baking tray. Rub a little oil and salt over it and bake for 30 minutes, turning the pieces gently over once. You’re not looking for loads of colour here, just lovely soft, golden squash.

Toss the fennel in olive oil, place on a separate baking tray and scatter with a pinch of sea salt. Bake for 30 minutes, turning once, until it’s nicely golden and sweet. When the squash is ready, put it into a processor with the tofu and blend until smooth. Now, place in a large bowl and stir in the flour, salt, pepper and sage until a soft dough forms. Leave to cool down and firm up – it will be a lot easier to handle.

Using two teaspoons, make gnocchi shapes (lovely little flat oval dumplings) with the mixture and place on an oiled baking sheet, leaving about 5cm of space for each gnocchi to grow. Brush the gnocchi with a little more oil and bake for 20–25 minutes, until crisp and slightly golden.

For the Spinach Pistou – Place the hazelnuts in a small skillet and warm on medium heat.  Keep them moving for 5-7 minutes – they will become roasted and smell so very sweet! Put them into a food processor and blitz for 30 seconds.  The nuts should begin to break down into lumps and chunks, which is what we want.  Add the rest of the pistou ingredients (except the oil) and blitz, drizzling the oil in gradually until you get a nice runny texture, like a think sauce.  You will need to scrape down the sides of the food processor a few times.  Add more oil if the pistou needs thinning.  Check your seasoning and set aside.

Serve

Warm, on nice big plates, drizzled liberally with the pistou. Scatter the crispy fennel and sun-dried tomatoes on top with a little more pistou, and finish with some chopped roasted hazelnuts.

Foodie Fact

Winter squashes like pumpkin and butternut squash are directly related to summer squashes like courgette and even watermelon (they’re known as the gourd family).  You can use most winter squashes in this recipe, as long as they are not too watery; acorn or hokkaido will be delicious.

Butternut squash is almost 30% protein and contains outrageous levels of vitamin A which makes our skin shine.  They’re also high in vitamin C and boast a good range of minerals like iron and calcium.

All of the parts of a squash plant are edible; fruit, flowers, leaves and seeds.

Categories: Dinner, Healthy Eating, Peace and Parsnips, Recipes, Special Occasion, Vegan | Tags: , , , , , , | 3 Comments

Christmas Pudding Truffles with Cashew Brandy Butter Sauce – Vegan, Gluten and Sugar-free

Boozy Christmas Snowflakes

Boozy Christmas Snowflakes – Vegan, sugar-free, healthy, all that jazz……

These snowflakes taste just like Christmas pudding but are waaaaaayyyyy easier and packed with natural sugars and gorgeous plant power!  When combined with our warm Cashew Brandy Sauce, this makes for the perfect Xmas sweet thang.

I always loved snowballs, normally chucking them at my sister. Also snowmen (or women) maybe one day we’ll make a boozy snow human! YUM!  We are visiting Jane’s Ma and Pa in sensational Stafford and it’s 14oC!  These sweeties will probably be as close as we get to snowflakes this year.

Here we have little explosions of tastiness, super rich and with a massive kick of brandy, chocolate and pecans to get you right into that festive cheer.  Everyone will LOVE them (guaranteed).  They can be made well in advance and keep nicely.

The warm sauce elevates these into the realms of dessert.  Quantity wise, have a play.  Thin out with water and add a touch of vanilla extract.  Make to your taste.  Its a little like custard but dare I say it…..even better (contentious behaviour there).  Having said that, custard would be lovely with these.

They are part of our lighter, nutritious, simple Christmas this year. These little snowflakes are easily made gluten-free, technically they are ‘sugar-free’ (refined that is) and are of course, full power plant-based, vegan happy.

MERRY CHRISTMAS Y”ALL!!!!!XXXxxxxxxxx

Festive sweet thangs....

Festive sweet thangs….

Recipe Notes
Use any combo of dried fruits, all welcome. We are not massive fans of that ‘dried mixed fruit’ stuff you can buy, they’re a little too dry.  We used whole dried fruits that are relatively inexpensive.

Not into the booze aspect. That’s very cool. Just up the juice quantity.

You don’t necessarily need a blender for this.  You can mash the fruit mix up with a potato masher. Jane’s Mum’s blender wasn’t doing it for us here, so we mashed it up.

The Bits - Maple syrup, soaked boozy fruit and pecans.  Woooah!

The Bits – Maple syrup, soaked boozy fruit and pecans. Woooah!

The Bits – Makes 15 little snowflakes
1 handful of each, dried apricot, dried pear/ apple, dried dates, dried figs (all roughly chopped)
2 handfuls raisins
4 tbs brandy
3 tbs apple juice or orange juice
1 orange (zest)
1 1/2 inch fresh ginger (finely grated)
1 teas ground cinnamon
2 teas mixed spice
1/4 teas ground cloves
2 teas vanilla extract

4 handfuls oats or gluten-free oats
4 handfuls pecans (broken up with hands)

125g dark vegan chocolate

2-3 tbs maple syrup (optional)


Snow
2 handfuls desiccated or grated fresh coconut


Cashew Brandy Sauce (varies depending on numbers)

Cashew butter

Maple Syrup

Brandy

Vanilla extract


Do It
Soak the dried fruit, spices, vanilla and orange zest for at least two hours in the brandy and juice. Longer is better.

Melt the chocolate in a glass bowl above gently simmering water. Leave to cool for 15 minutes.

In a food processor/ blender, add the oats and blitz until they resemble a coarse flour. Add the dried fruit mix and pulse until the mix is broken down but still chunky.

Scrape out into a large bowl, add the chocolate and pecans. Combine well with a trusty wooden spoon/ spatula.  Taste and stir in maple syrup if you’d like it sweeter.

Scatter the coconut over a plate and with slighty wet hands (prevents too much sticking) grab a squash ball sized lump of the mix and roll between your hands into nice even balls.

Place in the coconut and roll gently. Now pop them onto your display plate.

These snowflakes will keep well in a sealed container, but look best when freshly rolled.

For an extra special dessert, gently warm up enough cashew butter in a small saucepan and add maple syrup, vanilla extract and brandy until you love it!  One tablespoon at a time is best.  Thin with a touch of water or soya milk if needed.

Just like Christmas pudding, but wee.

Just like Christmas pudding, but wee.

Serve

Spoon your sauce onto a plate and pop two or three snowflakes on top.  They are also amazing as they are.

Foodie Fact

A word on ‘sugarfree’-ness.  Not all sugar is the same!  Sugar in dried fruits like these are in a natural solution of all kinds of things; anti-oxidants, minerals, micro-nutrients most of which are beneficial to the body and really help out the immune system.  Dried fruit is packed with goodness and the ideal winter snack and fruit sugar should not be lumbered in there with refined, cane, beet, corn sugars etc.  Fruit sugars (not loads of course) are way cool with us.

PS – Dried fruit is also very high in fibre, which is an all-time superhero for our bodies.

Categories: Desserts, Recipes, Vegan | Tags: , , , , , , , , , | 7 Comments

Maple Roasted Parsnip & Mushroom Roulade with Cashew Cream Sauce (Traditional Vegan Christmas Fare)

Parsnip, Walnut & Mushroom Roulade with some tasty trimmings

Parsnip, Walnut & Mushroom Roulade with some tasty trimmings

A simple, vegan feast to satisfy all this Christmas!

Here is a old school dish that I came up with last night, ideal for a Christmas day centre piece and only using two pans and a baking tray! I’ve also included quick recipes for the cooking veggie accompaniments – Chicory braised in sloe gin and pan fried Brussels Sprouts with Curly Kale and the creamy sauce is something everyone will enjoy.  You are sorted for Xmas 2015!

I’ve had quite a few requests for a Christmas recipe that is both straightforward and seasonal.  Being the BHK, we don’t plan things, we just let them leap out of the veg basket and we had to go parsnip this year.  It has been ‘the year of the parsnip’ for us in many ways!

All of these ingredients most of us have around the kitchen at this time of year.  I love the way that we can create feasts from simple plant-based ingredients, packed with bold flavours and interesting textures.  We are spending Christmas this year with Jane’s parents and I think they’ll love this dish, a taste of more traditional British fare.

A vegan Christmas is a delight!  I find that I cook lighter and more nourishing dishes than previous Christmas times.  Xmas can be so packed with heavy, rich food and I can’t help feeling lucky to be stuffing myself with food that is delicious and won’t leave me in a food coma, snoring by the fire place.  If I could tone down the red wine glugging, Christmas would be a highly healthy time of year!  Jane and I will be making a whole host of vegan dishes on the big day and all across the festive season, the perfect time of year to let plants shine and inspire.

I like this recipe because it is fun for all the family, no matter what the tastes.  The pastry is something everyone can get down with, crispy, flaky and then the filling is packed with flavour finished with a very creamy, slightly cheesy plant-based sauce that will be a surprise to some.  Cashews are superheroes for plant-based creaminess.

This recipe suits is you are catering for a vegan/s over Christmas.  It can be made in advance and warmed up in the oven on the day or you can prepare the filling ingredients and roll the roulade in the morning.  I have to say that freshly baked it is tastier and the pastry has a better texture.

A festive feast!

A festive feast!

Recipe Notes

This roulade will be lovely with any veggies, but we’ve paired it with a few of our extra special favourites; chicory, kale and Brussels Sprouts.  A few roast potatoes are never a bad idea!   We also love red cabbage however it arises.

If you don’t have any nutritional yeast flakes the sauce will not be cheesy.  Now may be a good time to invest in a pot of these wonderful, savoury flakes.  Especially if you are planning on cooking vegan food regularly.  Otherwise stir in some Dijon mustard or herbs.  It will be delicious.

Cashew butter can easily be substituted by blending up cashew nuts, seasoning with salt.  Soak two handfuls of cashews for 2 hours in plenty of water and then blend.  They will form a smooth paste, perfect for adding to sauces and stews.

If you don’t have access to fresh herbs, that’s cool, lets go for roughly 3/4 teas dried rosemary and 1 1/2 teas dried thyme.  You can always taste the leeks after cooking and add more herbs if you like.

This is the easiest method of rolling a roulade, you can go for a more traditional roulade roll if you are happy with that.  This method is failsafe.

Many brands of puff pastry are vegan, have a quick check of the ingredients.

Chicory is generally quite bitter but when cooked with a sweet liqueur or even a fruit vinegar, will have delicious sweet and sour flavour.

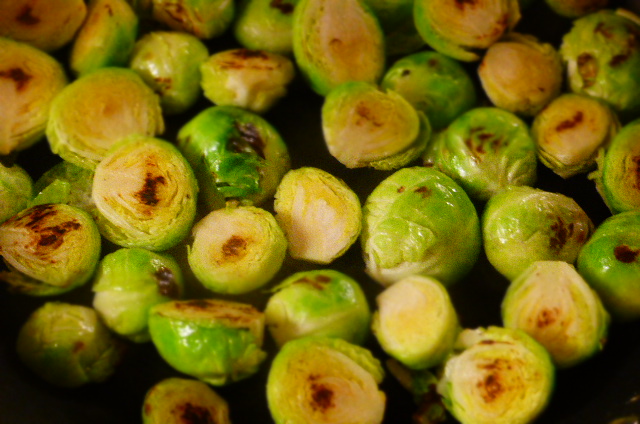
Christmas is not complete without delicious Brussels Sprouts.  Simply pan fried in a little oil, with sea salt is my favourite way to enjoy them.

Happy cooking and Merry Christmas!!!!!!!!


The Bits – Makes 12 slices (enough for 4-6) 

325g/ 2 medium-sized parsnips (chopped into 1 1/2 cm wide batons – the longer the better)

2 big handfuls walnuts (roughly chopped)

3 teas maple syrup

1 1/2 teas lemon (zest)

1 head garlic (whole)


300g/ 2 medium leeks (cleaned and finely sliced)

2 teas fresh rosemary (finely sliced)

3 teas thyme leaves (picked from stems)


250g mushrooms (finely diced)

Black pepper and sea salt


2/3 500g vegan puff pastry block (roughly 350g)

3 tbs soya milk

Flour (for dusting)


Cashew Cream Sauce

100g/ 1 small leek (cleaned and finely sliced)

400ml soya milk (or non-dairy milk of choice)

4 tbs cashew butter

2 tbs nutritional yeast flakes

Sea salt (to taste)

Lovely maple roasted parsnips and walnuts

Lovely maple roasted parsnips and walnuts

Do It

Preheat an oven to 200oc (180oc fan oven).

Place the parsnips and head of garlic on a baking tray, toss with a 2 tbs of oil and a large pinch of salt.  Roast for 15 mins then gently turn over the parsnips, scatter the walnuts around the tray and drizzle all with maple syrup.  Roast for 7 minutes, turn and check that they are not burning.  Roast for 3 minutes more until the parsnips are totally. beautifully golden.  The walnuts will also be nicely caramelised.  Little explosions of flavour for the roulade!  Scatter over the lemon zest and set aside.

While the parsnips are roasting, grab a large frying pan.  Add 1 tbs oil and fry your leeks for 5- 7 minutes.  When they are soft, stir in the herbs.  Set aside.  Rinse out the pan.

Now add another 1 tbs of oil to the pan and fry your mushrooms for 8 minutes on a medium heat until most of their moisture has been released.  Mix with your leeks, season with salt and pepper, set aside.

Cut a piece of baking parchment/ greaseproof paper out that will snugly fit in a baking tray.  Place on a cool work surface and lightly dust with flour, using a rolling pin, begin to roll out your pastry.  Dusting regularly as you roll, it will help to turn the pastry over a few times while you are rolling.  You’re looking for a rectangular shape around 14″ by 10″, nice and even.  When your happy with the size, trim the edges of with a sharp knife.

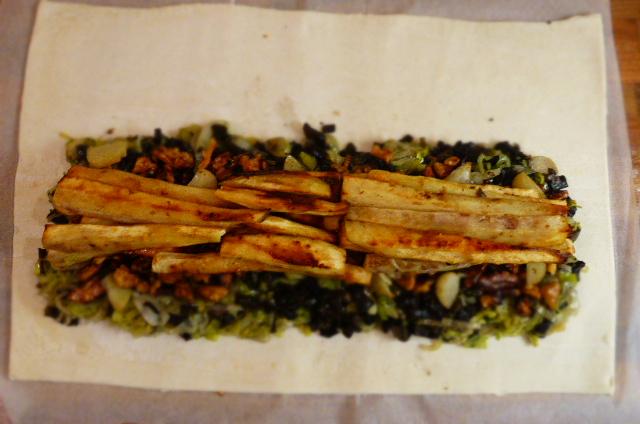
Your filling ingredients should now be cool, if not leave them for a while.  Begin to fill your roulade, leeks first.  See the photo below.   Now top with a layer of walnuts,  pressing down lightly.  Top with your parsnips.  Using the baking parchment, roll your roulade.   Lightly brush all of the edges, a 2cm border all around, with soya milk.  Pull the top edge of the paper towards you, packing any filling back in as you go.  Now spin the roulade around and pull the other side of the pastry up and over so the pastry overlaps slightly.  Press gently and using the paper again, flip the roulade over so that the fold is on the bottom.  Using your hands, shape the roulade into a neat, fat sausage shape.  Now press and tuck in your ends, making sure they are well sealed.  All of this is best explained by the photos below:

Spread out the leek layer and top with walnuts, pressing down gently.

Spread out the leek layer and top with walnuts, pressing down gently

Top with the roasted parsnips

Top with the roasted parsnips

Using the baking paper, roll one edge over.....

Using the baking paper, roll one edge over…..

Rolled up like a big, fat......sausage.

Rolled up like a big, fat……sausage

Cut slices, which help to act as a portioning guide and brush with soya milk

Cut slices, which help to act as a portioning guide and brush with soya milk

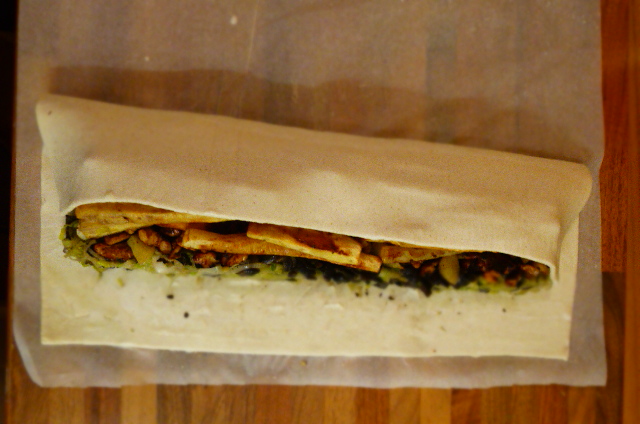
Cut slices into the top of the roulade and brush with soya milk.  Place in the oven for 40-45 minutes, turning once to get a nice even bake.

Sauce time.  Simple.  Add all of the ingredients to a small saucepan and warm until a low simmer, stirring regularly.  Pop a lid on, turn the heat down and leave to slowly cook through for 10 -12 minutes.  Once the leeks are soft, stir in the yeast flakes and blend with a stick blender, adding salt as needed.  This sauce does not like to be boiled for a long time, a low simmer is ideal, keep your eye on it.

Chicory braised in sloe gin

Chicory braised in sloe gin

The Veggies

3 large heads chicory (cut lengthways into quarters)

3 tbs sloe gin, port or berry vinegar (like blackberry, blackcurrant or even raspberry)

Black pepper and sea salt


6 large stems curly kale (stems removed, leaves finely sliced)

400g Brussels sprouts

Sea salt


In your trusty frying pan, add 1 tbs oil and warm on a high heat.  Lay in your chicory pieces, season with salt and pepper, fry for a couple of minutes until well caramelised and then turn over.  Fry for another 2 minutes, drizzle over the sloe gin.  Lower the heat, pop a lid on and leave to cook for 5-7 minutes, adding a splash of water if needed.  The chicory will bes soft, set aside and keep warm.  Rinse out the pan.

Adding 1 tbs oil, warm of medium high heat and add the sprouts.  Toss gently and fry for roughly 6 minutes, until the sprouts are nicely coloured (the way you like ’em).  Now add your kale and a splash of water.  Lower the heat and leave to cook for 6 minutes.  Try one (yum!).  Season with salt.

You’re now looking good to serve your festive feast!

Brussels!  Yes, please.....

Brussels! Yes, please…..

Serve

Place the golden roulade onto a nice serving platter (big plate) or chopping board and surround with glorious veggies.  Using bowls to serve the leftover vegetables.  Pour the sauce into a warm bowl/ sauce boat and enjoy the feast!  This dish goes brilliantly with a spoonful of our Pear and Cranberry Chutney.

Yes, it does look a bit like a pastry-based rocket.

Yes, it does look a bit like a pastry-based rocket

MERRY CHRISTMAS everyone! (Drawn by Jane's niece Martha)

MERRY CHRISTMAS everyone! (Drawn by Jane’s niece Martha – 9 years old)


Categories: Dinner, Recipes, Sauces, Special Occasion, Vegan | Tags: , , , , , , | 13 Comments

Festive Pear & Cranberry Chutney

Pear & Cranberry Chutney Pear & Cranberry Chutney

Making your own chutneys at Christmas is a joy! A jar of homemade chutney is such a lovely gift and is so special to crack open at this time of year.  The gift of chutney!

This is a traditional-ish recipe with less sugar and a very decent kick of spices.  I have made chutneys and jams with chia seeds and no sugar etc, but my Auntie Betty would approve of this one and at Christmas, Auntie Betty know best!

This festive time is a wonderful opportunity to enjoy the bounty of the year, all those tantalising tubs of things we’ve been keeping in cupboards, tucked away for a special occasion, finally get dusted off and shared with loved ones.  We have loads of interesting little foodie bits that have been amassed from food fayres and markets this year and have no idea how we can form a cohesive, tasty meal out of them?  I’m sure we’ll figure something out!  Theses pots and parcels have many positive memories attached to them.

We’ve been getting some wonderfully sweet pears at the minute and really relishing them.  This is the ideal time to think chutney and preserving, when there is a glut, the jars come out!  When made in bulk, things like chutney are easy and cost effective.  I know we are all a little busy at this time of year, but this is something I think you’ll squeeze in.  The flavour is worth it!

This chutney could hardly be easier, pop in a pan and simmer.  The results are suitably chutney, like a tangy taste explosion!  I’ve reduced the amount of sugar in here, as I find most chutneys way too sweet.  I like mine with plenty of spice and twang.

CHUTNEY TIPS:

If you’re planning on keeping a chutney for a while, check what your lids are made of.  Most jar lids are metal and you’ll need to place a disk of greaseproof paper between the lid and the chutney to stop it reacting.

Chutney can be kept, in a dark place for years, if jarred properly.  This means that the jars must be well sterilised in an oven, which is the easiest way to sterilise a large number of jars.

Shaking bicarb and water in jar can get rid of unwanted, lingering smells that may taint your precious chutney.

Chutneys are like fine wines, they get better with age.  Some people keep chutneys for years!  Vintage chutney.  The flavours definitely mellow and deepen after around a month but this chutney is good to go straight away and consumed within two weeks.

Recipe Notes

If you are short of fennel, use something like celery or even carrots.

Pears, glorious pears...... Pears, glorious pears……

The Bits – For two regular sized jars (280g-ish) 

475g firm pear – cored and peeled (cut into 1cm small cubes)

130g fennel – ½ medium sized bulb (finely diced)

140g unrefined brown sugar

50g onion – 1 small

175ml apple cider vinegar

2 inch cinnamon stick

1 teas ground ginger

50g dried cranberries

Large pinch chilli flakes

1 small clove garlic (crushed)

Large pinch sea salt

3 cloves

1 teas mustard seeds


Do It

Put all ingredients into a saucepan and bring slowly to a boil.

Stir regularly and simmer with a loosely fitted lid for 1 1/2 hours, until the chutney is a nice dark brown colour and has thickened.  We don’t want it to be like a jam, the pears and fennel will still have a little texture and the chutney will be thick but runny.

Spoon into sterilised jars straightaway and screw lids on firmly.  This should mean that the jars are well sealed (i.e. the lids are sucked in and pop when opened)

Decorate with amazing labels and enjoy!

Pear and Cranberry Chutney - on the hob Pear and Cranberry Chutney – on the hob

Foodie Fact

Pears are a member of the rose family and are a great source of fibre and vitamin C.

Categories: Chutney, Recipes, Vegan | Tags: , , , , , , , , , | 2 Comments

Ginger & Chocolate Treats (Simple festive fun)

Ginger & Chocolate Treats

Ginger & Chocolate Treats

This is a relatively inexpensive and super delicious festive treat or gift. These sweet thangs are warming and dangerously moreish. Add to that the fact that they only take a few minutes to get together and we have ourselves a Christmas classic! At least in the Beach House anyway. If you’re the kind of person who loves licking chocolate off things (who doesn’t!!!) then this is the one for you.

This recipe basically an assembly job, dipping crystallised ginger into dark vegan chocolate. The sweet ginger combined with the bitter chocolate is an utter sensation!

I find crystallised ginger way too sweet to eat as it is, so dipping it in chocolate is the perfect way to make it appealing to all. The process, like most festive cooking shenanigans, is loads of FUN! The ginger is also very warming we find, especially helpful up here in wild and wonderful Wales.

One part of Christmas that we love is the way that it focuses our minds on how we eat and how we can feed our loved ones. We tend to get more creative and throw ourselves into crafts, arts, baking, all sorts of activities that we maybe overlook in the year.

Pop these into little bags with fancy bows and you’ve got a gorgeous little crimbo pressie for loved ones, neighbours, work colleagues, the postie…….. With any leftover chocolate, why not pop a few nuts into the mix, or dried fruits. Walnuts are particularly satisfying as the chocolate sticks in the nobbles and bobbles of these funky nuts.

Recipe Notes

You may like to dust these treats with cocoa/ cacao or even cinnamon.

Ginger & Chocolate Treats - still a little soft to scoff

Ginger & Chocolate Treats – still a little soft to scoff

If you are short of time and still want to create some homemade magic, here we are:

The Bits

250g crystallised ginger
150g very dark chocolate (70-80% cocoa content is best)

Do It
Boil a kettle. Add boiling water to a small saucepan. Pop a glass bowl over the saucepan and gently warm the water. Break up the chocolate and pop in the bowl.

Stir and melt the chocolate until it has mostly melted. Keep stirring, the rest of the choc will melt.

Using a skewer (cocktail sticks are best) dip your ginger pieces into the just melted chocolate and place on a chopping board/ tray covered with greaseproof paper. Be sure to allow excess chocolate to drip off, shake it a little, so there is just enough to cover the ginger. Otherwise you’re left with a puddle of chocolate that sets in a funny shape (this however can look very cool!)

Leave to cool at room temperature and once the chocolate has solidified, eat one to test it. At least one……..Then bag up, pop in a sealable container, gift wrap………enjoy!!!!

Any spare chocolate?  Grab some nuts/ dried fruit and coat them for extra treats.

Nutty Chocolate Delights!

Nutty Chocolate Delights!

Foodie Fact

Although this recipe is by no means the healthiest one we’ll post, ginger is still ginger and has some shining bonuses to make our bodies smile.

Ginger is especially good for the digestive system, both soothing and inflammatory.  Ginger is also packed with anti-oxidant properties and is generally immune boosting and can help with nausea.  All of this sounds like a perfect reason to incorporate more ginger into our diets (these treats being the sweetest by a mile!)

Our little 'naff' tree sparkling away - our corner of chintz in the BHK

Our little ‘naff’ tree sparkling away

Categories: Recipes, Vegan | Tags: , , , , , , , , , | 3 Comments

Mango & Coconut Lassi

rsz_p1250244

Mango and Coconut Lassi (Vegan)

A quick and delicious breakfast for us this morning.  The perfect antidote to a very grey day in Wales, some tropical flava!  We managed to pick up/ save some very ripe mangoes recently and have been trying out coconut water, which seems like a bit of a craze at the minute.  Mangoes and coconut, beaches and palm trees, a little escapism from the dark nights and storms of our little hillside retreat.

A lassi is something like an Indian milkshake that comes in many varieties, basically salty or sweet, but there are so many ways this yoghurt based drink can be enjoyed.  Salted lassi is lovely, normally flavoured with a little ground cumin.  Lassi’s are easily made vegan with the addition of non-dairy milk and vegan yoghurt, both are best used unsweetened we find.  You can then control which and how much sweetener you choose to use, if any.  The mango and coconut water are already sweet here and any sweetener is really only needed to give the sweet tooth a little treat.

TOP MANGOES

We’ve eaten mangoes all over the world, but have to say that the best are Indian.  I don’t think any other country reveres a fruit quite like Indians with their mangoes.  Maybe the French with grapes?!  Italians with tomatoes?!!  Brits with apples?!! Its out there for discussion.  Surely having a mango tree in your garden is a sign of very good karma though!  Especially in Wales!!

The sheer diversity of mangoes in India is bewildering and the season is anticipated like the festive season over here.  Mangoes are now very expensive in India, especially certain highly regarded varieties like Alphonso, Badami, Chausa, Dasheri…..there are loads.  Where are you favourite Mangoes from?  Thailand and the Philippines are closely behind India in the mango nirvana stakes for sure.  The ones we bought here were from Brazil(!)

Adding turmeric to lassi’s is an age old remedy for stomach complaints in the sub-continent and we like adding turmeric to anything, such is it’s vibrant health giving properties (not to mention the colour!  WHAM!!  YELLOW!!!)

We are drinking these in autumnal Wales and need no extra chilling.  If you happen to be in a nice hot part of the globe (well done!) you may like to add a few ice cubes to the lassi and decrease the coconut water a little.  You could also freeze your coconut water into ice cubes, this works brilliantly and adds a lovely coco twist to cold drinks.

Other lassi varieties you could try:

Strawberry, Pineapple and Mint, Avocado and Lime, Beetroot and Thyme, Chocolate and Pistachio,  Apple and Chai Spiced…….

You may also like to check out the brilliant Vegan Richa’s recipe for a spicy Thandai Lassi.

How to pick a ripe mango?  Well worth knowing.

Mangoes are such a treat in Wales, they don’t come our way very often.  We think a lassi is the perfect home for a nice ripe mango and a breath of bright tropical air in the early dark nights and rain clouds of beautiful Wales.

Recipe Notes

If are struggling to find coconut water, go for non-dairy milk (like soya or almond) and even straight water will make a good lassi.

If you can get ground cardamom, please do.  Just a sprinkle on the top transforms the lassi.  Cardamom and Indian sweets got together perfectly, but remember that too much can be overpowering.  Lightly sprinkle.

These lassi’s are made without turmeric, so the colour is a little lighter.

Mango and Coconut Lassi (Vegan)

Mango and Coconut Lassi (Vegan)

The Bits – Makes two small glasses

1 mango (peeled and de-stoned)

175ml coconut water

5 tbs dairy free yoghurt

1-2 teas sweetener (we used brown rice syrup)

1/2 teas turmeric (optional)


Pinch cardamom powder

Do It

Pop all ingredients into a blender and blitz until smooth and creamy.  Check the sweetness and you can even add more yoghurt for extra creaminess.

Creamy sweet fruity YUM!

Creamy sweet fruity YUM!

Serve

Pour into your finest glassware and sprinkle over a little cardamom and chopped almonds or pistachios for a real authentic India style.

Foodie Fact

Soya is packed full of protein and coconut has amazingly healthy fats.  Mangoes are very high in vitamin A and C……as far as breakfasts go, this is a smooth and tasty winner!

Categories: Breakfast, Healthy Eating, Recipes, Smoothies, Vegan | Tags: , , , , , , , | 1 Comment

Windfall Apple and Oat Crumble – Simple Autumn Classic

Windfall Apple and Oat Crumble
So the leaves are all turning burnt gold, auburn, crimson and the morning are crisp with deep powder blue skies.  I love this time of year, wandering through dried leaves, staring into fires, wrapping up, rediscovering the delights of sloe gin and big, bombastic bakes!

Desserts or otherwise, its time to wake the oven up,  it tends to be underused in the summer months and dust off our oven dishes.  Autumn and winter mean we need warm hugs and serious sustenance in our bowls/ plates.  It’s something of a survival mechanism and certainly leads to oodles of well-being.  Cosy soul food!

Nothing says autumn more than the first crumble of the year.  Your body knows what’s coming, the dark and windy time when we crave large plates of stodgy happiness to warm our wintery bones.  We are enjoying a beautiful September up here on Tiger Mountain, but the  nights are getting a bit chilly and crumble is the perfect antidote.  Easing us into this time of year in the tastiest of ways.

Crumble’s beauty lie in their simplicity and the way they gobble up our autumn fruity abundance.  This recipe is beautifully basic and can be taken in so many directions with addition of other fruits (think blackberries, damsons, mulberries, dried fruits etc) or flavourings (like elderflower, orange blossom, I’ve even tried a tahini and apple crumble which was a treat).  Adding chocolate to a crumble has been tried and works like a dream.  This recipe is a lovely foundation to add to as you see fit.

ORCHARD DREAMS

We are setting out a little orchard in the garden.  The trees are young (bar our ancient looking plum tree and windswept crab apple) and normally offer scant fruit.  My Snowdonia Pear Tree, a juvenile, was unceremoniously beheaded by a storm recently.  Its tough going for saplings in these parts!  Our little Bardsey Apple tree however is a rugged super star, branches laden every year with tart and juicy, vivid green apples.  Not such great eaters (too much of a twang) but perfect when cooked.  These apples were actually all windfall, saved from the fate of an army of slugs that camp out and descend like slimy vultures on any fruit that hits the deck.

Windfall Bardsey apples in the garden Windfall Bardsey Apples in the garden

APPLE ABUNDANCE

What to do with all those apples?  If your, family members, neighbours, avid scrumpers know of an apple tree, I’m sure you’re asking yourself the same thing.  Here are few little ideas for all those surplus apples:

  • Make a Tart Tatin (see below)
  • Cook into apple sauce and use on desserts and breakfast bowls.  Apple sauce is also wonderful in baking, it helps to bind cakes etc together.
  • Make your own Apple Cider Vinegar or Apple and Mint Vinegar
  • Make Apple Vodka, Whiskey or Gin by steeping the apples in alcohol.
  • Try a Apple and Ginger Smoothie or Apple and Kale Juice
  • Add slices to pancakes and bread (works brilliantly with rye or spelt flours)
  • They make a great Raita
  • Chop them up and mix them into your muesli/ granola/ sprouted grains etc for breakfast.
  • Make Apple and Plum Chutney
  • Make Beetroot and Apple Sauerkraut or add to your favourite Kimchi recipe (there’s a nice one in Peace and Parsnips
  • Add them to stews, salads or soups
  • Spread them out somewhere, preferably on cardboard and keep them for as long as possible.  Crunch and yum!
  • Make cider.
Discovery Apple and Apricot Tart Tatin Discovery Apple and Apricot Tart Tatin

ALL APPLES ARE NOT CREATED EQUAL

When cooking with apples its worth tasting one first.  They can be so varied and this is what I love about them.  They are surely one of the finest things we grow in the UK and our traditional varieties offer up a fascinating and varied palate of flavours and textures to play with in the kitchen; some are flowery in texture and sweet, some crisp and tangy, we just need to find them the right home.  I have to say that the best way to eat a good apple is to give it a little polish on our trousers or jumper (why do we do that?) and crunch into it.  I like to eat the core and seeds as well.

Making this pud into a pure plant-based pleasure is a cinch, you’re really just substituting the butter in the traditional crumble with oil and some flax seeds, which offer a lovely nutty flavour and help to give the crumble a little bite and oodles of nutrition.  I am also not great at using large scoops of sugar, I need gentle persuasion.  You can probably make this with other sweeteners, but for once in the BHK, we’re going (almost) traditional.

Crumble is oh so simple but surprisingly many are still not great.  Being too sweet or having a dry, floury crumble are two cardinal sins of crumble-hood.  I like a nutty, crisp crumble.  This is why crumble is always enjoyed best straight out of the oven.  The longer its left, the more time for the crumble to loose its magic crunch.  I like to add nuts and flax seeds to add even more flavour and bite.  To avoid just a mouthful of floury sweetness, I like oats bound with a little flour.  Simple pleasures are always the best!

So grab a fireplace, a large spoon and a nice crisp autumn night and enjoy this true British classic.

Recipe Notes

You can use gluten free flour and oats to side step gluten here. 

The amount of sugar you will need depends on your apples.  Ours are very sharp, so we went for 90g.  Jane has a sweet tooth (see above) and was very pleased with the sweetness level with that amount.

Crumble is amazingly adaptable, make it well in advance or make a large batch of apple sauce and use for other purposes (see above).  Crumbles also freeze brilliantly.

I don’t like going ott with cinnamon, I just like it somewhere in the background.  Not a main player in a crumble.  Add more if your a spicy crumbler.

Enough frivolity, lets crumble!!!!!!

The Bits

Apples

950g apples

60-100g light brown sugar (unrefined)

3 tbs water

1/2 – 1 teas cinnamon


Crumble

100g oats

20g flax seeds (ground)

75g mixed nuts (roughly chopped)

30g light brown sugar (unrefined)

70ml rapeseed/ olive oil

1 teas cinnamon

20g buckwheat/ wholemeal flour


Do It

In a saucepan, add all of the ingredients for the apples.  Bring to a gentle boil and cook for 20 mins with a lid on or until the apples are tender and just falling apart.

Mix all of the crumble ingredients together in a bowl.  Preheat oven to 200oC.

In a baking dish (approx 10″ by 8″), spoon in the apple sauce and sprinkle over the crumble mix until there is a nice thick layer.

Place in the oven and bake for 30 minutes, until the crumble is a dark golden colour and the apple sauce is bubbling away.

Before..... Beginning…..
Middle...... Middle……
End! End!
The Prequel (?) - Windfall Apple and Oat Crumble with lashings of custard The Prequel (?) – Windfall Apple and Oat Crumble with lashings of custard

Serve

We had ours with custard.  Mainly because we don’t have any ice cream in the freezer.  If we had ice cream, I am sure there would have been a long debate about which way to go.  Which way do you go?  The timeless question.  I think it depends on how the stars are aligned (or something).  PS – It must be vanilla ice cream.  Of course.  Anything else would be utterly ridiculous.

Beach walking off all that crumble - Dinas Dinlle, near Anglesey Beach walking off all that crumble – Dinas Dinlle, near Anglesey

Foodie Fact

Crumble is food of the Gods and makes you happy:)

Dinas Dinlle Beach Dinas Dinlle Beach
rsz_p1240351 Happy Autumn to you all!!!!!!!!!!!!


Categories: Desserts, Foraging, gluten-free, Recipes, Vegan, Wales | Tags: , , , , , , , | 9 Comments

Dischi Volanti with Avocado and Kale Pistou, Broccoli and Slow-Roast Tomatoes

Dischi Volanti with Avocado and Kale Pistou, Broccoli and Home Sun Blushed Tomatoes

Dischi Volanti with Avocado and Kale Pistou, Broccoli and Slow-Roast Tomatoes

‘Dischi Volanti’ translates as ‘Flying Saucer’ and this dish is supernatural in loads of ways!  A dish that is easy to prepare, with ingredients that can easily be swapped and changed.  The basis is a vibrant ‘pistou’ (very similar to a pesto) made creamy and rich with avocados.  I love this side of plant based cooking, always looking for creative ways of adding richness and texture to traditional dishes.

WHAT ARE SUPERFOODS?

There’s a lot of talk about superfoods at the minute in the UK. In fact, its a buzz word all around the globe. I sometimes wonder what actually constitutes a ‘superfood’?  It used to be only foods with purely radiant health properties, but this seems to be getting looser nowadays.

Really all plant foods are ‘super foods’.  They all contain some form of incredible nutrition (except maybe Jerusalem Artichoke, beautiful when roasted though!)  The huge advantage of a plant based diet is very low cholesterol and saturated fats along with a complete lack of animal protein.  All of this will result in better health.  I also think we need to look at the way our ‘superfoods’ were produced or grown, how they were transported, who profited from them…….  I wish things were simpler to fathom, but a superfood to me has greater implications than just our own health.

There is no wonder cure in foods, a harmonious approach to eating and nutrition is important, a balanced diet is ever the way to proceed; rich in wholefoods, variety and plenty of fresh, seasonal ingredients.  We like to think that the plant-based way is a ‘super diet’.  Ticks all the boxes for a healthy way of being.  Food can be our medicine after all!

In the BHK we like to look close to home for our super magic wonder foods and find the sparkling health properties in what some may see as normal fruit and veggies. This dish highlights a few of these superstars; Broccoli, Rocket, Tomatoes, Kale…..to name but a small cluster of shiners.

REAL EVERYDAY WONDER FOODS

Broccoli – probably one of the healthiest and tastiest vegetables. Grows like a dream in the UK and is available for most of the year. Packed with vitamin C, calcium, protein. It really is one of the most amazing things you can eat.

Kale – a leafy green that is obvious a little en vogue at the moment, but rightly so. Its been making people shine for years and all our Holywood/ famous types are not averse to looking and feeling at their best. I guess they get some pretty good nutritional advice. Kale is high in iron, calcium, protein, vitamin C.

Rocket – is one of natures best sources of calcium. I bet you didn’t read that on a milk carton! In truth, there are many better source of calcium in the plant world that milk. Milk is just a source of calcium, certainly not the source (as I was led to believe for much of my adult life). Good to know these things!

Avocado is of course not so local, but we wrote an article about it recently highlighting our love and appreciation for all things avo – Avocado – Friend or Foe?!  It’s a treat.

Pistou is like pesto without the pine nuts, I’m taking real liberties here by calling this creamy, plant-based sauce a ‘pistou’ but I think you’ll agree that it works well whatever the name. You won’t find this type of pistou in the south of France, that is for sure! I thought about using blended cauliflower to add richness and that creamy touch, but avocado is easier and sensational (and green to match the colour scheme of the dish).

You can use shop-bought sun blushed tomatoes for this one, but we have plenty of tomatoes coming from the Trigonos farm and in our organic veg box at the minute and this is one way of making them shine.  The slow roasting process does take a while in the oven, so maybe you’d like to whip a cake up or some muffins while the oven is one.  We made some Blackberry and Almond Flapjacks while our tomatoes were slowly drying out. Thin, tray bakes are perfect at a low temperature so are the ideal fit when drying out your gorgeous toms.

We would have used spelt pasta here, its our favourite at the moment, but we had a bag of Volanti left over from our Italy trip (seems like many lifetimes ago now) so decided to put it to very good use.  Also eating ‘Flying Saucers’ makes us feel like kids again, playing with Alphabet Spaghetti and the like.  Fun and games with serious flavours!

This dish will only take a short time to get together, the homemade sun blushed tomatoes do take a while in the oven, but otherwise its a matter of blending up the pesto and cooking the pasta.  That’s it!  It is ideal for people who are averse to green food and we know a few (naming no names……Dad).  This is a plate to get everyone into the green revolution!

Recipe Notes

Try to leave your tomatoes in the oven for as long as possible after cooking has finished.  Ideally leaving them to cool down with the oven.  This really helps to get them dried gently.

If you are doing a load of slow-roast tomatoes, keep them in a jar covered with oil.  This means they will last much longer.  Even better if you flavour the oil with fresh herbs and a little garlic.

Some subs – Broccoli for runner beans, green beans, mangetout, snow peas.  Kale for spinach.  Rocket – Watercress.  Cashews – Pine Nuts, Almonds, Hazelnuts

Slow-roasting in the Beach House Kitchen

Slow-roasting tomatoes in the Beach House Kitchen

The Bits – For 2

6 tomatoes (cut in half)

250g Dischi Volanti pasta (or pasta of your choice)

1 medium broccoli (florets cut in half, stem thinly sliced)


2 ripe avocados

2 handfuls kale (finely sliced)

14 basil leaves

2 cloves garlic (crushed)

1 lime (juice)

2 tbs nutritional yeast flakes (optional – for added savoury cheesiness in the pistou)


3 handfuls rocket leaves


Garnish

1/2 red chilli (finely diced)

1 big handful cashews (toasted is nice)


Slow-roasting tomatoes at Trigonos (you can see the scale goes up a little!)

Slow-roasting tomatoes at Trigonos (you can see the scale goes up a little!)

Do It

The slow roast tomatoes can be done well in advance.  Start the tomatoes off a couple of hours before you want to eat.  They take a while to dry well, intensifying the flavours.

Preheat the oven to 160°C / 320°F.  Place them skin-side down on a lightly oiled baking tray.  Drizzle with olive oil and season with salt and black pepper.  Place in the oven for at least an hour, checking after 45 minutes.  Now press them gently with a fork or spatula to release some of the juices.  Turn them over and pop back in the oven for 20 minutes more.  Turn the oven off and leave the tomatoes in there until needed.

When your tomatoes are approaching deliciousness, blitz together the avocado, kale, basil, garlic and lime juice in a food processor.  Season with salt, pepper and nutritional yeast flakes if you have some.  Add a splash of water, until a thick, smooth sauce consistency is formed, roughly 50ml will do it.

Cook your pasta in a large sauce pan, remembering to add salt to the boiling water.  Three minutes before the pasta is ready, add the broccoli to the pan.  This will result in nice crisp florets.  Drain when the volanti is al dente and pop back into the warm pan.  Pour over the pistou and combine gently.  Stir in the tomatoes and rocket.

Serve

Serve immediately topped with a scattering of cashews and chilli, a drizzle of good olive oil for added richness and a nice green side salad with a racy dressing.

Dischi Volanti with Avocado and Kale Pistou, Broccoli and Slow-Roast Tomatoes

Dischi Volanti with Avocado and Kale Pistou, Broccoli and Slow-Roast Tomatoes

Foodie Fact

(I think we pretty much covered it above today.)

Snowdon yesterday looking stunning in the September sun

Snowdon yesterday looking stunning in the September sun

Categories: Healthy Eating, Nutrition, photography, Recipes, Superfoods, Vegan | Tags: , , , , , , | Leave a comment

‘Eating for the Earth’ – An article written for the Barefoot Vegan Magazine

barefoot vegan sept_oct issue lee 1I am now a regular contributor to the Barefoot Vegan Magazine, something I am very proud of.  It’s a beautiful online mag, packed with interesting and enlightening articles.  It is a real wealth of insight into the modern vegan lifestyle and I would urge you all to have a look, whether a full-power plant-based shiner or a curious veggie dabbler, there is something for all.  You can subscribe for free here.

You know that we love nature in the BHK and I see that the state of our environment is a major issue of concern for most people.  In ‘Eating for the Earth’ I explore the environmental impacts of Animal Agriculture, the worst polluting industry on the planet (well above the entire transport industry).  Going vegan is the number one way to positively effect our environment.  Just one meal makes a difference.  Our forks are our greatest weapons in combating our negative environmental impacts and what we choose to eat has never been so important.

“Making ethical choices in what we buy, do, and watch. In a consumer-driven society our individual choices, used collectively for the good of animals and nature, can change the world faster than laws.” Mark Bekoff 

There is more, Jane has also written an article for this edition of the Barefoot Vegan.  How cool is that!  Both of us in one shining mag!!!  Jane writes about her work within the Red Tent movement and how it supports women globally.  An empowering article for all women.  Jane started the local Red Tent in North Wales, which has been going for two years and which regularly transforms the Beach House living room into a sea of red fabric and smiling faces.

I hope you get the chance to read the articles and we always love feedback and a chat in general.  You’ll find regular BHK updates on twitter and facebook.  For more information about veganism or going vegan, two amazing resources are The Vegan Society and Veganuary.

If you are in the UK, Jane and I are attending loads of food festivals and doing book signings all over the place.  I’ll be at the Penarth Book Festival doing a talk about compassionate eating and Peace & Parsnips with Anthony Slaughter, Deputy Leader of the Wales Green Party.  We’ll also be down at Vegfest in London on 11th October where Peace & Parsnips has been voted in the ‘Best Vegan Cookbook’ Category.  You can vote here for our book, plus loads of other amazing vegan cookbooks, products, nibbles and restaurants.

Viva Veggies!!!!!  Surely the tastiest way of saving the world!

3214102


Categories: Peace and Parsnips, Press, Vegan | Tags: , , , , , , , , , , | Leave a comment

Griddled Ruby Grapefruit and Beetroot Salad with Toasted Cobnuts and Aronia Berry Dressing


Chargrilled Ruby Grapefruit, Beetroot, and Cobnut Salad with Aronia Berry Dressing

Chargrilled Ruby Grapefruit, Beetroot, and Cobnut Salad with Aronia Berry Dressing

We’ve had a real foodie time of it recently and this salad reflects that.  Not only have I picked up some amazing produce at Ludlow and Beaumaris Food Festivals, but I have also been inspired by the chefs I’ve met.  This is a salad that is caught between summer and autumn, quite apt in September.  It’s also caught somewhere between a restaurant table and home kitchen.  Do not fear, all of the these ingredients are easily interchangeable and there is only a few, quick, prep steps.

This dish is a looker and is something you could serve at dinner party and it would go down a treat.  Its full of bold flavours and the Aronia berry vinegar really lights things up.  Like all salads, its a perfect way of expressing gorgeous produce.  We have made these portions main course size, but you could easily scale things down and serve as a starter.

Some of the special bits; cobnuts (from Ludlow), organic beetroots from Tyddyn Teg and Aronia Berry Vinegar

Some of the special bits; cobnuts (from Ludlow), organic beetroots from Tyddyn Teg Farm and Aronia Berry Vinegar

I think this is the best way to cook beetroots.  Although my mind does change often. I also love charring citrus.  Aine Carlin reminded me how cool charring citrus can be with this simple and delicious dessert recipe ‘Cashew Cream and Griddled Oranges’.  Check it out on youtube.  Aine’s new cookbook is out soon, which is very exciting news.

WHAT’S A COBNUT THEN?

Basically its a hazelnut.  This is the perfect time of year to pick them up and when they are fresh and young, they are plump and have a light, creamy taste and a texture similar to coconut.  They are lighter than a hazelnut when roasted and something that is well worth a try.  Cobnuts were only introduced to the UK in the 19 th century and they are famously from Kent.  In this salad they bring crunch and richness.   Use them as you would use a hazelnut.

Cobnuts -de-shelled and soaked

Cobnuts -de-shelled and soaked

ARONIA BERRIES

We met a lovely group of people at Beaumaris, Beri Da, who are growing Aronia berries in the next valley from us.  Incredible to think that these things are happening so close and you miss them!  We have tried a lot of food and nibbles over this weekend, but some really stand out.  Beri Da is certainly one of them.  Everything they produce is delicious and something a little different.

Beri Da is a small family ran business and you can read more about their story here.  Aronia berries are like blueberries but more intense and packed with even more antioxidants and good stuff.  They are native to North America but are increasingly being grown in the UK.  They are thriving near Mount Snowdon and the guys have just planted even more bushes at the base of the mountain.  A very scenic place for superfoods to grow!

The Aronia vinegar we bought is very intense, fruity and fragrant. A little goes a long way.  We also have some chutney made with beetroot which is just too good to eat right now.  We need to hide it away and dream about it for a while.  Its fair to say that Aronia berries are going down well in the BHK.  We are hoping to pop over and help with the next harvest, I’m not sure how many berries are going to make the basket!

These beetroots were so good looking, I love that crazy, deep purple.

These beetroots were so good looking, I love that crazy, deep purple.

I’m going to write more about the brilliant producers we met over the weekend in our next post.  I’ll also let you know how our first cooking demo’s and book signings went at food festivals.  We started at one of the biggest and surely one of the best, Ludlow.  It was a blast!

VEGFEST 2015

If you haven’t voted in Vegfest 2015’s massive vegan poll, tututututututututttttt!  There are loads of vegan products, authors, suppliers etc to be voted for.  You’ll find ‘Peace & Parsnips’ in the ‘Best Vegan Cookbook’ catergory along with a host of other excellent plant based cookbooks.  The Vegfest is like the vegan Oscar’s and we’ll be down there doing a cooking demo.  Is going to be HUGE!  Exciting stuff.

Lets get cooking……

Recipe Notes:

When frying the beetroots you can use any fruit vinegar, blueberry, raspberry, blackberry etc but all will be different.  Some sweeter, some more potent.  You just need to taste and adjust accordingly.  For frying the beetroots you can also use balsamic vinegar and save your precious fruit vinegar for the dressing.

If you chargrill the grapefruit for too long, they will begin to fall apart.  Keep it to roughly a minute each side, we’re just looking for a few nice griddle marks to add a smokiness to the citrus flavours.  Its well worth the little extra hassle.

I have added avocado for a little bit of richness, but you could easily use cashew cheese or even well drained and marinated tofu.

Our Aronia berry vinegar is very potent, you may need to add more fruit vinegar to balance the dressing nicely.  It should be quite tart with good acidity and a nice twist of sweetness.

The rapeseed oil we use here is good quality, single press, made like olive oil-type stuff.  The flavour is sensational and we are loving Blodyn Aur or Bennett and Dunn.  Both excellent and part of a new wave of quality rapeseed oil producers in the UK.

This recipe makes just enough dressing.  Double the quantity if you’d like extra to be served on the table.

Nicely caramelised beetroots in Aronia berry vinegar - the smell was sensational!

Nicely caramelised beetroots in Aronia berry vinegar – the smell was sensational!

The Bits – For 4
6 medium beetroots (scrubbed and trimmed)
1 small cucumber (peeled and cut in 1/2 moons)
1 ruby grapefruit (peeled and cut into 1cm slices across)
2 handfuls de-shelled cobnuts or hazelnuts (toasted)
8 big handfuls beetroot leaves or spinach/ chard leaves (finely sliced, chop the stems too and keep separate for garnish)
1 avocado (peeled and cut into small chunks)
2 radish (thinly sliced)
2 big handful basil leaves
1 tbs rapeseed oil
2 teas aronia berry vinegar or other fruit vinegar (balsamic will do)

Aronia Berry Dressing
2 teas aronia vinegar (or other fruit vinegar)
3 tbs rapeseed oil
1/2 lemon juice
Pinch salt

Do It
In a saucepan, cover the beetroots with water and add 1/2 teas salt, bring to a boil and lower to a simmer. Pop lid on and cook for 45 minutes. Remove the beetroots with a slotted spoon, keep the cooking broth to drink or use as a colourful stock. Pop the beets back in the pan and pop the lid back on.

Make the dressing by whisking everything together (with a fork if you like) in a small bowl.

Grab a griddle pan and very lightly oil, place on a high heat. When hot pop the grapefruit slices on. Leave to cook for a minute, they don’t take long. Flip them over using a thin spatula and cook for a minute on the other side. Now do the same with your cucumber slices. One minute each side. Set aside.

Peel the skin off the beetroots (you may like to wear clean marigolds or other plastic gloves for this job). Using a teaspoon helps to bring the skin away from the beet. Cut the beetroots in half lengthways and then each half into four even pieces. Warm the oil in a frying pan and fry the beetroots for 10 minutes, turning them regularly. You should get some nice colour on them. Add the vinegar and toss the beetroots to cover with vinegar, this will help them caramelise nicely.  Cook for 2 minutes and they’re ready to go.

On large plates, scatter the leaves and top with grapefruit, cucumber, cobnuts, beetroots, avocado, sprinkle over the sliced beetroot roots, radish and basil, drizzle liberally with dressing.

Chargrilled Ruby Grapefruit, Beetroot and Cobnut Salad with Aronia Berry Dressing

Chargrilled Ruby Grapefruit, Beetroot and Cobnut Salad with Aronia Berry Dressing

Serve
Best served when the beetroots are still warm. We had ours with some steamed whole grains (millet, green lentils and buckwheat) tossed in a little lemon juice and rapeseed oil.

Foodie Fact

Nuts are good for you.  Very good for you.  Little nutritional powerhouses they are.  Cobnut kernels contain 17% protein by dry weight, and about 15% fibre.  Cobnuts are rich in vitamin E and calcium. They also contain vitamin B1 and B6.  Not bad!

Our foodie weekend salad with all the trimmings

Our foodie weekend salad with all the trimmings

Categories: Autumn, Healthy Eating, Local food, Lunch, Recipes, Salads, Vegan | Tags: , , , , , | Leave a comment

Nutty Apricot and Sesame Energy Balls plus the benefits of soaking nuts and seeds

Nutty Apricot and Sesame Energy Balls

Nutty Apricot and Sesame Energy Balls

I love these little energetic things. The perfect way of cramming loads of nutrition and energy into the smallest possible area. These little balls are packed with protein power and full-on flavour and are highly portable! They went down a treat yesterday, I had to share them with you.

Nuts and dried fruits are nutritional power houses and contain vast amounts of good stuff; sugars and fats. The last two should of course be enjoyed in moderation and these little balls are perfectly portion controlled. Unless you make them the size of a cricket ball ( I prefer more of a squash ball size and smaller) then you’ll be getting the optimum levels of everything you need from a revitalising, healthy between meal booster.

PLAY BALL!
I have kept these very simple and natural. No added flavours, just the nuts, seeds and fruit. I like to use seeds primarily because they taste amazing, but they are also less expensive and work just as well as nuts. I used a good mixture of nuts, but you can mix and match with whatever you have handy. Nuts like walnuts, cashews and almonds blend smooth, it is more tough to get a Brazil nut to play ball! This is great when mixed with other nuts, adds a crunchy texture. The same can be said for sunflower seeds, once soaked they blend up nicely, unlike pumpkin seeds which take a little more blitzing action. If you have a high powered blender, non of this really applies, as they will take care of anything you put into them. They’d quite happily blend a bean tin I’m sure (this is an untested theory).

BENEFITS OF SOAKING YOUR NUTS
I mention nut soaking quite a lot in Peace & Parsnips, I think its important to know about and can really accentuate the flavour, texture and nutritional properties of nuts and seeds. It takes a little forward planning but is very much worth it. Nutrients are tucked away in our food and in some occasions, are missed by our bodies. They are not available to the body, so we miss out on all the goodness. This is known as the ‘bio-availability’ of nutrients and soaking nuts in water before using them opens up the nutrients to be absorbed by the body. They have known this for thousands of years in India and soaked almonds are promoted within the Ayurvedic diet for a number of health boosting reasons.

Soaking nuts in water, preferably overnight, inhibits the potentially harmful effects of enzymes inhibitors, tannins and toxins in nuts.  Nature doesn’t want seeds and nuts to germinate until the right conditions are present, by soaking nuts and seeds we are creating these conditions.  They literally come to life!  Enzymes are essential to good health, just as important as minerals and vitamins.  Soaking releases more beneficial enzymes that our bodies love.  Most nuts also taste better after they have been soaked, they plump up nicely and become crisp.  We normally soak to order, but you can soak in bulk.  This just means that your nuts need to be dried out a little.  You can do this in a dehydrator or in a low oven.  The nuts can then be stored in a air tight container and used on cereals and salads.

TOP FIVE REASONS TO SOAK NUTS, SEEDS (AND LEGUMES)

1 – Increase the amount of vitamins, especially B vitamins

2 – Produce greater levels of beneficial enzymes

3 – To make digestion easier

4 – Allows easier absorption of protein

5 – To limit enzyme inhibitors, tannins and potentially harmful toxins

We soak nuts in warm water and some people add a little salt.  Cover the nuts and leave them overnight, between 7 – 24 hours is best.  That’s it!

REASONS TO LOVE TAHINI (AND SESAME SEEDS)

Tahini is a paste made from ground sesame seeds and is one of our favourite ingredients.  A wonderful source of vegan creaminess that creeps into dressings, sauces, stews/ curry’s or mixed with jam/ molasses/ maple syrup and lathered on toast and crackers.  Tahini normally comes in light and dark varieties, dark has a much more toasted, full flavour.  Its not only the delicious aspects of tahini that are attractive, nutritionally its a proper superstar, its is actually one of the best sources of calcium found in nature and also keeps your skin vibrant and muscles toned.  It contains 20% protein which is higher than most nuts and is high in very good fats of the unsaturated variety.   See our Foodie Fact below for more nutritional bits and pieces.

Feel free to sweeten them as you see fit (taste the mix before rolling up) but I think they are mighty fine with just the apricots.  Good dried apricots will not be bright orange.  Try and get some un-sulphured apricots, they are out there and well worth the effort and slightly higher expense.  Hunza apricots especially (from Afghanistan) are really interesting.  If you are living in an area where loads of apricots grow, you could dry your own and even use the kernels instead of nuts or seeds.  Apricot kernels are delicious and becoming quite popular in the UK.

We love to play around with combinations of nuts, seeds and flavourings. The possibilities are huge and its much more satisfying and cheaper to make these at home. The main thing is having a dried fruit to bind everything together, normally soaked so that they break down nicely into a sticky paste. Then add nuts and seeds to the equation, any type that takes your fancy and flavour with things like citrus zest, cocoa/ cacao, rose water, orange blossom water, vanilla extract, pomegranate molasses, spices……etc.  Energy balls are a medium for a healthy snack charged with all the nutrition we need when leading an active and healthy life.

Nice sticky mix

Nice sticky mix

The Bits – For 12-15 energy balls

300g mixed nuts and seeds (soaked in water for at least 7 hours beforehand.  I used cashew, walnuts, brazils and sunflower seeds)

150g dried apricots (soaked in water for at least 1 hour before hand)

4 tbs toasted sesame seeds

2-3 tbs light tahini

2-4 tbs sweetener (maple syrup, brown rice syrup etc)

Do It

Drain your nuts and place in your blender/ food processor.  Blend them for a minute of so, scraping down the sides of the blender a few times.  Add the drained apricots and continue to blend until a chunky paste is formed.  You can keep the apricot soaking water, its lovely and sweet.  The mix should be sticky, you will be able to form small balls with  it between our fingers.  Stir in the tahini and sweetener (if using).

Pour the sesame seeds onto a plate and spread out.  With damp hands (stops the balls sticking to your fingers) take a roughly squash ball sized amount of mix (3-4 tbsp) and roll in your palms into a ball.  Pop it onto the plate and roll in the sesame seeds.  Apply a little pressure when doing this to make them stick.  Place the finished ball onto a serving plate.  Repeat until all the mix is used up.

These energy balls will firm up in the fridge and keep well in a plastic container out of the fridge.   Of course, they will not be lasting that long…..!

Serve

These type of energy balls are designed to be portable and travel perfectly.  They are especially good sustenance when exercising, down the gym or hiking.  They are a boost anytime and sometimes I like to nibble one before a busy day in the kitchen.  Intensely nutritious and easy to roll.

Chocolate and Coconut Energy Balls

Chocolate and Coconut Energy Balls – a simple variation with walnuts, sunflower seeds, cacao, coconut and vanilla extract

Foodie Fact

Tahini is a great friend of the BHK.  Very high in many vitamin B’s and vitamin E.  It also contains lot of minerals like iron and potassium and contains chemicals that help our liver detox.  Tahini is alkaline which makes it easy to digest and helps with weight loss.  As mentioned above it is very high in protein and even higher in calcium.  Try a scoop of tahini in the morning instead of dairy products and you are covering yourself for calcium and a healthy raft of other things.

—————–

Have you met Cosmos yet? He’s our new garden cat.  You may remember our dear Buster who has moved on…….where to we are not sure>  Cosmos is a character and it’s good to have him hanging out, lying down and occasionally purring.  Cats are great teachers in so many ways.

Cosmos - The new cat on the scene

Cosmos – The new cat on the scene

Categories: Desserts, gluten-free, Healthy Eating, Nutrition, Recipes, Vegan | Tags: , , , , , , , | 7 Comments

Charred Cauliflower Steaks with Coconut & Kale Puree

Charred Cauliflower Steaks with Coconut and Kale Puree

Charred Cauliflower Steaks with Coconut and Kale Puree

This really is vegan food for everyone!  Charred cauliflower is something that appeals to all and not something you’d expect from the humble cauli.  It’s actually a superstar veg and has been hopelessly cooked over the years, giving it a bad rep.  Don’t boil it to death, breath life into it by bringing out its intense flavours and creaminess.  Of course, this being the BHK, we have to talk a little about its shining health properties.  Its REALLY good for you (see ‘Foodie Fact’ below).

Here’s a dish that looks great, tastes mighty fine and takes very little preparation. This is the easy kind of recipe that anyone can whip up at home and make it look like a restaurant style dish. I love it when that happens! This is also a very BBQ friendly way of cooking cauliflower.  These steaks will grace any BBQ and make a tasty burger filling (or two).  Charring the cauliflower ‘steaks’ (what else could we call them?!) and poaching the rest of the cauli in coconut milk highlights two of the amazing flavours hidden in a humble cauliflower.  In this dish, you get the best of both worlds.  Great texture and superbly creamy when poached and blended (something to do with the natural pectins).

Vegans can easily cook this for self-confessed carnivores (aka people who cannot live without meat….until they try these!!!) and want to make their way into the world of plant-based food.  There is a huge shift towards plant-based foods happening and there are an infinite number of ways of making plants incredible; vegans are now making meringues and macaroons out of chickpea/ bean juice, the other night I made something like a parmesan cheese out of gram flour (its a long story……more to come in that department).  Endless is the plant kingdoms culinary surprises and I feel we are only beginning to harness the tastiness of plants.  Watch this space.  Vegans are pulling out all the creative stops!

BLEEDING BURGERS!?

Somebody has recently made a vegan burger than bleeds.  I have very contrasting feelings about that.  One, a little unsettled.  Two, amazing for our health, animals and the planet.  Looking at it like that, the little weirdness is something I can get over.  The more plants we pack into our diets, the better for all!

Its a stormy day up here on the hill, but we’ve had a few nice days of sunshine which always makes me very happy for our little veg patches.  I also get to dig my shorts out.  Our cauliflowers are nothing to write home about this year, slugs seem to find them irresistible and our slug issues are many and overwhelming sometimes.  You know we’ve only watered the garden once this year.  Once!  This is surely some kind of record.  Wales will not be running low on water anytime soon.  Its a blessing (in a way).  But maybe it could bless us more in autumn, than in the heart of summer.  We’ve been harvesting blackberries (strangely early), raspberries, rocket and kale.  We’ve also got a good looking crop of potatoes, beetroots, parsnips and we may even get a few peas if the wind stays down.

BEACH LOVIN’

When the sun comes out, we’re on the beach.  Our local beach Dinas Dinlle (where a lot of the pictures in Peace & Parsnips were taken) is one of my all-time favourites.  Backed by the Snowdonia hills and mountain rangers, it stretches for many miles, all the way from Caernarfon down to Trefor near the Llyn Peninsula.  There is a large Bronze age fort halfway along the beach and at one end you have a bird anctuary and the other, a dramatic mountain range, the Rivals.  I run along the beach quite often and when the tide is out, feel like the only person alive. No footprints to be seen, just me and the smooth sand stretching off into the distance, the sea birds, the occasional wave.  Even though the weather is….changeable, the sea is still warm and the water seriously rejuvenating.  A swim in the Irish Sea is not easily forgotten!  There is something very special about our local beach, overlooking Lovers Peninsula on Anglesey and the Menai Straits.  (Maybe I should start working for the Welsh Tourist Board?)  Anyway…..back to the kitchen….

No complaints here - North Wales is beautiful! Dinas Dinlle Beach

No complaints here – North Wales is beautiful! Dinas Dinlle Beach

The Bits – For 2
1 large cauliflower (750g)
1 white onion (finely diced)
3 teas ground cumin
2 teas turmeric
2 pinches chilli flakes
3 large stems kale (roughly 80g leaves only)
3 tbs light olive/ coconut oil
500ml coconut milk

Black pepper and sea salt

Do It

Trim your kale leaves off the woody stems.  Finely slice.  Cut cauliflower (as below) down the centre into two cross sections/ steaks, roughly 1 1/2 inches think.  Nice and chunky.  Trim the end of the stems off.  Roughly chop the rest of the cauliflower.  Sprinkle the steaks with salt and pepper.

Cut your 'steaks' from the centre of the cauliflower. Nice, neat, cross sections if poss. (they cook nicer that way)

Cut your ‘steaks’ from the centre of the cauliflower. Nice, neat, cross sections if poss. (they cook nicer that way)

Preheat oven to 180oC.

For the puree – In a large saucepan, add 1 tbs oil and warm on a medium heat, saute your onions for 2 minutes, until softened.  Now add the cauliflower and 2 teas turmeric and 2 teas cumin.  Stir well and cook for 2 minutes.  Pour in the coconut milk, bring to a boil and lower heat to a simmer.  Pop a lid on and leave to cook for 15 minutes.  Stirring occasionally.

For the steaks – While the puree is simmering.  Grab a large, heavy frying pan.  On a high heat, warm 1 tbs oil.  When hot, place your cauliflower steak (one at a time), face down, into the pan.  There should be a good sizzle now.  Press down with a spatula to get it nicely charred.  Check after 1-2 minutes of frying.  Once you get a nice char, flip over and do the same on the other side.  You may need a drizzle more oil here. don’t be shy with it, this dish needs a bit of oil to get that nice colour.

Straight out of the pan, sprinkled with spices, ready for the oven

Straight out of the pan, sprinkled with spices, ready for the oven

Now place the cauliflower steak onto a baking tray, lightly sprinkle with ground cumin, chilli flakes and a few more twists of fresh black pepper.   Repeat the process with the other piece of cauliflower.  Once both are cooked, place the tray in the oven and finish off cooking the cauliflower for 15-20 minutes.  Check that the base of the stem is softened.  You can do this by trimming off a slice of the stem and trying it.

Finish the puree, by adding the finely sliced kale leaves and stirring them in.  Pop a lid back on and simmer for a few minutes.  Then blend the puree well with a stick blender or add to a food processor and blitz, thin with a little water if needed.  Check seasoning and keep warming.

Charred Caulifower Steak - Ready for your resident/ local carnivores approval!

Charred Caulifower Steak – Ready for your resident/ local carnivores approval!

Serve

On a warm plate, ladle out some sauce into the centre, spread out evenly in a circular motion with the base of the spatula and gently place a cauliflower steak in the middle.

Foodie Fact

Cauliflowers are actually really high in Vitamin C, in fact, this dish will easily supply your daily RDA for Vitamin C in one tasty plate.  Cauli also contain a good amount of protein and high levels of fibre.  It also offers a load of the vitamin B’s and a healthy helping of omega 3 fats.    So if you’d like to keep a healthy heart, brain, give yourself a bit of a detox, cauliflower is perfect.

Catching a few rare sun rays in the herb garden aka the sun trap

Catching a few precious sun rays in the herb garden aka the sun trap

Categories: gluten-free, Healthy Eating, Nutrition, photography, Recipes, Wales | Tags: , , , , , , | 10 Comments

Blog at WordPress.com.

%d bloggers like this: