gluten-free

Smoky Beets, Red Pepper and Chipotle Soup

Just what we need in late Autumn! Soups with lots of colours and big flavours.

Get a little spicy, plus a little smoky this autumn!  This is a radiant soup filled with delicious flavours and fresh, seasonal produce.  Lots of beetroot and red peppers, this is exactly what I want to be eating right now.  It’s adding a vibrant slice of Mexico to your autumn and all you’ll need are staples most of us have in our cupboards and some chioptle chillies/ chilli paste.  More of that a little later…..

I wanted a soup that was hearty and sustaining, so we have lentils, colourful and healthy, so we have red peppers and beetroots, a little creamy, creme fraiche, a little crunchy, pepitas (or pumpkin seeds as we call them), finished with a sprinkle of fresh coriander and you’ve got a very tasty bowl indeed.  I’d happily eat soups like this all day, every day, until next May, when things thaw out.

Getting Frosty

We’ve been getting frosty over here in Snowdonia, the first glimpse of snow and ice on the mountain tops, washing freezing on the line, that beautiful early morning frost that makes all the plants look like their draped in jewels.  I love this time of year.  Lots of sunshine still, so soup in the garden is also doable.  I’m thinking winter BBQ’s are on this year!  Why not?  The first frosts always says to me, “Parsnips!”  They’re always bettter after the first frost, as well as sloes.

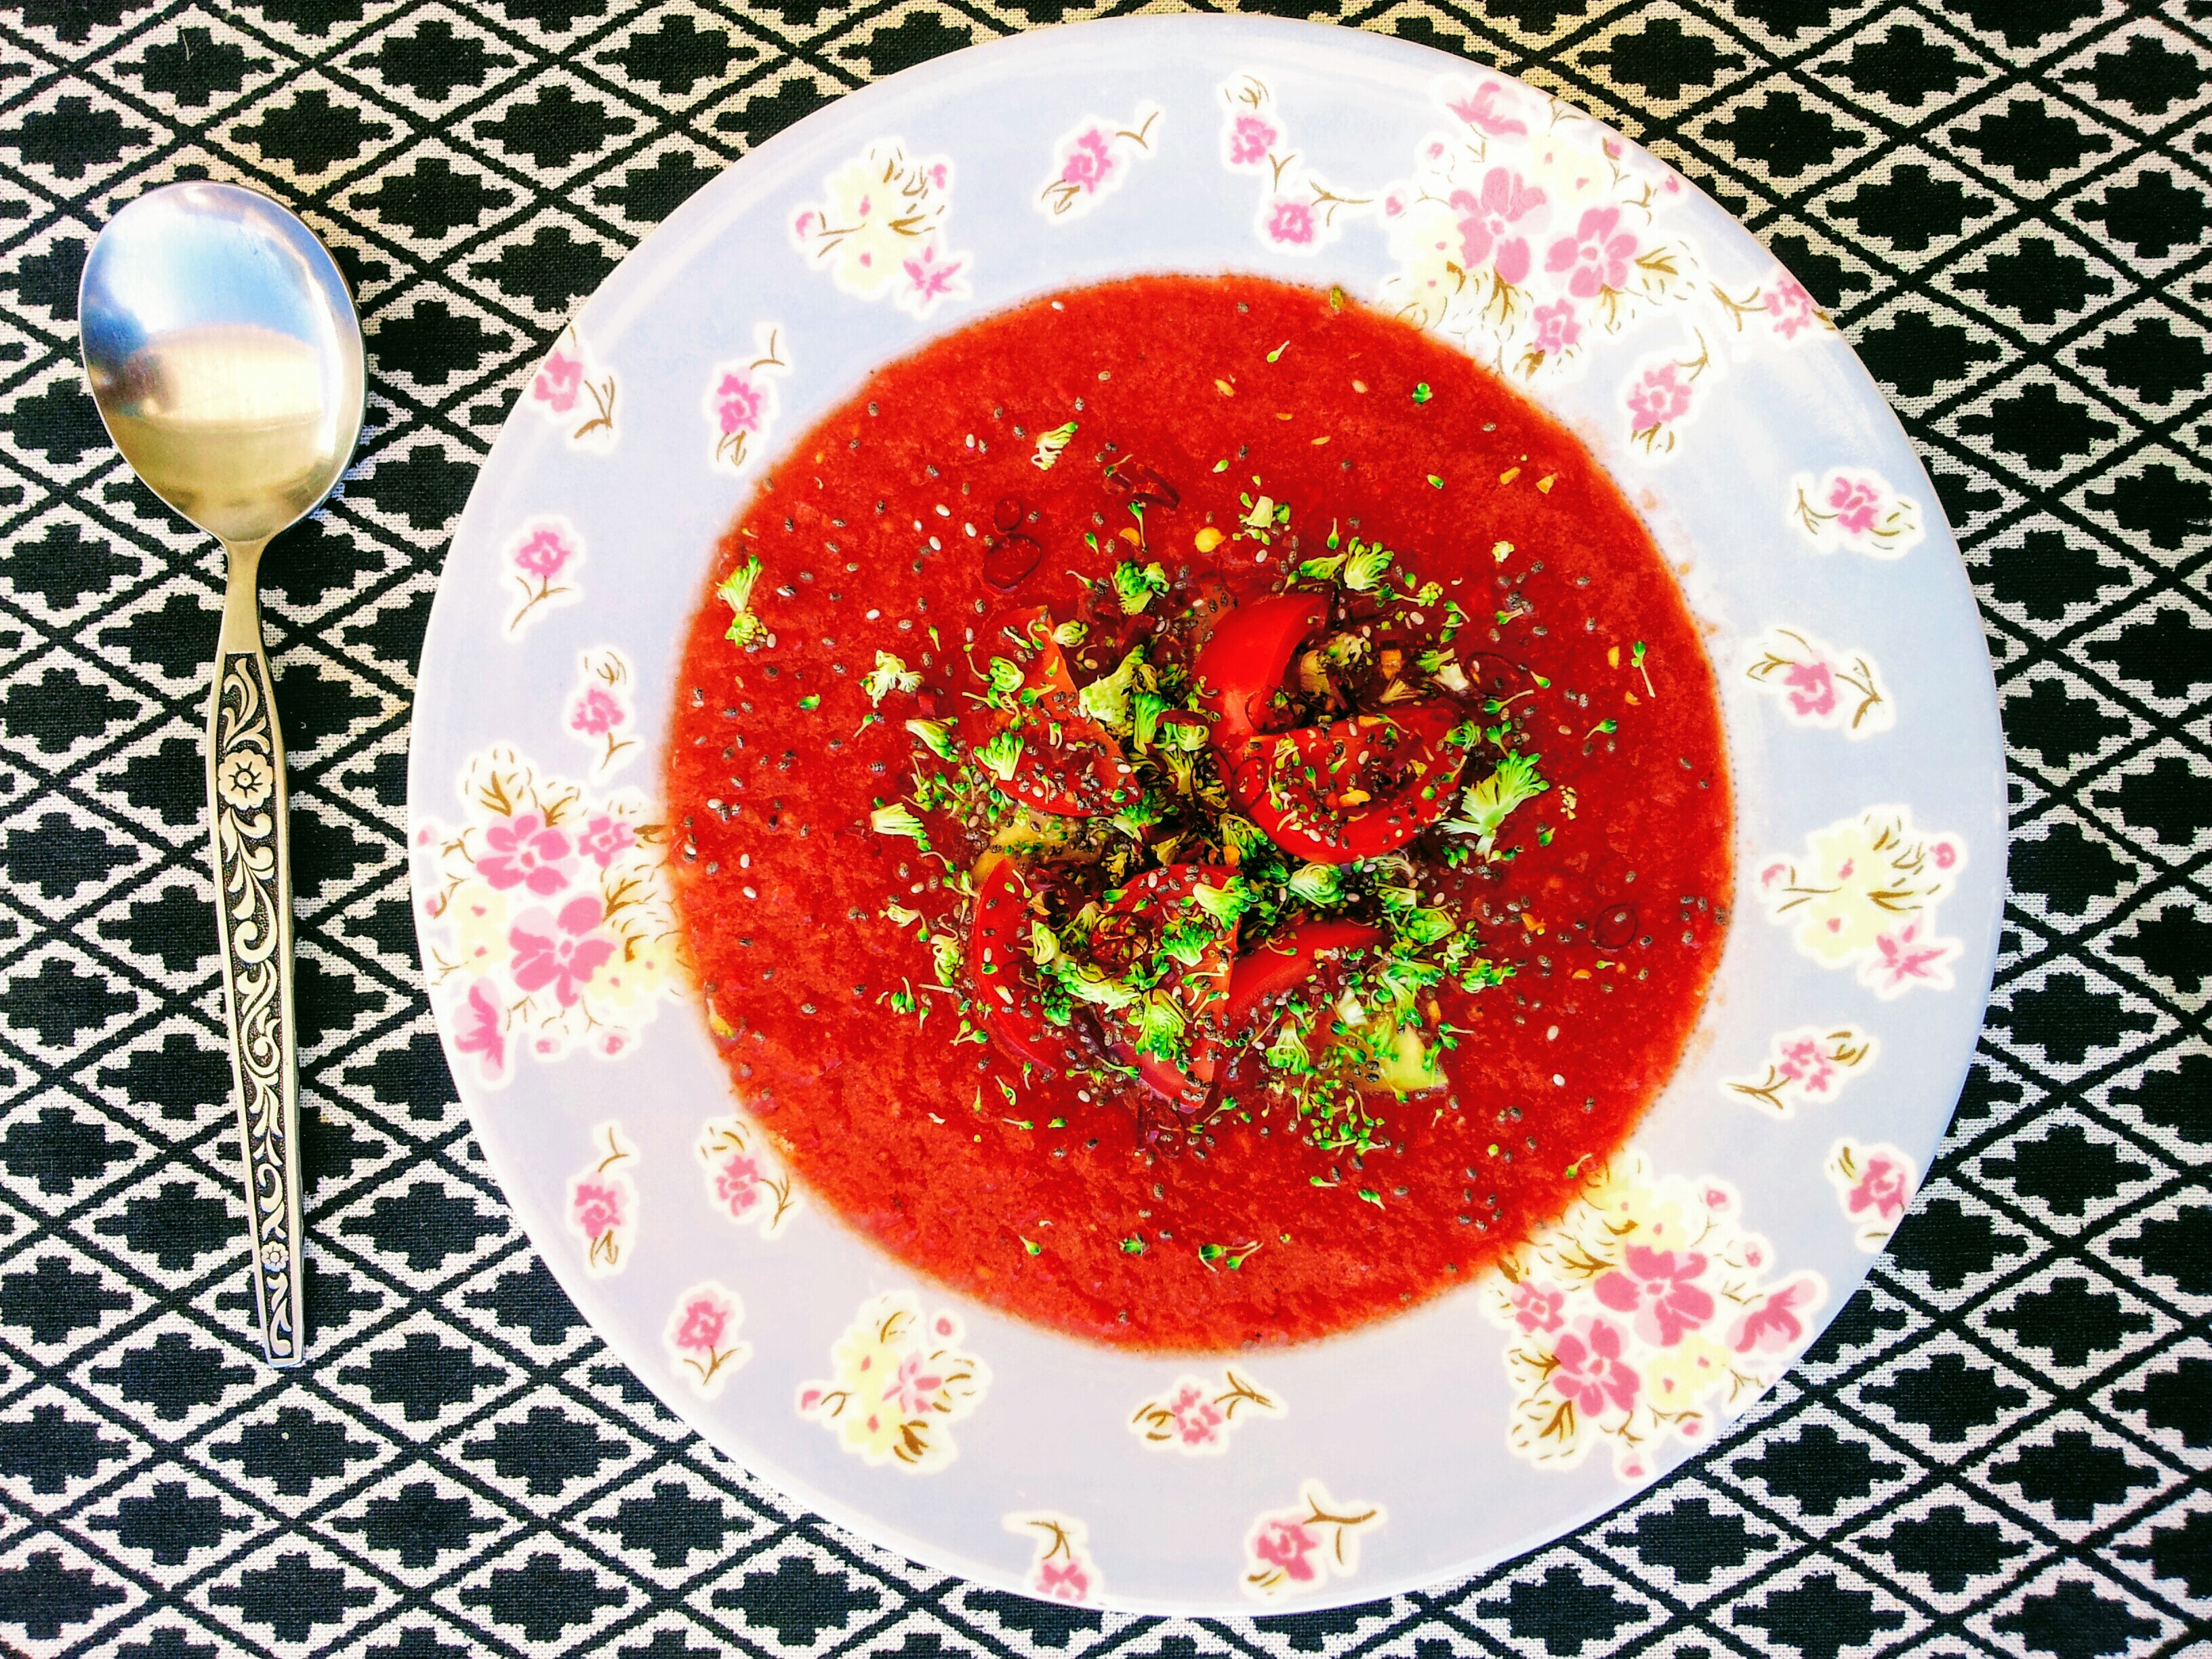
Smoky Beets, Red Pepper and Chipotle Soup (vegan, gluten-free)

Viva Mexico!

I’m lucky to have travelled Mexico extensively, I drove around it for a while with some friends, from the border with Texas right down to Guatemala.  It took about 6 months.  I was in my 20’s and, as you can probably imagine, I had a good time!  There is so much joy for living and eating in Mexico!!

I had no idea how good Mexican food was until my first few days wandering around Mexico City.  I’d been working in fine dining style restaurants and was really into that way of doing things, but my first few tacos in Mexico blew my mind.  I was hooked and a new way of approaching food dropped into my world.  Sensational food didn’t need white table clothes and weighty price tags, it could be fast and furious on a street corner, or served in the back of taxi mid-traffic jam.  Good food is everywhere in Mexico, it is hard to escape, and let’s face it, why would you want to escape it anyway!

I ate some INCREDIBLE soups in Mexico.  If a soup can be life changing (if your soup was changed by your life, or vica versa, please let us know, we’d like to hear that story!) I had many in Mexcio.  Things I’d never imangine, avocado is soups, soft cheeses in soups, garlic, nachos, smokiness, it really blew me away.  Mexcian food is so rich and diverse, lots and lots of new dishes to explore.

Having said all of that, this soup is not a traditional Mexican recipe at all, but Chipotle chillies make anything taste Mexican to me.  They were one of the many new flavours I discovered on my trip.  The cumin in many Mexican dishes originally came from Spanish immigrants, who picked it up from North Africa via the Moors.  I’m fascinated by the way that our food tells us a lot about our history, how our cultures developed over time.  It is Day of the Dead tomorrow, this soup would be a perfect addition to the feast!

Chipotle!

Chipotles are dried and smoked chillies, one of many varieities.  I remember buying smoked chillies in markets, so many types, big and small, different colours and shades, all with distinct flavours.  It was steep learning curve.

Chipotles start off as red jalapenos and are smoked and dried for days, coming out looking a little like the chilli version of a raisin.  You can buy them in many ways, powder, flakes, dried whole, in cans or in a potent paste, as we use here.  Chipotle’s are used in all kinds of marinades and stews, they give a subtle earthy, smokiness to dishes with a little kick of chilli.  Adding one chipotle to a stew or soup can really mix things up.  In the UK, they are normally found in paste-form, in little jars, that keep well in the fridge.  I like to mix it into mayonnaise, dressings and generally use it as often as possible.  I love the flavour.  It’s very unique.

I am off to Spain soon, where they do some nice things with smoked chillies, but honestly, no one smokes chillies like Mexicans.  Spanish chillies are very mild, they hardly tickle, Mexican chillies however, they can melt things, or just add a lovely spiciness to dishes.

We’re lucky to have loads of organic beetroot at the minute coming from the veg farm

Get Your Beet On!

So get your beet on, gather some lovely veggies and have fun with this soup.  Beetroots are the most outrageous roots and I think we underuse them in the UK.  The colours, flavours and awesome nutrition (see below) they bring to our table are always very welcome.

Please let us know if you like the recipe, enjoy Mexican food, or anything else really in the comments below.  If you try out the soup, why not share your kitchen creation with us all over on Facebook, our cooking group is here.  

Enjoy this beautiful time of year (in Australia it’s spring right!?!)

More soups and hearty, healthy, delicious vegan recipes for everyone coming soon…..


Here’s some Mexican inspired dishes we’ve cooked in the paste, from Loaded Nachos to a Cashew and Kale Mole, Pickle your own Jalapenos and Dark Chocolate and Chilli Bronwies.


—————–

Recipe Notes

If you love your smokiness, add a little more chipotle, or add smoked paprika (same time as the cinnamon) for a smoky, but less spicy soup.

No red peppers, any pepper will work fine.

Same goes for the pumpkin seeds, any toasted seed or nut would be nice here, but pumpkin seeds (pepitas) are used quite a lot in Mexican cooking.

If you’re getting beetroots with their leaves on (congratulations!), you can cut them off, wash them and stir them in at the end of cooking, just before serving.  You may also like to do this with spinach, kale or any other greens.  Adding greens to dishes can never be a bad thing.

Beetroot, Red Pepper and Chipotle Soup

The Bits – For 4-6 bowls

550g beets, roughly 3 medium beetroots (diced)

1 red pepper (diced)

1 medium onion (diced)

200g red lentils (rinsed and drained)

2 teas cumin seeds

1 1/2 teas oregano

1/2 teas cinnamon

3 tbs tomato puree

1 ltr light vegetable stock/ hot water

3-5 teas chipotle puree


Topping

Toasted pumpkin seeds

Vegan yoghurt/ creme fraiche (g.f.)

Freshly Chopped Coriander

Sliced chillies


Do It 

In a large saucepan, add 1/2 tbs cooking oil and warm on medium high heat.  Add the cumin seeds, stir and fry for a minute, then all the onions, peppers and 1 teas sea salt.  Fry until soft and slightly caramelised, 5 minutes will do.

Add the lentils, beetroots, oregano, ground cinnamon and tomato puree.   Then pour over the vegetable stock and bring to a boil, lower to a simmer and leave to cook for 35 minutes, stirring occasionally.

Allow to cool slightly and blend using a stick blender or pour into a blender and blitz until smooth.  Taste and season with salt and pepper, adding more chipotle if you like.

Top with toasted pumpkin seeds, creme fraiche/ single vegan cream, chillies and coriander.


Foodie Fact 

Beetroot is a stunning root in more ways than one.  Besides the amazing flavours and colours, we’re talking about a contender for the healthiest veg ever!  It’s well up there.

Packed with anti-oxidants, plenty of fibre, it is very good for our digestion, and also contains plenty of minerals.  Beetroot juice is now drank by many atheletes to improve performance.  We love beetroots mixed into juices or smooties with things like apples and carrots.  What an amazing way to start the day!

Categories: Autumn, gluten-free, healthy, Healthy Eating, Nutrition, photography, plant-based, Recipes, Soups, Travel, Vegan, veganism | Tags: , | Leave a comment

Italian Herb and Sun Dried Tomato Dumplings


Thanks for your patience everyone, I’ve finally got around to posting this recipe.  It’s been a long time coming, but I’ve had a few things on my plate. As they say.

These dumplings are perfect with pasta and a rich tomato sauce, but also ideal served in a wrap, as a canape/ starter.

This is a simple and versatile recipe that has recently become a staple in the BHK.  I have noticed that non-vegan really dig these, they taste like dumplings but are made with chickpeas and oats.  Easily made gluten-free and can be pan fried or baked.  That to me is the hallmark of a staple recipe, something that is not too fussy, that can be whipped up in a short window of time and most importantly, are very delicious.

Italian Herb and Sun Dried Tomato Dumplings – Just add pasta

MIX IT UP

The base of chickpeas and oats can be played around with, you can take the flavours wherever you’d like to lead them; add spices for Indian dumplings, served with a spicy curry sauce; add za’atar and make things more Lebanese, serve in a wrap with tahini; add some chilli, ginger and coriander, serve with noodles and Chinese sauce (sweet and sour, black bean, hoisin…..)  So, so many ways to make your dumplings shine!!

The autumnal beach – spectacular Snowdonia!

Jane and I are heading over to Spain very soon, can’t wait!  In one way, it’s a shame to leave Snowdonia right now, so much sunshine and last night the mountains got their first little cap of snow and frost.  Icy winds, sunny days, I love that about these wintery times.  In this climate, I flip into soup mode.  Just made a huge pan of veggie broth, old school, like my Nana’s did it.  Plus some quinoa bread, not quite the same as Nana-made bread, but I reckon they would have liked it, with plenty of strawberry jam.

These dumplings have been discussed quite a bit over on our vegan cooking group on Facebook.  I’ve been meaning to post this and a huge stack of recent recipes, but life has been nice and full recently.  Lots of cooking, lots of cool new projects, lots of time hanging out in the mountains.  It’s been a stunning autumn.

Thanks to all who have sent messages of support recently, some which say things like “Where’s your new book dude?”  It’s coming!

These bookie type things can take a while, but fingers crossed, I’ll have some more news soon.  If you haven’t heard, here’s my last cookbook, Peace & Parsnips.

Any ideas about what you like in a cookbook?  Do let me know in the comments below.  I love to hear your feedback.  Really, I write recipes partly for me, but another big part is for you.  The readers of the BHK, I wonder a lot about what you’ll like and always listen to your comments.

Other news.  We sent out our autumn newsletter recently, if you missed it, just sign up here, it takes a few minutes.  We’ve got some cool interviews (are you interested in fermentation, we interview the Queen of Fermentation!  Janice Clyne), plus recipes, pictures, news, loads of nice things.  Sign up, we’ll send it across.


Recipe Notes

You can see that I like these dumplings with a little colour, from a hot pan.  You can cook them on a lower heat if you like, for a longer time.

If you are cooking your own chickpeas, not using tinned, make sure they’re not overcooked or mushy.  This will lead to a wet mix, which is not what we want.  Remember that once the mix cools, it will get thicker.


Italian Herb and Sun Dried Tomato Dumplings


The Bits – For 16 dumplings 

2 medium onions (sliced)

3 cloves garlic (chopped)

2 tins chickpeas (drained)

3 teas dried Italian herbs (a mix of dried oregano, thyme, basil, rosemary, sage)

8 pieces sun dried toms, plus any oil (finely chopped)

125g gluten-free oats

1 1/2 teas salt

A few twists of black pepper

A sprinkle of chilli flakes (or more if you like your chilli)

Cooking oil


To serve

Fresh basil leaves


Do It

In a large frying pan, add 1 tbs cooking oil, warm on medium high heat, add the onions and garlic.  Saute for 5 minutes, until soft and golden.


Add the cooked onions and the rest of the ingredients to a blender, with any oil left on the board from chopping the sun dried tomatoes.  Blend until smooth-ish. Some chunks are fine. Taste and season if you like.


With slightly wet hands, roll around 2 heaped tablespoons of mix into balls.  Place on a plate.


Warm the frying pan again, add 2 tbs oil and warm on medium high heat, add some of your dumplings to the pan, don’t overcrowd.  Roll them in the oil and get them well covered, fry them for 6-8, minutes, until golden all over and we’ll warmed through. Set aside.  Fry in batches if needed.


Alternatively, preheat a fan oven to 180oC, lightly oil the dumplings and place onto a baking tray, then into the oven.  Cook for around 15-20 minutes, until they are hot in the middle.


Serve with a rich tomato sauce, freshly torn basil leaves and pasta of your choice.  


Foodie Fact

Chickpeas are a real nutritional powerhouse.  They are filled with protein and fibre, also lots of minerals like iron, magnesium and potassium and vitamins like Vitamin C.  Chickpeas are also a good source of calcium.  Overall, the more chickpeas we can get onto our plates and forks, the better!

Categories: Autumn, gluten-free, Healthy Eating, Nutrition, photography, plant-based, Recipes, Vegan, Wales | Tags: , | 2 Comments

Apple Crumble Cookies – Gluten-free, Vegan

Apple Crumble Cookies – Gluten-free, Vegan.  Yes please!

If you’re a fan of apple crumble, you’ll love these!  The cookie version.

I wanted to combine the best things about an apple crumble into a cookie, just to change things up a bit.  That lovely crunchy crumble and the sweet tartness of the apple sauce.

These cookies are crisp on the outside and very apple-y inside, with that lovely warming cinnamon and plenty of oats.  They’re even gluten-free, but you can make them with wholemeal flour and normal oats.  I’d just like to invite as many people as possible to the good food party!

These cookies are sweet!  But balanced with the tartness of a green apple, I’ve used russet style apples from our neighbours garden, donated, not scrumped (see all our scrumping talk on our last post).  I think an apple with good acidity and a bit of bite is what we’re looking for here.

The best things about a crumble, wrapped up in a cookie!

Please don’t worry about us, we’re still eating plenty of Apple Crumbles this autumn.  Jane loves ’em too much!  But these cookies were a big hit with everyone who’s tried one, even our neighbour Meirion, a man who dearly loves a good crumble, is a fan of the cookie variety.  That’s when I knew this was a winner, they got the nod from our Meirion.

We’re just fixing our fire at the minute, autumn is giving us those signals, nice and crisp at mornings and at night.  The occasional dramatic storm.  I do love sunshine, but I admit that a roaring fire on a cold night is very tempting.  Just need to get a big pipe and stick it onto the back of the fire.  Some of you know all about my DIY skills, so I’ll probably get the fire man in.  I’m better off with the pots and pans!

The North Wales coastline is stunning in Autumn, awesome sunsets

Another bonus of autumn is all the produce, I’m just blown away at the minute.  I just got the list through from our local organic farm and it knocked my socks off.  As a cook, I almost don’t know where to begin with it all.  I feel very lucky to have such problems!! 

I’m back cooking at Trigonos this week and I love to create new recipes like this.  There are many gluten-free visitors who need catering for, the Trigonos cooks come up with all kinds of gluten, sugar, oil, nightshade, salt etcetc free dishes.  I’ve always found it a great challenge, but having dishes which are gluten-free and vegan is a sound start to planning a menu.  These cookies can be enjoyed by loads of people!  Maybe you’re gluten-free, but I bet you know someone who is.  The mystery of gluten-free baking is disappearing as more and more people experiment with new ways of making cookies, cakes, scones and tray bakes.

Chop those apples nice and small

Chopping your apples up nice and small is one of the keys to success with these cookies.  Of course, take all the pips and core out, but I leave the skin on.  These apples had nice, thin skins and I reckon there’s some nice flavour there when baked.  You can see the apples turn a lovely golden brown in the oven, something like apple crisps.  They’re good these cookies!

These kind of cookies are going to make this autumn very sweet!  Hope you get to try one soon.


Recipe Notes

You can use flax seeds instead of chia seeds.  Pop the seeds into a blender and blitz until a fine powder is formed.  Then mix that with water until a gelatinous mix forms.  It only takes 5 minutes or so to get nice and thick, ready to bind our cookies together.  Ground flax and chia are ideal egg replacers in vegan baking.

You can also use light brown sugar in these cookies, although I prefer the texture using the golden caster sugar.

I used a Dove Farm white gluten-free flour mix here.  It works really nicely.  Gluten-free oats are available in most supermarkets.

I use cold pressed rapeseed oil here, but you can use most, neutral flavoured oils.  I prefer cold pressed oils.

For non-gluten-free cookies – Wholewheat flour and normal oats will work nicely here too.

Missing cookies? Has anyone seen these cookies. 15 minutes after leaving the oven, they were never seen again. Another batch coming soon:)


Apple Crumble Cookies – Gluten-free, Vegan


The Bits – For 10-11 small cookies

Dry

125g gluten-free oats

100g gluten-free flour mix

1 ½ tsp g.f. baking powder

1 ½ tsp ground cinnamon

⅛ teas salt


Wet

100ml cold pressed rapeseed oil

3 teas ground chia seeds (mixed with 7 teas cold water)

1 teas vanilla extract

125g golden caster sugar


175g or 2 small green apples (cored and finely diced)


Do It

Preheat a fan oven to 180oC.

In a large mixing bowl, mix together the dry ingredients.  In another mixing bowl, mix together the sugar and the wet ingredients.

Pour the wet ingredients into the dry ingredients and stir until just combined.  Don’t over do the stirring.  Fold in the apples.

Line a baking tray with baking parchment, form roughly two heaped tablespoons worth of cookie dough and apple in your hands, roll into balls.  Press the pieces of apple into the cookie ball as you go. The apple keeps the cookies nice and moist.  Press this ball down gently onto the baking tray, forming a rotund disc shape.  Continue until the mix is used up.

Bake for 17 – 20 mins on a middle shelf, until the apples are golden brown and the cookies form a nice crust.  Leave to cool for 20 minutes on the tray before enjoying.  Remember that the cookies will firm up as they cool, don’t worry if they are a little soft to the touch.

We had ours warm, dipped into vegan creme fraiche.  Yes!  It was very good.

Just before they hit the oven – Apple Crumble Cookies  This was an early attempt, these apple chunks are a wee bit too big.  Go for very small pieces. 

Foodie Fact

An apple a day keeps the doctor away.  Why?  Because my Nana told me that, what more proof do we need?!

Apples are a good source of fibre and vitamin C, plus potassium, which is good for the heart.

Categories: Autumn, Baking, gluten-free, photography, plant-based, Recipes, Vegan, Wales | Tags: , , | 10 Comments

Mushroom and Squash Rogan Josh – Traditional Kashmiri Curry

Mushroom and Squash Rogan Josh – How to make a proper vegan curry, from scratch (even the spices!)

Make a decadent, aromatic, rich curry from scratch and even make your own spice mix.  I’ve cooked this curry, and variations of it, loads recently, but think this version is the best.  It does take a little longer, but you just can’t compare the flavours.  I’ve given you options to make this a quick curry too, but I’d urge you to give the full version a try.  You’re gonna love it!!

The Real Deal 

Rogan Josh is a rich, classical style curry made with yoghurt as a sauce base, not onions.  It was brought to Kashmir by the Mughal’s as they swept across North India.  I’m captivated by Indian history and if you’re not a regular BHK reader, by way of background, I’m in love with India and have been there many times, travelling from the tip down south to the top, the Himalayas!  I am yet to visit anywhere that is as enchanting and mesmering and the FOOD, lets just say it will take me this lifetime at least to explore such a vast and tantalising cuisine.  This curry is a good start, a staple and as ever, this is vegan food everyone one will love!  How could you not?  We get all the full flavours of roasted veg and mushrooms and treat it to a very special sauce.

If you make this curry, please let me know, I’d be excited to hear about your spice adventures and how you found the flavour.  Once you try this, you’ll never go back to shop bought or jars (unless you were in a real rush!)  I love curries, but at this time of year, with it getting colder and darker, I think this style of warming, rich curry really comes into it’s own.  A radiant, colourful bowl of big flavours that’s perfectly suited as a winter/ autumn warmer.   I get quite passionate when talking about Indian cooking.  Does it show?!

Make your own spice mix. It’s quick, easy and totally, very much, better than shop bought spices


Roast your own!  Spices

Spices!  They bring everything to life.  I’ve written so much about spices over the years, not to mention a hefty spice intro (with nutritional benefits) in Peace and Parsnips. I talked a lot about spices in there, they’re so important to my cooking and dare I say, Indian is my favourite way of cooking.  No, I don’t!  It does depend on how the stars are aligned and what I fancy and all of that, but, we all know Indian food is utterly diverse, vibrant and totally brilliant.

I give you full instructions below about how to toast and grind your own spice mixes, this one is similar to a Garam Masala, a North India spice mix filled with warming spices like cinnamon and cloves, you can see the picture above and you can probably imagine the aroma when all that hits a warm pan.  Out of this world!!


Garam Masala – Hot Spice!

Dry toasting spices like this in a pan adds complexity and brings out all the incredible aromas.  There are many versions of Garam Masala (‘Garam’ – Hot, ‘Masala’ – Spice Mix).  You could add Mace or nutmeg for example.  But I think this is a good all rounder.  If you don’t please let me know below.  If you do, again, let’s talk in the comments.  I love chatting about spices and learning new things.

I’ve added smoked paprika and turmeric to this spice mix, they’re not classically ‘Garam Masala’, but I like them in this Rojan Gosh.

You can also use shop bought spices here.  See in the recipe below.  Keep your spices in a sealed container and use well within the use by date on the packet.  Smell them, if they don’t smell of much, they won’t add much to the curry.


Rojan Gosh – filled with influence from the Mughals andPersia, this dish has a fascinating history

 We’re going to Kashmir……

Kashmir is a stunning region in the very North West of India, and a very good song of course (click here for Led Zep’s version of Kashmir).  Apparently Robert Plant had never even been to Kashmir when he wrote it, just liked the sound of it.  Maybe he just loved a good Rojan Gosh? Which loosely translates as ‘Rojan’ – to stew, ‘Gosh’ – red.

The well used BHK Dhaba


Recipe Notes

I’ve gone for mushrooms and squash here because they’re seasonal and I love them.  But you can use similar vegetables, carrots, potatoes, peppers, whatever takes your fancy.  The key here is the sauce.  That’s where the magic is!

I mentioned that this was traditional, that was a small, white lie.  It is pretty traditional, but in Kashmir they may use something called Cockscomb Flower to give the curry a more reddish hue.  But I’m happy with this colour.

Kashmiri chillies are quite important here.  You’ll find them in most supermarkets and especially Indian/ Asian food shops.  They are milder than many chillies.  We want lots of chillies in the Rojan Gosh masala, but not loads of heat.

If you don’t have dried Kashmiri chillies, that’s cool, go for chilli powder or cayenne pepper, anything to add a little heat to the curry.

Saffron can also be added here, but I think it just gets lost with the other spices and is basically a waste of our precious, and not inexpensive, saffron.

When I mention coconut cream, I mean the cream off a tin of coconut milk.  That means, the thick bit.  Adds lovely creaminess.  Yoghurt is best, unsweetened soya yoghurt, now available in most supermarkets.

Spices, you will have too much here for just one curry, but if you’re going to make your own spice, you may as well make a decent batch I say.  Keep them in a sealed container or jar.  Label them up, with a date, or give them away as a gift.  In my experience, people love the gift of spice!


Mushroom and Squash Rogan Josh


The Bits – For 4-6

1 roasted medium squash, 650g (skin on, chop into chunks, seeds removed)

1 tin chickpeas (drained)

200g or 3 big handfuls mushrooms (chopped)

3 big handfuls or 75g greens (kale, spinach, chard)

5 tbs plain soya yoghurt/ coconut cream


Garam Masala – Spice Mix

½ teas green cardamom seeds (seeds from 10 cardamom pods)

½ stick cinnamon

2/3 teas cloves

1 teas black peppercorns

2 tbs cumin seeds

2 tbs coriander seeds

1 teas fennel seeds

3 bay leaves

1-2 dried red Kashmiri chilli

1 teas turmeric

1 ½ teas smoked paprika


Or use shop bought spice mix like garam masala plus 1 teas smoked paprika


Curry Paste

1 roasted red pepper (seeded, chopped into chunks)

3 garlic cloves

2-4 dried kashmiri chilli

1 inch fresh ginger (chopped)

3 tbs tomato puree

1 teas salt

3 tbs cold pressed rapeseed oil (or whatever oil you use)


3-4 tbs Spice Mix


Garnish
Fresh coriander and sliced chillies


Do It

Preheat a fan oven to 200oC.

On a baking tray lined with parchment, place the red pepper and squash.  Toss in a little salt and cooking oil.  Roast in the oven for 25-30 minutes, until soft and slightly blackened in places.

For the spices – Place a pan on a medium heat, add all the whole spices and toast for 4-8 minutes or more, tossing them and making sure they’re all toasted and smelling fragrant.  They will take on a slightly darker colour and smell ‘toasty’.

Be sure not to burn them, the best way to check this is the smell and the look.  You don’t want any black bits at all.  Some people prefer darker spices, some prefer lightly toasted.  I’d start with lightly toasted.  Add the ground turmeric and paprika a minute before you finish toasting the spices.

Place all the spices in a small blender or spice grinder (coffee grinders are also good), and blitz until a powder forms.   Use some in the curry and store the rest in an airtight container.  Garam Masala is a versatile spice mix.

For the curry paste – Place the roasted red pepper in a blender with the other curry paste ingredients and blend to a smooth paste.

For the curry – In a large frying pan, warm 1 tbs cooking oil and fry your mushrooms for 5 minutes, until they’re soft.  Add the curry paste, thinning out with water or soya milk (creamier) as needed. Once the curry paste is bubbling away, spoon in the yoghurt and check seasoning.

Now add the roasted squash, chickpeas and greens. Warm through from 5-7 minutes, then serve scattered with freshly chopped coriander with naan, chutneys and rice.

This would be delicious with our Mango and Papaya Chutney or Cashew and Green Pepper Pulao or even Quick Carrot and Ginger Pickle.


Snowdonia looking stunning in the autumn sunshine.  Sometimes the mountains around here remind me of the Himalayas.


Foodie Fact

Squash is bang in season at the minute, there are so many varities.  If you’re reading from the US, were of course talking Winter Squashes here.  They are a rich source of vitamin C, A and plenty of fibre and minerals.  Also remember the seeds, you can clean and dry them and they are amazing roasted in the oven for 10-12 minutes.


Our new NEWSLETTER is out very soon, sign up HERE (it takes a few seconds). 


Categories: Autumn, Curries, Dinner, gluten-free, Healthy Eating, Nutrition, photography, plant-based, Recipes, Vegan, veganism, Wales | Tags: , | 7 Comments

Almond and Orange Biscotti – Vegan, Gluten-free

Almond and Orange Biscotti – Gluten-free and vegan

Delicious crunchy biscuits with toasted almonds and a touch of orange.  I love biscotti on their own, but they are so versatile and seem to go perfectly with ice cream.  Not sure why?  Something about that crunch!  They keep well and make lovely gifts, when nicely wrapped.  Early Christmas presents!!?

I’ve been working on a gluten-free version for a while and I’ve cracked it!  Sometimes recipes happen quickly and they’re great, sometimes they takes years to develop and seem to improve naturally each time, a tweak here, a few minutes more in the oven there.  I love this biscotti base recipe and play around with the flavourings and nuts regularly.  I like them spiced up of course, a little cinnamon and cardamom with the orange works really well.  I recently made some coconut and lime biscotti, which whilst not being very Italian, went down a treat

I love recipes that tick many boxes like this one.  Vegan.  Tick.  Gluten-free.  Tick.  Yum.  Big tick.  Because let’s face it, just because we’re baking gluten-free we still want awesome results.  It’s a brilliant challenge and I don’t think anyone will tell the difference with these biscotti.

There’s a magic combo here of gram (chickpea) flour and corn flour which I use quite a bit in vegan baking.  The cornflour really helps to bind things together and gram flour is just one of my favourite things.  People can’t believe it when you tell them it’s got chickpeas in.  The shock can lead to dropped biscuits!  But just to confirm, when baked, gram flour has no chickpea flavour.  No worries.

As with all my baking, I try to keep the sugar to a minimum.  I do some ‘sugar-free’ baking, but generally I find that can mean substituting one sugar for another sugar (maybe in liquid form).  I like coconut sugar, but I’m not a fan of it’s price tag.  I try to use good quality brown sugar in baking.  Mostly labeled as light brown sugar.  Some cakes may not be as light, textures do change, but I rarely bake with white sugar.

Biscotti and a brew – Yes please!!

We’ve been talking soup over on the Facebook page, the autumn is settling in nicely up here in Snowdonia.  A nice nip in the air and the nights are creeping in.  The blackberries are going wild! 

I know you can buy biscotti easily in the shops, but I find homemade is much more rewarding, and these are simple enough to get together.

If you try out the recipe, please let us know  in the comments below, or just say a quick, ‘Hello!!’   We love hearing from you, especially when you’ve just eaten a warm biscotti!

——————


Recipe Notes

If you don’t have gram flour, you can use a gluten-free flour mix instead.  Don’t substitute the polenta, it gives the biscotti a nice bite.

Like I said, use hazelnuts or cashews if you like and any citrus you fancy.

I mentioned in the recipe, but do keep your eye on the biscotti when you’re getting to the end of baking.  There is a fine line between bang on and overdone with biscotti, I think it’s because we bake them for so long.  If your oven is a strong, fan oven, maybe drop the heat 20oC when you go for the second bake.


Almond and Orange Biscotti – Vegan and Gluten-free


The Bits – For 24-ish


Dry

200g gram flour

25g cornflour

75g polenta

1 ½ teas gluten-free baking powder

¼ teas salt


1 handful toasted almonds (roughly chopped)


Wet

125g coconut oil (melted)

150g light brown sugar

½ tbs well ground chia seeds (mixed with 3 tbs water)

1 tsp vanilla extract

1 tbs orange zest


Do It

Preheat fan oven to 180°C.

Mix the wet ingredients in one bowl, and the dry ingredients in another bowl, then pour the wet into the dry and mix well with a spoon. Don’t worry about over stirring; this is gluten-free.

Line a baking tray / sheet with baking parchment. With wet hands form the dough into two even balls, then fashion into two long flat sausages / logs. The biscotti will rise and spread out a little when baked, but not much.

Place the two logs / sausages onto the baking tray and into the oven for 30 minutes. Turn your tray 90o once if your oven is hotter at one end than the other.

Remove from the oven and leave to cool slightly on the tray. When cool enough to handle, place the two sausages / logs on a chopping board and with a sharp knife cut into biscotti sized slices, roughly ¾ inch in width. Grab the baking tray and flip the individual biscottis on their sides and bake again for 10 more minutes each side. Keep you’re eye on them after the last flip so that they don’t burn. Once there are very crunchy place on a wire rack to cool.

Enjoy with ice cream or a nice coffee (or both!)  We just had them with roasted peaches and coconut ice cream with raspberries on the side.  Must take a picture next time.


Foodie Fact

Almonds not only taste amazing, they’re really good for us too.  They’re high in anti-oxidants, which are in the skin, so try and eat almonds skin-on.  They’re high in Vitamin E, and minerals like manganese and magnesium, plus plenty of fibre and good fats.  Of course, they’re nuts!  Loads of protein there.

Categories: Baking, Desserts, gluten-free, Nutrition, photography, plant-based, Recipes, Vegan | Tags: , , , , | 2 Comments

Roasted Mediterranean Vegetable Rice – Lebanese Style

A simple, stand out dish to spice up your autumn

This is a real centre piece dish which is simple to make and packed with big flavours and colours.  This recipe will add a little warming spice and vibrancy to your autumn cooking.

You may not have roasted, or baked, rice before, but it’s an easy way of getting really intense flavours into a rice dish.  This is a great base for all kinds of variations, I made it Lebanese, down to the fresh spices I had; bharat, za’atar and sumac, but you could easily make it Moroccan, Italian, Indian, even Spanish, whatever spices and herbs you prefer.  The technique is the same, highly untraditional, but tasty non-the-less.

You could say that this is a Lebanese Paella, but maybe that’s pushing things.  I have a feeling I’d upset many of my Spanish friends and readers.  Paella is a passionate subject!

I’ve never had a dish like this in Lebanon, I know there are a load of rice dishes, but I’ve not tried a baked rice one.  I do love a Maqluba though, here’s my recipe from a few years ago Maqluba with Roasted Pepper, Aubergine and Almond.

This was cooked when we were in Spain, so I was making Paellas regularly, mainly because I love them dearly.  They are great cooked on a hob in a traditional Paella dish and in the oven, a little variation cannot be bad.  I think nailing a paella is important, get one paella that you know and love and your quality of life increases dramatically.  Paella is such a satisfying dish, a dazzling centre piece and like I said, is pretty easy when you know how.  Practice + a little know how = yums!

Big on flavours and colours.

A baked rice dish goes well on a sunny day, but I think they’re even better in autumn and winter time, when the toasted, roasted, aromatic flavours of this dish really come into their own.  There are many layers of flavours and textures, to me, this is what makes vegan cooking awesome.  I was talking at the weekend at Ludlow Food Festival, to a tent full of meat eaters, about the very same thing.  Most agreed that they’d eat vegan/ plant-based food if it was tasty without any qualms.  It’s all about unlocking the deep and stunning flavours in plant-based food.  This dish is like a key.  Meat eaters will love it, something you can cook for your family or a group of friends, and all will leave satisfied.

CRUSTS

Crusts.  They taste good.  They’re like a concentrated version of the rest of the dish.  The crispy, dark best bit. Many cultures agree with me, those who know a thing or two about cooking rice, I’m thinking Iran and Spain in particular.  The crust has a special name and is the prized part of the dish, handed to the most deserving person and polished off with relish.  Don’t fear a crust on this dish.  It’s a good thing.  Scrape it off and serve it as a crispy topping.  Of course the art is to discern between a crust and a layer of burnt food.  It’s a skill best learned through practice and a keen sense of smell.  You can also peek a little when the rice is cooking.

Rice is a source of carbs, which is a good thing.  They keep us ticking over.  Nothing wrong with a nice plate of carb rich bits like rice mixed with plenty of fresh veggies and legumes in our opinion. They give us the energy to swim and run around.  Using brown rice here would make the dish even healthier, slow release carbs, long lasting energy.

I love this dish served with hummus or tangy labeh (yoghurt or sour cream would also be ace), a crisp green leaf salad and some lemon wedges.   Maybe even a sprinkle more za’atar and bharat.  Now that’s getting my taste buds excited.  In fact anything which combines the Lebanese flavour trinity of bharat, za’atar and sumac is exhilarating food.  If you haven’t tried these together in a dish, I highly recommend you pop down to the shops and get some.  They are widely available.  A nice idea is to toast some flatbread/ pitta, drizzle with olive oil and sprinkle over these spices/ herbs.  Instant Lebanese toast!  Serve with chopped tomatoes and cucumber, a nice breakfast there.

Shall we call this a Lebanese Paella? Controversial.

If you’re interested in my travels around Lebanon last year, here are a couple of blog posts:

Seeking Falafel Perfection in Lebanon

I Ate Lebanon!

Or just click on the recipes header (above) for a selection of Lebanese recipes.  Surely one of my favourite cuisines with so many vegan options.

If you like this recipe, please let us know.  If you make this recipe, maybe you’d like to share a picture over on our Facebook cooking group, click here.  Lots of vegan cooks with positive outlooks over there doing amazing things with vegetables.  Feel free to share this recipe far and wide! 

Happy cooking!!

——————–

Recipe Notes

Top this dish with any veg that is looking good.  Autumn is here in the UK, we are spoilt for choice.  I used Med Veg because I was in Spain.  If I cooked it here I may top this with ingredients like red cabbage, more onions, wild mushrooms, carrots or squash.  My point is, feel free to play.  Let us know about your amazing creations in the comments below.

Don’t have bharat, use another spice mix like garam masala or ras el hanout.

Don’t have za’atar, use dried thyme with a few sesame seeds mixed in.

Don’t have sumac, leave it out.  When you serve this dish with lemon wedges, it adds the citrus kick we need.

Lemon wedges.  Yes, I do serve everything with lemon wedges!  It adds a lovely citrus lift to this dish.

You can use any type of shallow oven dish.

This dish will vary, mainly depending on the type of rice and dish used.  Check after 25 minutes, most of the liquid should have evaporated, remember, the rice will soak up a little liquid when you leave it to rest.

Roasted Mediterranean Vegetable Rice – Lebanese Style

Roasted Mediterranean Vegetable Rice – Lebanese Style


The Bits – For 6

400g short grain rice (risotto or paella rice works well)

50g green/ brown lentils

1 tbs cooking oil

1 tbs cumin seeds

2 medium onions (sliced)

4 large cloves garlic (sliced)

2 tbs bharat – spice mix

2 tbs za’atar

2 teas salt

650 ml light vegetable stock or hot water

400 ml tomato passatta

1 big red pepper (sliced)

1 small aubergine (sliced)

1-2 tbs olive oil


Toppings

Toasted walnuts/ almonds

Za’atar and sumac

Chopped fresh parsley


Serve

Lemon wedges

Hummus or vegan labneh


Do It

Wash and rinse your rice and lentils with plenty of cold water.  Drain well.

Preheat oven to 225oC.  Place in your shallow oven dish to warm.

In a large frying pan on medium high heat, add the oil and when warm the cumin seeds.  Fry them for 30 seconds and then add the onions and 1 teaspoon of salt.  Cook for 12-15 minutes, until nicely golden and caramelised.  Add the bharat spices, garlic and za’atar, stir and fry for a minute then pour in the passatta and 1 teas more of salt.  Simmer and stir for a couple of minutes.  Now mix in the rice and lentils and then vegetable stock, stir well to combine.

Pour the rice mix into your warm, not hot, oven dish.  Level it out with a spoon and scatter over the aubergine and peppers and gently press them down with your hand, until they’re roughly half submerged in the stock.

Place your dish in the oven for 30-35 minutes. Check after 25 minutes and drizzle over a little more olive oil to help the vegetables caramelise and add richness.

Once cooked, cover and set aside for 5-10 minutes to cool a little.  Then sprinkle over parsley, more spices and toasted nuts.  Best served as suggested, with hummus/ labneh and a crisp salad.


Foodie Fact

Aubergine is a superhero of the veg world.   Have you tried cooking an aubergine on an open flame until charred.  When peeled, the aubergine is smoky and delicious, ready for traditional dishes like Babaganoush, but also makes an amazing burger filling or pizza topping.

Nutrition wise, aubergines are not exactly outstanding.  They do contain some fibre, vitamin B1 and minerals like copper and manganese, there are some cool chemicals in the black skin that are really good for us. 

Categories: Autumn, gluten-free, healthy, Healthy Eating, photography, plant-based, Recipes, Travel, Vegan | Tags: , , , | 3 Comments

Chocolate, Sea Salt & Quinoa Cookies (Gluten-free)

Chocolate, Sea Salt and Quinoa Cookies (Gluten-free)

Perfect weekend treat cookies!  Rich, light, chocolaty and yeah, made of quinoa.  More of that later, but these cookies are delicious!  I could eat a whole tray of them with a really big cuppa.

This recipe comes by popular request from our vegan cooking group over on Facebook.  It seems the combination of chocolate, sea salt and quinoa flour has got us curious, maybe some a little skeptical?  But it all works very nicely!

So, let’s start this weekend as if we mean it, with a big plate of warm, freshly baked cookies.  Made with love.  The whole house smelling like one big yummy cookie.  This recipe will make you many new friends, please neighbours, pacify children and generally help us to incorporate more cookies into our diets.  Which is important!

Try something new!

These are not just any old cookie though, they’re made with quinoa flour.  Yup!  It’s a thing.  And a mighty fine thing it is.  They’re a full chocolate flavour with added richness coming from the tahini/ peanut butter plus a little twist for the topping, sea salt.

I’ve been looking for a use for a bag of quinoa flour for a while, it just sat there staring at me from the cupboard, asking “Why am I here?”  I was challenged, I tried a few things out that I wasn’t happy with (you cannot make tofu with quinoa flour!  You can however make inedible grey sludge instead).  Then we had a big bake off, Jane’s Tea and Cake Day, loads of friends, loads of cake.  What better time to unveil a quinoa cookie?!  I really like them, these are soft, light cookies.

So, quinoa in cookies, whatever next you may say?  Well, quinoa flour is a healthy choice and more accessible now in shops.  It has some protein, a little fibre and a good lump of iron in there.  The protein in there helps with the baking, gluten is a protein, so flours rich in protein are best to use when baking gluten-free.  I like to add it to gluten-free bread recipes, it gives a good texture and makes for light baked goods.

Salt on sweet things? “Why?”

I know it sounds strange, in fact with the quinoa element also, these cookies may not be getting you that excited.  But trust me, salt is an essential component of many desserts and sweet things.  It brings dishes to life!

A little salt will make all the difference and sprinkling good quality sea salt on these cookies really enhances the deep chocolate flavour, salt also goes very well with peanut butter.  You’ve all tried salted caramel and most people seem to like that sweet and salty thing.

Although it’s distinctly not for everyone, our friend popped over and tried a cookie, I totally forgot to mention the salt and the face she pulled was impressive and a bit worrying.  A face filled with pure shock and disgust.  “What the heck is that?!”  Pointing at the salt.  Eyes blazing.  “SALT!!!”.  Then came a saddened shake of the head, and a defeated, pitiful, “Why?” 

Make your own quinoa flour

I realise that we all don’t regularly stock quinoa flour in our cupboards.  But quinoa grains are more popular.  All we need to do to make quinoa flour is blend the grains in a high speed blender for 30 seconds to 1 minute, until nice and fine.  Then pass this through a sieve, taking out the lumps, and leaving you with light quinoa flours.  This works for most grains if you’re running low on specialist flours.  Try toasting the flour or the grains in a pan for 5-7 minutes, on a medium heat, tossing regularly.  You’ll smell a toasty flavour and see the quinoa change to a darker shade of brown.  This adds a deeper flavour.

How do you feel about these cookies?  Are you going to give them a go?  Do you like a little salt in your desserts?  Let us know in the comments below and, if you have an question at all, fire them across.

Have a sweet weekend!

———————

Recipe Notes

Not into salt on cookies.  That is perfectly fine, just omit it, no topping.   But please leave the touch of salt in the cookie mix, as I said, it’s important.

Not a fan of tahini/ peanut butter, I would imagine any nut or seed butter would be fine, but I haven’t tried them out.  Don’t omit the nut/ seed butters, they give the cookies a nice richness.

Don’t over bake the cookies, 10 minutes should be enough, just till they form a crust.  They will be soft to the touch, just leave for a few minutes to cool on the tray.

Try to use a nice olive oil for these cookies.  I find the flavour of olive oil works brilliantly with dark chocolate.

Chunks are nice.  Of course!  You can keep the chocolate chunky for a nice chocolate surprise, or I also like to blitz the chocolate a few times in a blender and stir it into the cookie mix.  More and more richness!

I went off quinoa for a while, preferring more local grains, but in recent years, there are many sources of British grown quinoa.  Hodmedod’s is one.  They do some really interesting grains and pulses, I haven’t tried their smoked quinoa from Essex, but it sounds very cool indeed.  You will also find quinoa flour in places like health food shops and in some supermarkets (try the Free-from sections for example).

These cookies are absolutely brilliant with Dulce de Leche, see our recipe here.  Like a vegan coconut caramel.

Fresh out of the oven.

—————

Chocolate, Sea Salt and Quinoa Cookies

The Bits – For 10 cookies


Dry

100g quinoa flour

3 tbs cocoa or cacao powder

1/2 teas g.f. bicarb of soda

1/2 teas g.f. baking powder


Wet

80g light brown sugar

2 tbs tahini or smooth peanut butter

75ml olive oil

1 teas vanilla extract

2 tbs flax egg (1 tbs ground flax mixed with 3 tbs water)

1/4 sea salt


60g broken up, good quality dark vegan chocolate (I used 80%)

Extra sea salt for sprinkling


Do It

Preheat fan oven to 180oC.  Line a baking tray with baking parchment.

Make your flax egg, mixing the ground flax seed with the water.  Leave it for 10 minutes, it will thicken.  Add a little more water if needed and stir, we’d like it gloopy and thick, but not totally solid.

Place the dry bits into a bowl.  Place the wet bits into a bowl, mixing them until combined.  Now mix the wet bits into the dry, until a thick dough is formed.

Roll roughly 2-3 tablespoons of cookie dough into little balls in hands, then press down onto the baking tray, making small disc shapes.   They will expand a little during baking.

Bake 10 minutes until thin crust forms over the cookies, but they are still soft in the middle.  Leave to cool on the baking tray and get the kettle on!


Foodie Fact – Quinoa

Quinoa is actually a small seed and is a rare plant-based source of complete protein, meaning it contains all the 20 amino acids we need.

It’s rightly regarded as one of the most nutritious grains going; high in fibre and folic acid.  Quinoa is naturally gluten-free and contains good levels of minerals like manganese, magnesium, zinc and iron.

Some of the health benefits associated with quinoa are a healthy heart, weight loss and it may even help to fight cancer.

Categories: Baking, Cakes, gluten-free, healthy, Nutrition, photography, plant-based, Recipes, Snacks and Inbetweens, Vegan | Tags: , | 2 Comments

Mango and Papaya Chutney

Mango and Papaya Chutney (vegan, gluten-free)

A tangy summertime tropical treat that goes well with most things; curries, burgers, salads, vegan cheese.  I used our Moxarella – Vegan Mozzarella recipe here on quite a tropical ploughman’s style platter.

Mango and papaya are two of my favourite fruits, although getting good ones can be tough in Wales.  I’ve noticed more papayas becoming available and the key to a papaya is to get them nice and ripe.  The skin should be almost completely yellow and orange and it should feel a little soft.  When I’ve eaten papayas in more tropical places, they go from just ripe to woah, take it easy, way too ripe in around 10 minutes.  It seems that in cooler climates, papayas are more relaxed.  Ours took around 4 days to ripen in a fruit bowl with bananas, if you want to keep it from ripening, pop it in the fridge.  I think a ripe papaya is a match for a ripe mango and, in India especially, is probably a 1/5 of the price.  No wonder Christopher Columbus called it ‘The Fruit of the Angels’.

Papaya Farming

I’ve worked on a organic farm which grew papayas in India. I became pretty good at harvesting them.  This entails using a long piece of bamboo, standing under the tree and jabbing (gently) a ripe papaya with your bamboo appendage, they’re the yellow/ orange ones, and in approximately less than a second, catching the falling papaya with your free hand.  This is a tricky business and takes practice and the reactions of a mongoose, of which there was family of living just beside my hut.  This was in Tamil Nadu.  Most mornings we harvested the crops for the local market, a fascinating array of produce created in a relatively small area, using mainly permaculture farming practices.

I was writing parts of Peace & Parsnips at the time, in the sweltering heat of summertime, the farming was a day job of sorts.  It was a organic farm in a community called Auroville.  A fascinating place.  The farm was called Solitude Farm and I also cooked lunch there with the women in the kitchen.  I learned much, mainly about using tropical ingredients like yams, banana flowers, plantains, various flowers, purple amaranth, snake gourds, plenty of coconut, and all kinds of other things.  Surprisingly for me, basil and little sweet cherry tomatoes grew like weeds all over the place.  We cooked on wood fires, crouching on the floor.  I loved it.  The restaurant used only organic produce grown on the farm, even the rice and peanuts.

Lunch is legendary at Solitude – celebrating the produce from the farm

I’ve also harvested mango’s. It’s a more dangerous undertaking.  Mango trees do not want you to pick their fragrant fruits.  Goggles and gloves can be useful.

This chutney is quick n’ easy, give it a whirl and be sure to let us know how it goes in the comments below.

Recipe Notes

This is a lower sugar chutney, I prefer it that way.  This has a good balance I feel, but if you like a very stick and sweet chutney, you may prefer a few more tablespoons of sugar.

We enjoyed this chutney with a mixed bag of a platter.  Nachos, salsa, smoky vegan mozzarella and pickled jalapenos.

Papayas are easy to skin, you can use a potato peeler or a sharp knife.  Then just scoop out all the big black shiny seeds.  The seeds are edible, quite peppery and bitter.  Your papaya flesh should be soft and deep orange/ pink in colour.

When you cut into a mango, be sure to trim away as much fruits as possible from the seed.  There can be quite a bit of fruit hidden around the seed.

Papayas can be huge, but in Britain, they are sold quite small, lets say around 8-10 inches in length.  That’s the size we use here.  Avoid papayas which are bruised or have lots of black spots.


Mango and Papaya Chutney (Vegan. Gluten-free)


The Bits – Make two large jars or 1 litre kilner jar

1 onion (finely diced)

2 heaped tbs fresh ginger (finely chopped)

1 small cinnamon stick

1 teas cumin seeds

1 teas coriander seeds


4 green cardamom pods (cracked)

1/3 – 1/2 teas chilli flakes or 1 red chilli (deseeded finely diced)

1/2 teas ground turmeric

3/4 teas nigella seeds

2 mangoes (peeled, deseeded and diced)

1 papaya (peeled, deseeded and diced)

100-125 g light brown sugar

125 ml red wine vinegar

1 tbs cooking oil


Do It 

In a sauce pan, add the oil and warm on medium high heat.  Add the cumin, cinnamon and coriander seeds, stir a few times, for around 30 seconds.  Then add the onions and ginger.  Fry for 6 minutes, until soft, then add the rest of the spices followed by the fruit and then finally, the sugar and vinegar.  Stir well and bring to a simmer.  Leave to cook for 35 minutes, until the chutney thickens.

Allow to cool, then spoon into a sterilised jar and use within three days. This chutney is ideal served with your favourite curries, salads, burgers or why not try a tropical cheeze platter.

Foodie Fact

Papaya is very high in vitamin C and is also a good source of folates, vitamin A and fibre.  Papayas help to support our immune system, are anti-inflammatory and may well keep our hearts healthy.

Categories: Chutney, Curries, gluten-free, Nutrition, photography, plant-based, Recipes, Travel, Vegan | Tags: , , , | 24 Comments

Pea and Wasabi Soup with Seaweed Gomasio

Pea and Wasabi Soup with Seaweed Gomasio (vegan, gluten-free)

This is an ideal soup anytime of year, but works so well in the summer because it can also be eaten hot or cold.  The best of both bowls!  It sits in the fridge and is an ideal, standby meal.  The potatoes add some substance and the wasabi, a delicious, mustard-y kick.  In Snowdonia, we need a flexible soup this time of year.  One day scorching, the next chucking it down and nippy.

But really, British summertime has taken off this year, even in North Wales!  We’ve had a summertime!!  All that sunshine has come with a few challenges for growers, but the produce we’ve been getting is delicious.  It’s not often we get to try British fruit and veg that’s been bathed in a load of sunshine.  Is it just me, or are the strawberries the best for a long while this year?

Peas are one of my favourite things about summer, so here’s a simple soup recipe, using local peas given a global twist.  I think that’s one of my favourite things about cooking, taking the best local produce to Tokyo or Tehran for a ride.

Which is pretty much what happens in this recipe, some traditional Japanese flavours light up organic veggies from Snowdonia.

Fan of chilled soups?

If you haven’t tried a cold soup in the summer, give it a whirl.  The Watermelon Gazpacho recipe I shared earlier in the summer was really popular, I just think this type of soup is the idea summer meal.  It’s delicious, light and when served chilled, a cooling lunch on a steamy day.  This smooth and satisfying recipe reminds me a little of a Vichyssoise, a traditional French chilled soup, I think its the creamy texture, given by the potatoes.

Wasabi and seaweed may be new ingredients to you, but most supermarkets stock them nowadays.  Wasabi is similar to mustard or horseradish, you can use it as you would mustard.  I love it mixed into mayonnaise, or in dressings, even thinly spread in a sandwich with pan fried tofu or tempeh, lettuce and other vegetables.

What’s Gomasio?!  A tastier, healthier alternative to salt

Gomasio (or Gomashio) is a lot like a Japanese version of the Hazelnut Dukkha that I posted recently.  It is a Japanese condiment, basically toasted sesame seeds, with a little salt, ground or blended.  It’s something that adds so much flavour to whatever you sprinkle/ stir it on/ into.  Have you tried toasted sesame seeds at home?  Trust me, they’re intense little things!

Gomasio can add real bite and a lovely toasty flavour to your favourite salads or pan fried greens and also goes well with a host of Japanese dishes (as you’d imagine!)  Gomasio is something that can replace salt and with the sesame seeds, adds a lot of nutritional goodness to our meals.

The ratio of salt can vary depending on the diet, macrobiotic diets follow a roughly 18/1 ratio, average gomasio is more like 5/1 (5 parts sesame to 1 part salt).   You’ll find your perfect balance I’m sure.

Gomasio keeps well in a sealed container.   I pop mine in the fridge, it lasts much longer that way.  This goes for all seeds and nuts, once they’re chopped or blended, all those lovely fragrances and oils are released and to take care of them, pop them in the fridge.  Gomasio is one of those recipes that is so much more than it’s ingredient list, only two, it’s a keeper!  Pop it on the table, use as a replacement for salt or pepper.  Makes a very nice change I find.

Lots of peas with a nice tickle of wasabi plus the flavourful seaweed gomasio.

Keep up to date with new recipes and news from the BHK……

I hope you get to try out this recipe.  If you like this and would like to hear more from us, we’re working on our new newsletter at the minute, which will be out soon.  Sign up here, it takes a few clicks, and we’ll send you all the up to date info from the BHK with recipes, pictures and special offers for upcoming events.  I’ve decided to focus on writing a new cookbook, I’ll share something about that, and I’ve some exciting things to share soon regarding new events and festival appearances.

If you’re in the UK, I hope you’re having an awesome summer, diving into lakes, forests, ice creams and BBQ’s, and are also enjoying these long sunny nights properly.  If you’re somewhere else in the world, how has your summer been?


Recipe Notes

You can add tamari/ g.f. soya sauce instead of salt, but it can affect the colour.  I prefer this soup very green looking.

Just like horseradish or mustard, if you put too much wasabi in your soup, you’ll get that overpowering experience that leads to ‘mustard face’.  That’s what we call it anyway.  That fiery, burning sensation in your nostrils and roof of the mouth, leading to a look of sheer panic and confusion.  Some people like this kind of thing, but to avoid it, just add your wasabi a little at a time.  You can even leave it out until the end and add it bowl by bowl depending on how much ‘mustard face’ you enjoy.

You can buy seaweed flakes, or make them your self.  Place a nori seaweed sheet (the type used for sushi) into a blender and blitz until a powder forms.  This seaweed can then be mixed into your gomasio, to taste.

I use new potatoes, so there was no need to peel them.  The skins are so thin.  If you’re using other types of potato with thicker skins, I’d peel them first.

I chose to keep my seaweed and gomasio seperate for this photo, the sole reason being that it looked better!

Pea and Wasabi Soup with Seaweed Gomasio (gluten-free, vegan)


The Bits – For 4-6 Bowls

425g garden peas or petit pois (fresh or frozen is fine)

200g or x6-7 new potatoes (scrubbed and chopped)

175g or roughly 1/4 white cabbage (sliced)

3 heaped tbs chopped fresh ginger

1 medium onion (peeled and sliced)

1.25 litre hot vegetable stock (g.f)

1-3 tbs wasabi

1 tbs cooking oil

Sea salt


Black sesame (optional, nice if you aren’t using gomasio)


Gomasio

3 heaped tbs unhulled toasted sesame seeds

1/3-1/2 teas sea salt

Sea weed flakes/ powder


Do It 

Boil a kettle and make a light vegetable stock.  In a large sauce pan on medium high heat, add your cooking oil, once warm, add the onions and ginger.  Fry them for 5 minutes, until soft.  Add the cabbage and fry for 2-3 minutes, then add the vegetable stock and potatoes.   Bring to a gentle boil, put a lid on and cook until the potatoes are ready, around 10-15 minutes is normally fine.

Now add you peas and cook for 2 minutes. Leave the soup to cool slightly, then blend with a stick blender or leave to cool more and blend all in a blender/ food processor.

In a small bowl, add your desired amount of wasabi (remember you can add more later), add a few spoonfuls of soup and mix into a paste.  Add this wasabi paste to the soup.  Taste, check for seasoning, adding salt/ tamari or more wasabi, depending on how your taste buds feel.

Serve hot or cold, sprinkled with gomasio, seaweed and black sesame seeds.

To chill the soup.  Let it cool fully, place in a container and simply pop in the fridge.

For Gomasio – In a frying pan on medium heat, add the sesame seeds and toast them up to 10 minutes.   Tossing them or stirring them until they turn a darker shade of brown.  If you’re not sure how toasted you like them, take a few in a spoon, blow on them and taste.  Just be sure to keep moving them in the pan, they can burn quite easily.  Once you’re happy with them, pour into a bowl and leave to cool for a while.

Then add to a pestle and mortar and grind, or use a blender to blitz them up into a rough crumb.  Mix in salt and seaweed to taste.  Place in a sealable container and pop into the fridge.  Use within three days. It can be a nice alternative to salt.

This summer has been incredible in North Wales. So much sunshine, the mountains are looking sensational!!

Foodie Fact

As a condiment that can replace salt, gomasio is full of nutritional benefits.  Very high in calcium for a start.  A good source of minerals like copper, iron, magnesium, manganese, zinc.  I you are eating a vegan/ plant-based diet, sesame seeds are an excellent ingredient to incorporate into you diet.  Have you tried tahini drizzled over your breakfast cereal, or on toast?

The word ‘Gomashio’ in Japanese can also mean a person who has some white hairs mixed in with black hairs.  What we call the ‘salt and pepper’ look.  I’m getting there!

Here are some other dishes we’ve made recently high in sesame seeds:

Halva Choc Ices with Fig, Almond, Rose and Tahini  

Aubergine Fava Bean Fatteh with Tahini Yoghurt – Lebanese Party Food!

Beach House Dressing – One of our fav’s

Strawberry and Tahini Summer Tarlets

Categories: gluten-free, healthy, Healthy Eating, Nutrition, photography, plant-based, Recipes, Soups, Vegan | Tags: , , , , | 2 Comments

Egyptian Summer Mezze – Tomato & Cumin Chickpeas

Egyptian Lunch on the terrace with Hulba (Fenugreek Dip), Roasted Cauliflower Wedges and Spicy Aubergines

Have you tried Egyptian food?  This is the ideal recipe to start.  Many people ask for quick and easy recipes that are tasty, nutritious and something that can be rustled up without fuss.  Here we are!

This an ideal summer dish, light and good to go for a picnic twist, it can be eaten hot or cold.  It seems with all the sunshine we’ve been getting in the UK, the tomatoes are here!  Great news indeed.  Using nice ripe tomatoes in this dish with make all the difference.

These chickpeas are perfect with the Hazlenut Dukkha recipe that I just posted, a nice fresh salad, chargrilled/ roasted vegetables and some flatbread.  Summer lunchtime sorted!

I also roasted some cauliflower in the oven, really simply with some oil and spices, you can use the Dukkha, or something like Bharat.  Or even Garam Masala will be fine.  Just add a little spice.  Roasted cauliflower is a staple in the BHK in the summertime, great on the BBQ too.

I added a couple more Egyptian Mezze’s, with a classic Warm Aubergine Salad and a Fenugreek ‘Hulba’ Dip, which does have a very strong flavour, the fenugreek is full power.  The consensus from those present was leave the recipe for now.  I like it, it’s a bit like mustard, a little goes a long way.  Next time, I may reduce the fenugreek a little, it can be powerful stuff!

Other Egyptian Mezze ideas would be fava bean falafels, hummus, baba ganoush (ghanouj), fuul medames, tabouleh.  I love these rich, hearty, flavourful dishes.  All traditional.  All vegan!

Travelling Egypt

I love Egypt and the delicious buzz of eating out in Cairo, sipping some tea, taking a wander around Old Town, the little windy, ancient lanes and souks, more tea, then a nibble (repeat).  I may have been lost most of the time, but I never went hungry!

My last visit to Egypt was a good few years ago, but it left a big impression.  So much history (a massive understatement really) and people could not have been friendlier.  I just wandered around each day and invariably got myself invited to cafes or restaurants or weddings for sweet tea and meals and many happy memories.  I experienced incredible hospitality where ever I went.

One of my favourite foodie times was when I was walking up the coast from Dhaba, I met a bedouin family who invited me to stay with them and have some dinner, over near the border with Jordan.  They were camped on an isolated beach facing the Red Sea and twinkling lights of Saudi Arabia.  They made veggie food especially for me, cooked out under the stars and eaten on a huge colourful rug.  These spiced chickpeas are similar to one of the dishes we had.  This is my version.  I love recreating global dishes back in Wales.  When I travel, I write all my favourite food moments and ideas down in notebooks.  The one I brought back from Egypt is packed full with many happy memories of tasty times.

Egyptian Food

For those who haven’t tried traditional Egyptian food, I’d say it has many similarities with much of the food in the Eastern Mediterranean, lots of delicious rice, bean and vegetable dishes, maybe the best hummus I’ve ever tried (at least well up there with Lebanese Hummus).  In Egypt, you never seem far from an awesome flat bread or bowl of ful medames or Kushari, a dish I had never tried before and found it loads of fun.  Rice, lentils, pasta, tomato sauce, garlic vinegar, fried onions, a good hit of cumin, it’s seems all over the place, but really works.  Especially after a long day getting lost in old town Cairo, I needed plenty of feeding up!

Cumin is one of my favourite spices, ubiquitous in so many cuisines around the world, from Mexico to the Mediterranean and India.  Cumin is warming and highly aromatic, that’s why toasting and grinding your own spices at home is such a joy.  Cumin has a sweet smell but can be bitter to taste, so it does need cooking through.  I normally add ground cumin to dishes at earlier stages of cooking.  It acts as a great base for other spices I find, but in this dish, it takes centre stage.  We normally get white cumin seeds in the UK, but in India especially, the smaller black cumin seeds are popular, along with Amber cumin seeds.

Recipe Notes

The best way to go, cumin-wise, is to toast and grind your own.  If you have a pestle and mortar handy, or a blender/ food processor, we’re good.  Toast 2 tbs cumin seeds in a preferably heavy-bottomed pan, for a minute, until the colour slightly changes to a darker shade of brown and you can smell the lovely toasty cumin aromas.   I know in some Indian dishes, cooks prefer to really toast the cumin until they’re almost black.  But generally, the oils (plentiful in cumin) which contain the lovely aromatic qualities are quite sensitive to heat, I prefer, in this dish especially, just a light toasting in the pan.

You can use tinned chickpeas, but soaking and cooking dried chickpeas is more economical and you get the benefit of a nice stock to use afterwards in soups, curries or stews.  This stock can also be used as aquafaba, genius bean broth, which can be used to make all kinds of things; vegan mayonnaise, macaroons. meringues or to replace eggs when baking cakes.

The Egyptian olive oil I’ve tried has been excellent.  Drizzling it over and stirring it in at the end can add richness and great flavour to these chickpeas.

You may like to blanch your tomatoes and removed the skins, but my tomatoes were so sweet and thin skinned, I didn’t here.

Egyptian Chickpeas with Tomato and Cumin – Sinai-style 

——————————-

Egyptian Mezze – Chickpeas with Tomato and Cumin 

The Bits – For 4-6 

500g cooked chickpeas (or 2 tins, drained and rinsed)

1 large onion (finely diced)

2 large cloves garlic (finely sliced)

1 tbs cumin seeds

2 teas ground cumin

100ml hot water

4 medium ripe tomatoes (chopped into small pieces)

1 tbs cooking oil – I use cold pressed rapeseed oil

Sea salt


1 handful fresh coriander (finely chopped)

4 lemon wedges

A drizzle of extra virgin olive oil (1-2 tbs)


Do It

In a large frying pan, warm on a medium high heat.  Then add 1 tbs cooking oil and the cumin seeds.  Let the sizzle for 30 seconds before adding the chopped onion and garlic, with 1 teas sea salt.  Fry for 6 minutes, until the onions are slightly caramelised, then add the ground cumin, hot water and tomatoes.  Pop a lid on and lower the heat a little, cook until tomatoes are soft, around 5 minutes.

Now add the chickpeas, pop the lid back on and warm through, cooking for a couple of minutes.

Stir in coriander and olive oil, check seasoning.

Serve with warm flatbreads, lemon wedges and hazelnut dukkha.


Foodie Fact – Cumin

Cumin seeds come from a plant in the same family as fennel and parsley, it’s been around for a while, mentioned in the bible on a number of occasions and the ancient Greeks loved it.  They kept it on the table as an everyday spice, like we use black pepper nowadays.  It was also a staple in Roman kitchens, but became less used in Europe in the Middle ages.

Cumin is rich in copper and iron, zinc, calcium and potassium.  One teaspoon of cumin contains around 1/4-1/3 of our daily iron needs.  Pretty good!

Cumin has also long been regarded as anti-inflammatory, has anti-oxidant properties, is anti-bacterial, helps with digestion (in India it’s used frequently in daals for example, to minimise windiness).  Cumin may also help with diabetes and boosts the immune system.  Cumin is not alone in this respect, most spices have beneficial health properties and its an awesome idea to add spices to dishes and your diet in general.

Cumin seeds can be kept in a sealed container in a cool and dark place, they will keep for around a year.  Ground cumin, well, freshly ground is best, but it will last for a few months, but loses it’s flavour gradually.

Categories: gluten-free, healthy, Healthy Eating, Lunch, Nutrition, plant-based, Recipes, Side Dish, Travel, Vegan | Tags: , , , | 4 Comments

Hazelnut Dukkha – Versatile, Nutty Spice Mix


Hazelnut Dukkha – Egyptian Condiment

Only a small thing, a condiment, but it really packs in some intense, earthy flavours and livens up almost anything.

I’ve finally got round to posting (and finding) some of the Egyptian recipes I cooked in the Spanish sunshine.  Having been on the road for a while, recipes can wander off for a while.  They normally come back in one piece though.

Spain was so hot, we wanted things simple, quick and of course, super tasty.

Dukkha is ideal in this respect, perfect sprinkled on your favourite salad, mixed into youghurt to make a delicious dip, or even just served with warm flatbreads and olive oil.  I also use dukkha on top of roasted or barbecued vegetables and even Middle Eastern stews.

Dukkha is basically a condiment that livens up most things, bringing lovely, deep, toasted flavours, nuttiness and spices.  Dukkha keeps well in a sealed container and is a versatile flavour boost to have around the kitchen.  You can also play around with the recipe, this is classic old school style, by adding your favourite spices to it.

There are many ways of making dukkha, but I’ve gone for the easiest here.  We simply roast all the ingredients in an oven and bash them together in a pestle and mortar.  It’s a highly fragrant task.  Prepare for your kitchen to be filled with the aromas of toasty nuts n’ spices.  It’s delicious.

Go Spicy

I’ve been roasting many of my spice mixes at the minute and feel that if you have the time, this is the way to go.  Fresh roasted spices, ground in a pestle and mortar, or even a blender, are so much better than shop bought.  You can’t even compare really.  If you love spices and spicy foods, making your own makes sense.  I’ll post my Garam Masala recipe soon.

Egyptian Fava Bean Falafels

Egypt travel 

But this is Egypt.  A country I love, whose food blew me away.  I really wasn’t expecting it at all, I had no preconceived this and that, I just landed and ate.  The hummus is well up there with the best in the world, of course we all know about the falalfels, here’s my version – Egyptian Fava Bean Falafels.

You won’t be too surprised that I traveled all over Egypt and even did some touristy things like try to climb one of the great pyramids, I had no idea this was illegal until a man with a big gun chased me a fair way up the pyramid of Cheops (the big one).  It was very early in the morning, I was half asleep (missed the sign) and obviously most of the guards were.  To be fair, it was a long climb anyway.

I chilled on Mount Sinai with a load of very happy Christians, clapping with hymns at dawn, staying in monastery.  I dove in the Red Sea, a technicolour world bursting with marine life, at night, sat around fires, we looked right into Saudi Arabia, just across the sea.  I’m not a big city person, but one of the highlights was Cairo, the old town especially, the call to prayer each morning at 5am was a wake up call in more ways than one.  Egypt was the first Muslim country I had traveled around and everything all seemed very exotic and fresh, charged with new flavours, sights and sounds.

I’d love to go back, I didn’t quite make it down to Luxor.  Food wise, no problem, I was a vegetarian/ vegan hybrid at the time and always found lots of options, as you do in other Middle Eastern countries.  I specifically remember one bowl of perfect hummus, in a restaurant on a busy road, it was packed with families and the mezze style dishes just piled up on my table and I was in some form of food-induced bliss.  I’d been walking lots around Cairo (aka getting lost), it’s an ideal walking city with loads of windy lanes and interesting architecture.  I needed to keep my energy up you see!  Bring on the falafels…..

Egyptian style Aubergines, simply pan fried with onion, a little spice and lemon juice.

Buddhist tangent – Dukkha is also the word for “suffering” or more accurately ‘unsatisfactoriness” in Pali, the ancient language of many early Buddhist texts.  It’s what we feel about life much of the time said Buddha.  When I first came across the Egyptian condiment, I couldn’t separate the two really.  Spicy suffering crumbs, toasty torment, I’ve been through them all.  The opposite of Dukkha is Sukha in Pali, meaning something like “happiness”.  I was thinking about coming up with a recipe for Sukha, the topping to sprinkle all over your Nirvana, but I’ve never could see past Dukkha.  Here in lies my inherent problem.  I just can’t get enough of that Dukkha!!

I hope you get to try this recipe out, please let us know in the comments below.  Have you been to Egypt how did you find the food?  Are you a fellow vegan traveler, seeking out the tastiest plates in the coolest places?

——————–

Hazelnut Dukkha

The Bits – Makes one small bowlful

50g sesame seeds
25g hazelnuts (very roughly chopped)
10g cumin seeds
8g coriander seeds
1g dried thyme
3/4 teas sea salt


Do It

Preheat a fan oven to 180oC.

Toss everything on a baking tray and place in the oven for 10-15 minutes, checking after 8 minutes.  Mix the dukkha up a little to ensure that everything is getting an equal amount of heat.

Once the sesame seeds and hazelnut have gone a darker shade, place the dukkha into a pestle and mortar.  You can do this in batches unless you have a giant pestle and mortar.  Grind it all down, I like a few who spices left in there for extra flavour explosions.


Foodie Fact

Nuts are just packed with nutrition.  Hazelnuts are good for the heart, containing good fats and plenty of fibre, magnesium, protein and Vitamin E.  You can read our previous Foodie Fact  about our tips for soaking nuts to maximise and transform the nutritional properties of nuts here.  It’s a little tip that can have a big effect on a healthier diet.

Categories: gluten-free, healthy, Healthy Eating, Nutrition, photography, plant-based, Recipes, Side Dish, Travel, Vegan | Tags: , , | 3 Comments

Watermelon Granizado – Quick and Refreshing Cooler

Simple, quick and full of chill!

I think we all need one of these fruity, icy drinks at the minute. Seems like this heatwave is enjoying itself!  How are you staying chilled?  It was 32oC in North Wales yesterday, which is just outrageous.  Seems like we’ll miss all the sun, but we can’t complain in the slightest, the Spanish coast has been very good to us.

Granizado is something I enjoy in Spain and also Latin American, a traditional cooler, the varieties change constantly, but the constant is that it’s super refreshing when the heat is on.

I wanted to share this now as it’s super quick and easy to make and only takes a few ingredients.  I have heard of people making these into cocktails!  This is really a slush puppy gone to heaven and you can swap and play with which frozen fruit you use.  Berries for example are also incredible, as is pineapple, cucumber or mango.  Just make sure you add a nice twist of citrus to keep things lively and if you have a sweet tooth, pop a little sweetener into the mix.

Recipe Notes

Most watermelons I buy have very few pips/ seeds.  When chopping the melon, take out as many as possible.  A few in the granizado are fine.  The main thing is they just don’t look very nice.

A nice idea is adding a little fresh mint to this granizado, around 8-10 mint leaves will make things interesting.

Watermelon Granizado

The Bits – For 2 Glasses

2 1/2 cups frozen watermelon

1 small lemon (juice)

Optional – 1-2 teas sweetener – sugar, agave, bronw rice syrup….


Do It
Peel and cut up your water melon into small chunks, place in the freezer for a few hours. The smaller the chunks, the easier it is to blend later.

Place the watermelon into a blender, add the lemon and sweetener and blitz until broken down.  If it is not blending well, just leave it for 10 minutes to defrost a little.

Serve in your fanciest glasses, with a slice of watermelon on the rim, to keep things 80’s/ Miami Vice style.


Foodie Fact
Watermelon is very hydrating, they’re around 92% water! Perfect for summer. They also have good levels of vitamin C and A.


Categories: gluten-free, healthy, Healthy Eating, Nutrition, plant-based, Recipes, Smoothies, Summer, Vegan | Tags: , , , | 4 Comments

Top 10 Cooling Summer Recipes – Healthy, Plant-based, Delicious!

Here’s some of our favourite recipes to go with this heatwave.  We spend plenty of time in tropical and steamy places, so we know how to keep things cool when the thermometer starts to rocket.  There are even rumours right now of people in North Wales wearing shorts!

Chill Out!

Focusing on cooling ingredients, especially things like cucumber and watermelon for example, will help keep you chilled.  Also, hot drinks.  Sip some tea like the desert bedouins do, they know it works!  Although a nice long drink, with ice and all the trimmings is the perfect treat.

Try freezing fruits like watermelon, any melon actually, berries, mango, pineapple etc and simply blend them.  Very refreshing, the healthiest slush puppy you’ll ever try!

Also, you can freeze fruit like gooseberries and pop them in a drink, fruit ice cubes.  We also love juicing vegetables and fruits and pouring it into an ice cube tray, or even better, lollipop moulds.  Just add sticks (cocktail sticks are fine for the ice cube tray) and you’ve got gorgeous, healthy coolers waiting for you in the freezer.  Try freezing one layer of juice first, then adding another, and another, until you get a very cool rainbow effect.  Looks amazing!

Here’s our top 10 summer cooler recipes:

Cooling Watermelon, Tofu & Mint Salad

This is the perfect salad for a sweltering day.

Gado Gado – Indonesian Seasonal Salad with Kickin’ Zesty Peanut Sauce

Use whatever mix of veggies you like here, its the dressing that’s the superstar!

Moxarella – Homemade Vegan Mozzarella

The perfect centre piece for a summer ploughmans or salad platter, of course, goes amazingly well with basil and ripe tomatoes.

Watermelon Gazpacho – Cooling, Raw

Very chilled, very simple.  Plus, lots of vibrant colours and flavours.

Charred Fig & Rocket Salad with Lemon Tofu Feta

I love chargrilling or barbecuing figs at this time of year.  Perfect!

Coconut Pad Thai Salad with Almond Dressing

A taste of Thailand.  Light, but packed with nutrition, ideal at this time of year.

Summer Berry & Chocolate Cheesecake – Vegan, Gluten and Sugar-free

When eaten not long out of the freezer, these mini cheesecakes are cooling and so delicious.

Lebanese Halva Choc Ices – Tahini, Rose, Almonds & Figs (Sugar-free)

Our favourite choc ices, a must try and sugar free!

Chocolate & Peanut Butter Ice Cream (Sugar free)

This recipe comes all the way from India, Tamil Nadu, where it reaches nearly 50oC in the summer.

Mango & Coconut Lassi

Coconut + Mango can only = one thing.  YUM!


If you like these recipes, please feel free to comment below and share with friends and curious cooks!

Join our private plant-based cooking group here, for exclusive recipes, updates and meet like minded people, share pictures and generally celebrate and get inspired by awesome vegan food and a healthy lifestyle.

Stay cool!

Categories: Desserts, Detox, gluten-free, healthy, Healthy Eating, Lunch, photography, plant-based, Recipes, Salads, Summer, Superfoods, Vegan | Tags: | Leave a comment

Summer Berry & Chocolate Cheesecake – Vegan, Gluten and Sugar-free

Crack it! Grab a spoon;) Frozen chocolate layer then intense berries followed by creamy cashews and wait for it……secret chocolate base! Yow:)

This is the dessert for chilling and enjoying on sunny days.  Once we tasted it, we knew we’d be making these little cheesecakes all summer!  It’s a dessert that looks like a million euros and tastes much better!!

A tantaslising, layered cheesecake, rich, light and fruity all at the same time with a (quite) secret chocolate base and chocolate sauce that freezes and then cracks when cut into!  Plus, it’s simple to make.  They’re vegan, gluten and sugar-free.  It’s an all-round keeper, we had to share it with you all.

We’re still pretty blissed and floating around Spain, what stunning place!  Everytime we visit we love it more.  Finding new places to adore and a pace of life that tickles us.  Manana!  Hoooray!!  We’re heading off next week to some national parks down near Granada, lots of camping and snorkelling.

It’s birthday season here, it was mine (40 years and feelin’ gooood), Mum’s (age unprintable) and Jane’s (40 too in a few days!!)  We celebrated our 80th (40+40) birthday with a few friends down at a perfect spot, under some palm trees facing the beach.  There were top tunes and a full power vegan bbq, which Dad and I cooked.  We sat under a full-ish moon and watched the sparkling waves until sun was about to poke it’s head up.  What a day!

Summer Berry & Chocolate Cheesecake – Vegan, Gluten and Sugar-free

Birthdays, of course, mean desserts.  With a big ‘D’.  Lots of them.  Constantly.  So, I’ve been making a load recently and have really enjoyed all that sweetness, I’ll post as many as possible.

The fruit layer is flexible, you can try out other fruits.  We’ve made it with just strawberries and the results were delicious. The great thing about these little cheesecakes is they just sit in the freezer until you desire them.  Make a good amount and you’ll have cheesecakes on demand 24/7!  What a thing!!

You might be thinking that soaking nuts is to make them soft, which it is, easier to blend to a lovely smooth filling.  But, there are also some real health benefits to soaking nuts, read more below in the ‘Foodie Fact’.

Put these cheesecakes in front of your favourite people this summer and I promise you’ll get only full smiles and load yums.  Cheesecake makes the world happy!

Happy cooking and please let us know if you make these cheesecakes below, hearing from you brings a load of sunshine to our days.

—————

Recipe Notes

If your dates are not soft to the touch, soak in warm water for 1 hour and drain well.

If you’re in a hurry, pour hot water (from a just boiled kettle) over your cashews, this softens them quicker.  If you have a powerful blender, you don’t need to soak them at all.

I have tried these cheesecakes with other neutrally flavoured oils and it does work, but coconut oil is best, when the cheescake it cool, it helps to give a good and creamy texture.

Use any frozen berries, but I prefer a mix.  Things like strawberries, raspberries, redcurrants, blackcurrants, blackberries etc.  Bags of frozen berries can be bought, normally well priced, in most supermarkets.

This recipe will make 7 reasonably sized cheesecakes, or 6 big ones.  See how you get on.

—————–

Summer Berry & Chocolate Cheesecake

The Bits – For 6-7 mini cheesecakes 

Crust

125g walnuts/ hazelnuts 

45g soft dates (pitted, roughly 14 dates) 

3 tbs cacao/ cocoa powder


Filling

175 g frozen berries (2 big handsful)

125g cashews (soaked for 5 hours in cold water)

50ml lemon juice (1 large lemon)

40ml brown rice syrup or other sweetener of your choice

70ml coconut oil (melted)

Pinch of sea salt

1/2 teaspoon vanilla extract

75ml water 


Topping

Crushed pistachios

Rose petals

Or more berries


Chocolate Sauce or see our 2-Minute Chocolate Sauce Recipe

2 tbs coconut oil (melted)

2 tbs cocoa/ cacao powder

1 tbs maple syrup/ liquid sweetener

Little pinch of salt


Do It

You’ll need a standard, 12 cup muffin tray (or maybe you call them Yorkshire Pudding trays?).  The deeper sort, ideally the non-stick, silicone type which is flexible.  This gives a much better finish to the cheesecake as we don’t need to line the individual cups.

Crust – place the walnuts into a food processor and pulse until a rough crumb forms.  Add the other ingredients and pulse until a dough forms, which should stick together when pressed between finger and thumb. 

If you do not have a silicone, non-stick muffin tray, line 6-7 cups with cling film. Now, spoon roughly two heaped tablespoons of the base mix into each cup.  Press the dough down with the back of the spoon or your fingers to make a neat layer that snugly meets the edges.

Filling – blitz all the ingredients, except the berries, in the now magically clean food processor (bless those kitchen elves) until you have a smooth cream-like texture. You may need a few goes to get it all incorporated, scraping the sides down with a spatula.  Keep going, get it really nice and smooth, it makes all the difference.  Taste the mix, adding more sweetener or lemon juice if needed.  I like mine with a good zing of lemon.  You should be left with 500ml of filling.

Scoop out half the filling mix and set aside, add the berries to the food processor and blend again until smooth. 

Pour or spoon an even quantity of the white filling onto the bases, followed by an even quantity of the berry filling.  Tap the tray on kitchen surface a few times to get rid of any air bubbles and place carefully in the freezer, making sure the cheesecakes are level. 

It will take a few hours for them to freeze, you can, of course, make these cheesecakes well in advance.  Just cover them with cling film, or pop each cheesecake out and gather the excess cling film around them. The last way is nice and easy.  

Sauce – Combine the ingredients in a bowl and stir together until well combined. Taste and adjust as you like it, more sweetener or a little more bitterness from the cacao/ cocoa.

Depending on the ambient temperature, leave the cheesecakes on your dessert plates for 20 minutes out of the fridge.  We left these for around 10 minutes, but we’re in Spain and its a wee bit hotter than Wales and maybe where you are.  We quite like them when they’re still a bit frozen, especially on a hot day.  You may also find placing the cheesecakes in a fridge and leaving them for a couple of hours to help control the defrosting.

While the cheescakes are defrosting, drizzle over the chocolate sauce and, just before serving, top them with crushed pistachios and rose petals, also grated white chocolate or extra berries is equally as delicious.

Foodie Fact

Soaking nuts?  What’s that all about?  Nuts are packed with nutrition and things that do us good, but they also contain things called phytates and enzyme inhibitors, which decrease the nutritional value of nuts, grains and seeds, plus they make them harder on the digestion.

Soaking nuts activates helpful enzymes, mimicking nature really, the nut transforms, thinks it’s time to sprout.  Many nutrients will also become more bio-available (easier to use by the body).

Another way to aid digestions of nuts with skins, ie almonds, is to remove the skins.  By soaking your nuts, it makes this job super easy. Also, soaking the nuts, and rinsing, gives them a good wash, which is never a bad thing.

The best way to soak nuts is by covering them in fresh water, add a little salt (until it tastes as salty as sea water), then leave overnight or for 8 hours-ish (almonds more like 12, macadamisa 4).  The salt is optional, but is said to improve results.  Be sure to throw away the soaking water and rinse them well.  You could then dry and roast gently in a low oven to make them extra delicious or dehydrate them, if you have a dehydrator handy.

Categories: Cakes, Desserts, gluten-free, healthy, Healthy Eating, Nutrition, photography, plant-based, Recipes, Summer, Vegan | Tags: , , | 6 Comments

Super Tasty Mega Rice – Vegan Fried Rice

Sooooooooo tasty! Quick and easy rice dish, think Nasi Goreng (Indonesia)

There’s so much in this dish to get the tastebuds jumping; sesame pancake, oyster mushrooms, asparagus, ginger, crispy onions, deep and dark soya sauce……this is a quick lunch and an amazing way to treat leftover rice and veggies.

We all need a good, simple fried rice recipe under our aprons, in our cutlery draws or tucked away behind our chopping boards.  Super quick and tasty, some would say mega!!  This rice is something everyone will enjoy, packed with veggies and big flavours.

The sesame pancake is one of the stars here, it really adds something to the dish, giving it a change-up in texture and flavour.  It’s also very easy to get together and can be used in many dishes in many ways.  They’re great by themselves and are basically just a small cup of gram (chickpea flour).  Surely one of my favourite ingredients.

I was raised, for a chunk of my childhood in the Philippines, I just cooked this dish for Mum who says that it’s similar to my favourite Filipino fried rice that I ate breakfast, lunch and dinner as a nipper.  I’ve always loved trying new and exciting dishes.  Although this is a staple dish, we can take it in so many directions.  We eat it as a weekend treat in the Beach House, I like it especially in the mornings.  A big chilli hit in the AM beats an espresso any day!  Anyone else like fried rice for breakfast?

Use any array of veggies you like here, whatever is seasonal or hanging out in your veg tray/ basket.  This is similar to Nasi Goreng which is the ubiquitous vegan go-to dish in Indonesia, a country that Jane and I love deeply (see some our travel stories, street food or visiting tofu village).  I think it’s just as good without the fish sauce and Kecap Manis, which is a sweet soya sauce (I’m in Spain, so needed to improvise).

This style of rice dish is awesome with some aromatic paste, South East Asia style, probably the eastiest to get our hands on is Thai pastes, yellow, green or red.  A couple of tablespoons will do the trick.  But maybe you’d like to make your own, there are some good looking recipes for Basa Gede – Balanese Paste that are exciting me right now.  Must try soon, when lemongrass and the like are back on the menu.

Mega Tasty Rice – Leftovers given a very tasty make over

This is an awesome leftovers dish, using up rice cooked for something else.  If you’re cooking the rice especially for the dish, make sure it’s fully cooled first.  I always think fried rice is best when the rice has sat in the fridge overnight.  The best way to cool rice at home is to spread it our on a baking tray, it will cook much quicker than being left in the pan.  Rice needs to be cooled as quick as possible and then stored in the fridge.  Fried rice should be eaten straight away and not re-heated.

We love these little sesame pancakes

This dish is so simple and versatile, hope you get to give it a go!

Happy cooking!

—————————–

Recipe Notes

Any long grain rice will do here, whatever you like best.

Add more chillies, I dare you!  I love this dish fiery!!

If you’re cooking your own rice, roughly 140g of uncooked rice will make 400-ish g of cooked.

After cooking, cool your rice quickly by spreading it out thinly on a large plate/platter. Once cooked, place in a fridge.

Add whatever veggies you fancy to this, in fact normally, we add two or three more types to this dish.

To make this Mega Rice gluten-free, you can buy gluten-free soya sauce or tamari.

Fried Rice 101 – get all your ingredients and chopping done before you start cooking, makes things a cool  breeze as opposed to a potential heated stress-fest!

Super Tasty Mega Rice – Vegan Fried Rice

The Bits – For 4-6

1 small onion (finely sliced)

2 large garlic cloves (peeled and crushed)

2 tbs ginger (finely chopped)

1 small carrot (finely sliced into matchsticks)


100g oyster, or other, mushrooms (sliced)

1 green/ red pepper (deseeded and sliced)

2-4+ dried chillies or 1-2-3 teas chilli flakes (finely sliced)


6 asparagus spears (finely sliced at an angle)

400g cooked rice (from the fridge)

250g chickpeas (drained)

3 tbs good quality passata

1 1/2 tbsp tamari/ gluten-free soya sauce


2-3 tbs cooking oil (I use good rapeseed oil)


Sesame Pancake

50g gram flour

100ml water

½ clove garlic

Couple large pinches turmeric

Couple large pinches salt


1 1/2 tbs sesame seeds


Serve

1/2 cucumber (seeds removed and sliced)

1 large tomatoes (sliced)

Crispy onions (gluten-free)

Lime wedges

Your favourite chilli sauce


Do It 

Add the ingredients for the pancake, except the sesame seeds, into a bowl, gradually add the water, stirring as you go to make a smooth batter.

Grab a large, non-stick, frying pan/ wok, add 1/2 tbs oil, place on a medium high heat.  When the oil is warm, pour the batter mix into the centre of the pan, swirling the pan to make a thin pancake.  Cook for 1-2 minutes, halfway through that time, sprinkle over the sesame seeds to give the pancake a good covering.  Now flip the pancake using a spatula.  Cook for another minute, then set aside.  Give the pan a quick clean out.

Return the pan to the heat, add 1 tbs cooking oil, when hot, add the onions, ginger, garlic and carrots.  Toss and fry for 2 minutes, then add the mushrooms, dried chillies and peppers, cook for another 2 minutes, now add the passata, soya sauce, chickpeas, rice and asparagus.  Stir gently and warm through fully for 3-4 minutes, making sure nothing sticks to the bottom of the pan. Get it nice and hot!

Taste the rice, add a touch more soya sauce or salt for seasoning.  Chop up the pancake into strips and stir into the rice.  Serve straight away with crunchy veggies like tomatoes and cucumber, chilli sauce, crispy onions and a twist of lime is delicious.

View from the Beach House Kitchen (Spain branch) today. Way too close to the beach to work properly;)

Foodie Fact

Chillies have outrageously high levels of vitamin C, plus decent amounts of vitamin A, K and B-6. Vitamin C wise, they leave the oranges in the shade.

Categories: Breakfast, gluten-free, Healthy Eating, photography, plant-based, Recipes, Vegan | Tags: , , , , | 4 Comments

Watermelon Gazpacho – Cooling, Raw, Vegan, Delicious!

Cooling Watermelon Gazpacho – Vegan

Chill out!  It’s getting to that time of year when we need something cooling and delicious.  We’re in Spain right now and this is exactly what we feel like, everyday, all day.

This is something like the classic zingy gazpacho given a twist of fruity sweetness with the watermelon and a tickle of chilli and not to mention avocado.  This soup cries out to be enjoyed on a beach, or at least in a sunny spot/ garden.

This is the kind of light, tasty, no-fuss food that I love come summertime, making the most of the awesome summer fruits and veggies on offer.  The thermostat is being cranked up all over and we need something that’s going to tantalise our tastebuds, hydrate our bodies and not overload our stomaches.

Some people are still a little off with chilled soups, this may be the one that turns them!  Because it’s high in nutrion and things that make us shine, we only need a small bowl and our body gets all we need, we’ll be sated and energised.

You probably know that Jane and I are nomadic sorts.  We like to wander, and nibble while we go.  We were passing through the local port, over here in Spain, and decided on lunch in one of our favourite little spots, a place called Bar Fizz, where they cater nicely for vegans and the cooking is really good.  Jane had this soup for starter and we all loved it, everyone wanted a spoonful, I think its just the little twist of watermelon that makes things interesting here.

I’ve re-created it in the BHK, with a little help from some of my favourites; ginger, garlic, avocado and red pepper.  Not to mention the radiant, fruity, local tomatoes (the BHK has nipped over to Spain for a while, like Dr Who’s tardis but laden with blenders, pots and many kilos of random spices/ seeds).  We figure, whereever we are, wherever we lay our chopping boards, that’s our BHK!  Could be the Himalayas or a Thai beach, streetside Mexico City, in fact, wherever we’re invited/ allowed, we cook and bring the BHK love!

Perfect bowl of summertime chill! Watermelon Gazpacho with a tickle of chilli, peppers, cucumber and avocado

We hope you love this colourful soup, let us know below in the comments, and keep in touch by signing up to our newsletter here (only takes a couple of clicks).

Stay cool and enjoy the summer sun!

————————-

Recipe Notes

Instead of bread or croutons, why not try serving this with fresh, crisp salad leaves to dip in.

Add as many chillies as you like, we made it very mild.  Jane’s tongue is anti-chilli.

Add a little sweetener maybe if your tomatoes are not gorgeous and ripe.

You”ll need a decent blender to get this nicely smooth.  It’s ok a little chunky, but silky smooth is best.

If  there are lots of black seeds in your watermelon, takes as many out as you can.  You don’t need to be mega picky here.

This is a flavourful soup, if it tastes bland, just keep adding pinches of salt until the flavours erupt.

The toppings can vary here, avocado is nice, but use what you have.


Watermelon Gazpacho – Vegan, Low-fat, Sugar-free
For 6 large bowls

1.5 kg ripe tomatoes
1 large red pepper (deseeded and sliced)
½ cucumber (peeled)
350g watermelon
1 inch fresh ginger (finely chopped)
1 small onion (peeled and sliced)
½-1 red chilli (deseeded and chopped)
4 garlic cloves (peeled and crushed)
3 tbs red or white wine vinegar
1-2 teas salt
Several twists of black pepper


Topping

Broccoli sprinkles (aka finely chopped broccoli florets)

Chia/ pumpkin seeds

Herbs – Basil or Coriander

Chill, fennel, pepper, cherry toms, sliced radish, cucumber shavings, sprouts, edible flowers

Tofu feta or avocado


Do It

Place all the soup ingredients into a blender and blitz until the soup is smooth.  This may take a couple of batches which is fine.  Pour into a large bowl and taste, adjusting the seasoning as you like, a sprinkle more salt, a tickle more chilli.

Chill in the fridge for a couple of hours before serving topped with colourful, delightful things.


Foodie Fact

Watermelon is hydrating, low in calories, plus high in Vitamin C and A.  It helps to keep our skin and hair healthy.  Some nutrients in watermelon even help to protect us from sunburn, it’s the ideal summer snack!

This soup goes very well with beaches…………..

Categories: Detox, gluten-free, healthy, Healthy Eating, Nutrition, photography, plant-based, Raw Food, Recipes, Soups, Summer, Superfoods, Vegan | 14 Comments

Lebanese Halva Choc Ices – Tahini, Rose, Almonds & Figs (Vegan and Sugar-free)

Lebanese Choc Ices with tahini, rose, almond and fig, plus lots of chocolate!

Summer’s here, the sun is out and we all need more choc ices in our lives.  These are a delicious version with a Middle Eastern twist.  Something a little different and a little familiar.  Kids love them and they are actually very healthy.  Hah!  I know that might put some of you off but please come back, give them a go, I promise you’ll be hmmmmming soon.

I love Lebanon!  I also love choc ices!!  And here we are.  This is a recipe I make regularly and most people seem to love.  Rich, creamy (from the tahini and coconut oil), sweet with a little crunch (maple syrup and toasted almonds) and coated in dark and crunchy chocolate.  Who’s into that then!!?

Plus, so easy to make and just sits in the freezer demanding to be munched with smiles.  It’s a sugar free dessert recipe, plus vegan and gluten-free so the vast majority of people are invited to this chocolate coated party.

This recipe can and does change regularly, the fillings can be anything you like.  It is delicious without the almonds and figs for example, or you can add more chocolate (never a bad idea), pistachios, top with rose petals…..

Recipe Notes

It may sound strange, but salt is important in desserts, especially here.  Please don’t skip it, a little pinch of salt transforms the flavours in these choc ices.

Not keen on rose?  Many people aren’t.  I’d recommend omitting it or adding a little orange blossom water instead.

——————

Lebanese Halva Choc Ices – 12-14 slices

3 tbs coconut oil

60ml maple syrup or other liquid sweetener

1 teas vanilla extract

2 large pinches sea salt

340g light tahini (normally 1 jar)

1 handful roasted almonds

2 dried figs (chopped into small chunks)

1 teas rose extract


Chocolate

2 tbs cacao / cocoa powder

2 coconut oil (melted)

1 tbs sweetener (maple syrup, brown rice syrup etc)

Pinch sea salt


Do It

Halva – Melt the coconut oil, you can warm it gently in a saucepan or place the jar in boiling water, then allow to cool to room temperature. 

Mix the coconut oil with all the other ingredients together in a bowl.  Told you it was easy!!  Taste the mix now, make sure it is sweet enough for you, or has enough rose. 

Line a 9 inch-ish by 6 inch-ish rectangular container with cling film. Pour in the halva mix, smoothing over the top with the back of a spoon. Freeze for 1-2 hours or more.

Chocolate – Stir together the chocolate ingredients in a bowl until well combined.

Now, cut the halva into 12-14 small bars, and place on baking parchment in a large tuppperware style container, suitable for the freezer. Using a fork or toothpick, dip each halva into the chocolate, coat well, and place back in the container.

Cover the container and freeze.  Leave to sit outside of the freezer 10 minutes before serving.

Or, like the photo here, cut the choc ices and then simply drizzle over the chocolate sauce which will set very soon after.   This technique looks nicer.


Foodie Fact

Hard to know where to start with these desserts.  Tahini, cacao, coconut oil, almonds, figs….they definitely sit in a very sweet spot between decadent and healthy eats.

Tahini is very high in calcium, almost three times more than milk for example.  Cacao is very high in anti-oxidants and almonds are tops for protein, magnesium and potassium.  Figs are full of beneficial minerals and vitamins and a healthy dose of fibre.

Overall, this is probably the healthiest dessert I’ve ever made this side of a fruit salad!

Categories: Desserts, gluten-free, healthy, Healthy Eating, Nutrition, photography, plant-based, Recipes, Summer, Vegan | Tags: , , , | 5 Comments

Simple Green Pea Hummus – Goodbye Chickpeas!


Green Pea Hummus – A delicious twist on chickpea hummus

Jane said,  “This is the best hummus you’ve ever made!”  So I had to share this recipe with you.  Jane is, after all, one of the leading hummus connoisseur in the North Wales area.

This hummus is creamy and rich and doesn’t taste overly pea-y, if that’s something that may concern you.  Cooking the split peas requires no soaking, so it’s quicker than making proper chickpea hummus, which I always make with dried chickpeas.  I think the flavour is better from dried pulses.

Not very green is it!  That’s because we’re using dried and split green beans.  I normally use them for soups and especially, delicious daals, there’s a green pea daal recipe in ‘Peace and Parsnips‘ – Matar Daal with Watercress, Braised Red Cabbage Sabji & Brown Rice Chapatti (pg 237;)

There was a rumour that the price of chickpeas was about to sky rocket.  I haven’t seen it yet, but the cost of food does seem to be going  up gradually and may continue.  These green split peas are grown in the UK and are a good, inexpensive option, plus they’re packed with nutrition.

My roots are in Durham, North East England, an area with lots of tasty traditional dishes.  Pease Pudding has to be one of my favourite.  Like Durham’s answer to hummus really.  Normally just cooked split peas, flavoured with meat, I love to make it flavoured with all kinds of cool herbs and spices, roasted veggies.  It’s normally served on stottie cake (big flat Durham buns) with pickled beetroot and ham. I can see this being veganize-able very easily.  Having said that and even though I am partisan to all things Durham, Pease Pudding doesn’t come close to this hummus.  Sorry Mum.

These lovely British organic split peas deserved a fitting topping, so I wanted to use local and seasonal veggies too.  You could opt for any topping, or none, but bar the chillies, the toppings reflect North Wales right now, just as Spring is getting into gear.  Toasted walnuts or hazelnuts would be a nice addition.

Maybe we won’t be saying goodbye to chickpeas for ever, but for the forseeable future, we’re all about split green peas in the Beach House.  Never thought I’d say that, but they make a fine hummus.


Thanks to Hodmedods for this very nice pea pic:)

Recipe Notes

Hummus can be eaten warm, why not!?  It’s lovely just don’t let the beans cool and blend and flavour as usual.  Makes a nice change.

This is the basic recipe, but we love adding blanched greens to the hummus and blending.  Also, spicing it up with a little ground cumin is very nice.

If you only have yellow split peas, they will be fine in this recipe.

I find hummus changes overnight.  The flavours mingle and come to life.  If you can resist, make it the day before and watch how those flavours shine.

A simple way to make homemade hummus, the split peas have a great texture and are really creamy


————–

Simple Green Pea Hummus

The Bits – For one medium bowlful, enough for 6 people as a dip

250g dried split green peas

1/2 lemon (juice)

5 tbs light tahini

5 tbs cold pressed rape seed oil – or olive oil

1 small clove garlic (peeled and crushed)

1/2-1 teas salt (to taste)


Topping

Red Cabbage (finely sliced)

Fresh thyme (picked leaves)

Radishes (finely sliced)

A dash of rapeseed oil

Green chillies (finely sliced)

Salt and pepper


Do It 

Cook your green peas, they won’t need soaking.  Give them a rinse, cover with plenty of water and bring to a boil, then cook on a low simmer for 30 – 45 minutes, until they’re nice and tender but not one big mush.  Add water as you need it.  Or alternatively, just follow the handy instructions on your packet.  Leave the peas to cool.

Add all the ingredients to a blender and blitz, checking the seasoning.  Blend for a while, until it’s really nice and smooth.  This is a thick hummus, you can add a drizzle of water if you like your hummus a little thinner and lighter.

Serve in a bowl, or spread it out over a plate, I prefer the latter.  Scatter over your toppings and serve as you love your hummus most.

A new dawn for hummus – green peas, no chickpeas


Foodie Fact

High in protein and low in fat, plus they are one of the highest sources of fibre.

Categories: gluten-free, healthy, Healthy Eating, Nutrition, photography, plant-based, Recipes, Side Dish, Snacks and Inbetweens, Vegan | Tags: , , | 6 Comments

Fully Loaded Nachos with Columbian Frijoles Rojos

Fully Loaded Nachos (Vegan, Gluten-free)

Easter’s here!  Any reason to celebrate and feast right!  These nachos are maybe how they’d celebrate in Bogota or Cartagena?  Let us know in the comments if you’re in Columbia!

This is a celebration on a plate!  These nachos are fully loaded with all the goodies we know and love and the Frijoles Rojos (Red Beans) are such a simple way to make a spicy, tasty bean dish.  Years ago, I lived beside a few Columbian restaurants in Brixton.  I’ve loved the food ever since.

Everyone enjoys this dish!  All those colours, flavours and textures.  It’s a winner!  The rich and spicy beans, the crunch of the nachos, the creamy smoky dip, avocado, coriander, maybe a twist of lime.  Come on!  That’s something pretty special.

Fully Loaded Nachoes will brighten up any Easter feast and generally go down very well in the BHK, whenever we make nachos, they last approx 3 1/2 minutes.  Woof.  Gone.  It’s a communal dish that I love, as a cook, I can think of few things better than sharing food.  This is best served warm on a large plate or platter.

Columbian Frijoles Rojo (Vegan, Gluten-free, Low Fat)

If you are looking for something a little different and healthier, just sub the nachos/ tortilla chips with toasted soft tortillas (tostadas), cut into little triangles.  This is also a lovely way of serving these beans and traditional too (although the tortillas may be fried).

Usually, you might find things like beef and dairy cheese in this dish, we’ve ditched those of course, replaced with mega beans and creamy cashew cheeze.  Nacho cheese is generally a day-glo orange brick, something like vulcanized rubber meets food, totally overly processed and flavour-less if my memory is right.  Much better with the creamy cashews, Chipotle & Cashew Queso Dip recipe here.

This is one of those dishes which skirts between meal and snack.  I think most of us would be quite happy to live on nachos!!  I think it’s great party dish, something that can fill the belly, tickle the tastebuds, but really, you don’t need a lot of it to feel satisfied.  Maybe thats down to the sheer volume of flavours and the beans and toppings are all really nutritious, maybe the belly is satisfied because this dish is so dang tasty!?

When I was traveling around Mexico and Central America, I didn’t have many nachos.  Is there anyone here from Columbia?  How do you feel about nachos?  It seems more of a Northern Mexican/ Tex Mex dish that has probably caught on in many countries because it’s just an amazing combo.  Wikipedia says that the dish was created by Ignacio “Nacho” Anaya in about 1943  in Northern Mexico.  There we are.   A very tasty piece of history.

Variations on the nacho theme, I’ve read that in America there are things called S’mores Nachos, graham crackers, chocolate and marshmallows.  I’ve had S’mores in the past, they were built up like some kind of ‘food for the Gods’. They weren’t my cup of tea.  In Hawaii, they put pineapple on nachos.  I am sure that surprises no one.  Sounds good though.

I like Hodemdod’s beans.  Most of their beans and bits are grown organically in the UK.  Their Red Haricot beans will be perfect for these Columbian Frijoles.  If you live on this here, fair island (Britain) check em out.  Plant based people thrive on good pulses!  They make all the difference.

Fully Loaded and ready to go!

Recipe Notes

Fully loaded is one thing, but just the nachos and beans makes for a lovely meal/ snack.  You can add what you like on top, pineapple (A Hawain twist), bbq or chilli sauce, guacamole, sour cream, more cheese, pickled jalapenos….

Corn Tortillas/ Nachos are what we use here, they’re normally gluten-free, but check the packet.

Not into tortilla chips, this dish can be made into a main course when served with rice, mashed sweet potato, roast potatoes (with a touch of cumin), a nice big, crispy salad.

Finish with a Quick Salsa and Chipotle & Cashew Queso Dip


—————

Columbian Frijoles Rojos – Vegan, Gluten-free, Low fat

The Bits – For 4-6

500g/ 2 tins cooked beans (red kidney, red haricot, pinto, rosecco/ borlotti)

1 medium onion (sliced)
1 pepper (sliced)
1 medium sweet potato (cut into cubes)
2 large mushrooms (sliced)
250g/ 1 jar or tin tomatoes

2 teas smoked paprika
2 teas ground cumin
2 teas dried oregano

1-3 teas chilli powder (to taste)
1.5 teas garlic powder
Good twist of black pepper

1 tbs cooking oil (I use cold pressed rapeseed oil)


Do It

In a large saucepan, add the cooking oil and fry the onion until soft, 5 minutes.  Add the other veggies fry for a minute then add the spices, garlic powder and oregano, fry for another minute, then add the tomatoes and beans.  Cover and simmer for 25 minutes, adding roughly 350ml water to form a nice, thick sauce.  Stir a few times.  Season with salt.

Chiptole & Cashew Queso Dip – My recipe here 


Quick Salsa

The Bits – For one small bowlful

8 ripe cherry tomatoes (finely chopped)

2 tbs onion (finely chopped)

2 tbs fresh coriander (finely chopped)

Lime juice (to taste)

Large pinch salt


Do It

Toss all together in a small bowl or blend together in a food processor, changes up the texture a little.


Fully Loaded Nachos 

The Bits – Serves 4-8 as a snack

Trimmings

300-400g corn nachos/ tortillas

1 avocado (smashed with a fork)
Chipotle paste (stir in or drizzle as needed)
Spring onions (chopped)
4 handfuls cos/ little gem lettuce (chopped)

Fresh Coriander (chopped)

Lime wedges

1 red chilli (finely sliced)

Do It

You can warm the nachos/ tortillas in the oven for 5-10 minutes.  This is nice.

Spread the nachos/ tortillas on a large plate/ platter, top with the beans, then scatter with salsa, queso and the rest of your toppings.

Normally I make enough for two plates, you’ll have enough beans for this.  One plate of nachos is never enough!!


Foodie Fact

Red kidney beans are originally from Central America/ Mexico and are quite an ingredient!  Not only do they have that lovely, deep flavour, they are one of the richest sources of plant-based protein.

They are filled with fibre, which helps the body detox and are high in carbs, good ones, slow-release, meaning they’re a great source of energy.  They’re also rich in folates, iron, copper, potassium and loads more vitamins and minerals.  They’re known to be a weight loss friendly food.  Not bad for a humble little bean!

Remember to soak, drain and wash your beans well before cooking, if using dried beans.


If you like this recipe subscribe to our newsletter or follow us on Facebook for more news and recipes from the Beach House Kitchen.

Feel free to share this recipe and let us know your feedback in the comments below.  We love to hear from you!   

Categories: gluten-free, healthy, Healthy Eating, Nutrition, photography, plant-based, Recipes, Side Dish, Snacks and Inbetweens, Vegan | Tags: , , | 4 Comments

Chipotle & Cashew Queso Dip

Vegan Cashew Queso – Get Dippin’!!

Treat your nachos/ tortilla/ enchilladas (anything you fancy really) to this creamy, smoky queso!  This is a classic tex mex style dip gone vegan, it has a lovely thick texture that clings to your nachos and it’s a load healthier too.

Chilli con Queso (basically cheese plus chillies) is the national dish of Texas (Texas is a nation isn’t it?!)  That’s what I’ve been told….. Either way, the lone star state is pretty obsessed with this creamy, dippy, lovely stuff.

We love it poured over spicy sweet potato fries, now your nibblin’.  I’ve also found it makes an interesting twist on Welsh Rarebit…Texas Titbit?  Serve with your favourite Mexican style bean dish, this queso takes yum wherever it goes.

There are loads of ways of making a comforting vegan queso, but I like this one because it’s simple and uses easy to find ingredients.  You can add to it what you like, I’ve heard people are making kimhci queso!  But let’s face it, Kimchi goes well in most things.

There’s nothing flashy here, but it tastes goooooodd!  In the realm of dips, this is way up there for me.  Like a Texan hummus, a sunshine guac, but calling these dishes ‘dips’ seems to belittle them.   What do you think?

Nachos have always been a thing with me, I think there just perfect party food, they’re fun (Jane disagrees) and a mountain of nachos is perfect for sharing and enjoying with drinks and a giggle.  Why is that?  I think it’s the sharing aspect.  Communal nibbles.  I’ve always preferred sharing food, when we go to restaurants, I’m that guy who wants to taste everyone else’s food.  Hah!  You have been warned…..

Stone cold Tex Mex Classic

Thing about ‘normal’ queso is that its made with processed, ultra orange, cheese.  Bahhh!  This queso recipe has cashews which are creamy and lovely and packed with healthy stuff, also tapioca flour, gluten-free and a good source of carbs, chillies (super high in vitamin C), turmeric (outrageously good for us), paprika (see chillies), garlic…..you get the idea, this is a super healthy dip.  But, it tastes creamy and delicious too.

I have limited queso experience but I have fortunately been to Mexico, from North to South, totally awesome country and such a diverse food culture.  I travelled up along the border with the US, which can be a pretty dicey and spicy place in some towns and for a clueless wanderer, it was an eye opener.  But the nachos were always sensational.

I’d only known nachos from the UK, as say Doritos, but never with all the add ons and embellishments.  Making this queso really got my tex mex hat twitching, I’m going to do my fully loaded nachos for you, watch this little ol’ space.  They’re coming…..

I use tapioca starch here, many use corn starch, but tapioca gives it a really nice stringy, thick texture.  I’ve made mozzarella style cheese with tapioca starch, Moxarella recipe here, it really is a genius ingredient.  You’ll find it in health food shops across the land for sure.  Of course, you can order it online, we get ours from Suma but they do a minimum order.  Check out the website here, get some friends together and put an order in.  Suma will also sort you out with all those tricky to get vegan products that you may be struggling with.  We’re not sponsored in anyway by Suma, we just think they’re great.  We’re not sponsored by anyone actually!  The BHK is free!!

If you like what you see here, let us know in the comments below.  Are you in Texas?  Are you in Mexico?  Are you in Wales?

Chipotle Queso – The smokiness and chilli kick of the chipotle gives this dip something a bit special

Recipe Notes

If you have a really good blender, you don’t even need to soak the cashews, although soaking nuts is good for your health.  See what we wrote about that here.

If you’re not a chilli/smoky fan, leave out the chipotle, it’s still really tasty.

This queso is quite thick, just stir in more milk or water when you’re cooking to make it thinner, like a pourable, double cream consistency is nice drizzled over nachos (Fully Loaded Nachos coming soon).

We want a nice kick of chilli here, go for it!

Chipotle chilli paste, you’ll find in most supermarkets.  Stir it into stews and soups for lovely smokiness with chilli-ish benefits.

Not into mountains of nachos, toast or grill some corn or wheat tortillas and cut them up into little triangles.  Or go for veggies, chop up some of your favs and dip away.

Cashew & Chipotle Queso – Vegan, Gluten-free, low in fat, high in yum!

Chipotle & Cashew Queso

The Bits – For one large bowlful 

375ml soya milk

125g cashews (soaked in water for 2 hours)

2/3 teas turmeric

1 teas paprika/ cayenne pepper (if you like it really hot!)

4 tbs nooch (nutritional yeast flakes)

2 tbs tapioca starch/ flour

1 small garlic clove (crushed)

1/2 – 1 teas salt


2 – 4+ teas chipotle paste (as you like your fiery-ness)


Topping

2 tbs jalapeno chillies

Fresh coriander


Do It

Add all the bits to a blender, except the chipotle paste.  Blend until smooth.

In a saucepan on medium heat, add the queso and simmer for 8-10 minutes, stirring.  Tastes the queso, if it tastes a little chalky due to the starch/ flour, keep stirring and cooking.  Taste again, add chipotle paste and more salt as needed.

You may like to top with jalapeno chillies, a light dusting of paprika/ cayenne pepper and fresh coriander.

Very nice when served warm with nachos/ tortillas.  I also like to serve the nachos warm, pop them in a low oven for 5-10 minutes.

You can also serve this dip alongside Mexican/ Tex mex style bean dishes, burritos, tacos, quesadillas etc.   All very tasty.  I love it especially served with a tangy salsa.


Foodie Fact 

Cashews are low in fat for a nut and are a good source of protein and iron.

Categories: gluten-free, healthy, Healthy Eating, Nutrition, photography, plant-based, Recipes, Snacks and Inbetweens, Vegan, vegan cheese | Tags: , , | 5 Comments

Blog at WordPress.com.

%d bloggers like this: